Wbcom Designs WP Career Board Docs
Back to product Buy Now

Getting Started

Install WP Career Board, run the Setup Wizard, and add blocks to your pages

Introduction to WP Career Board

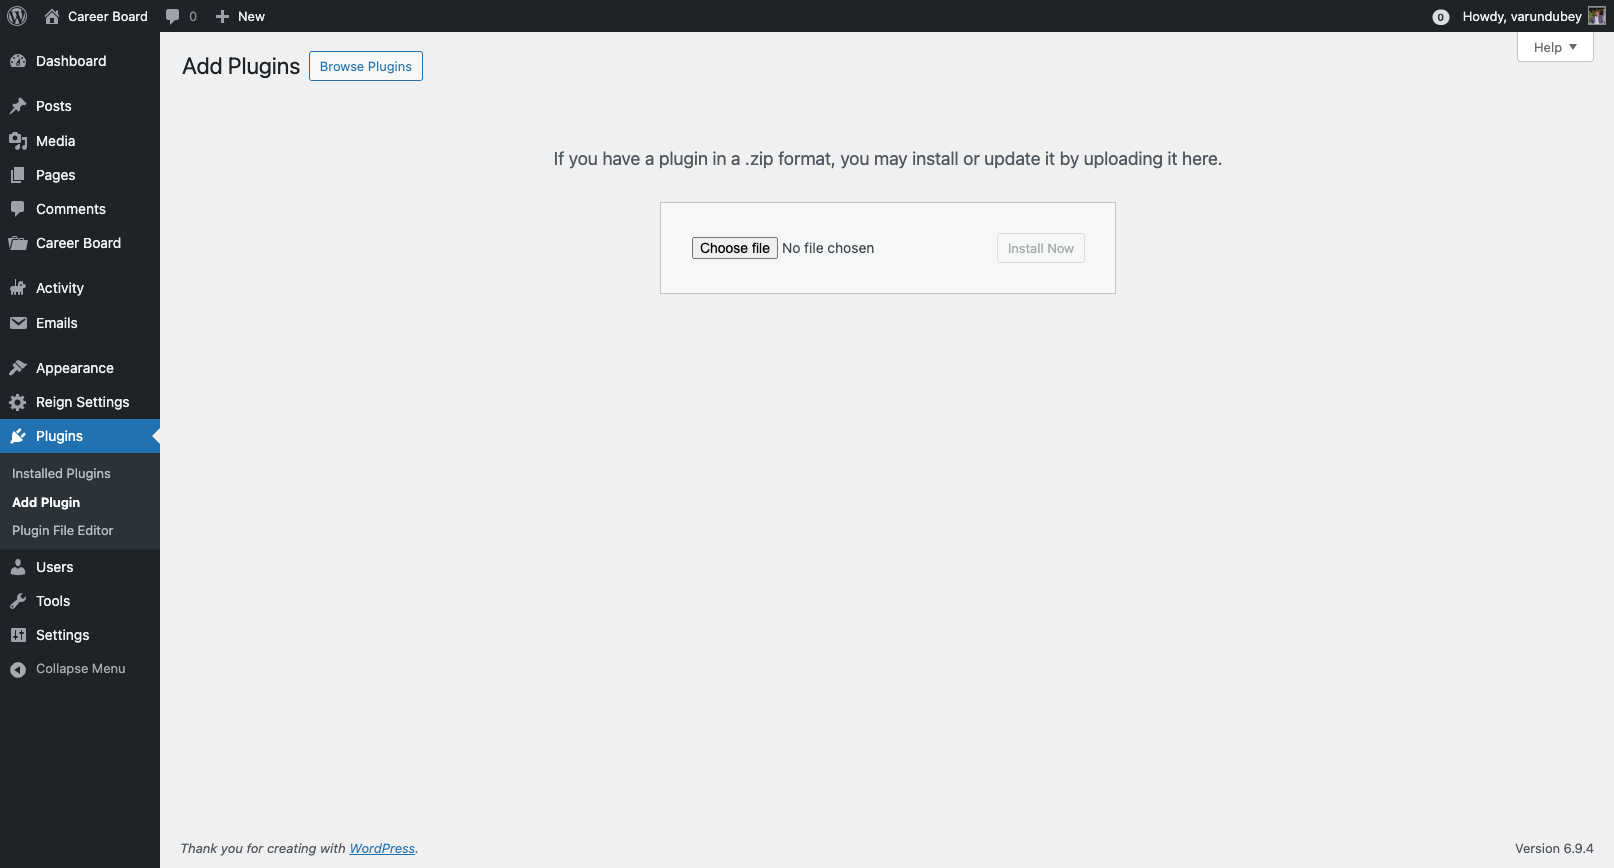
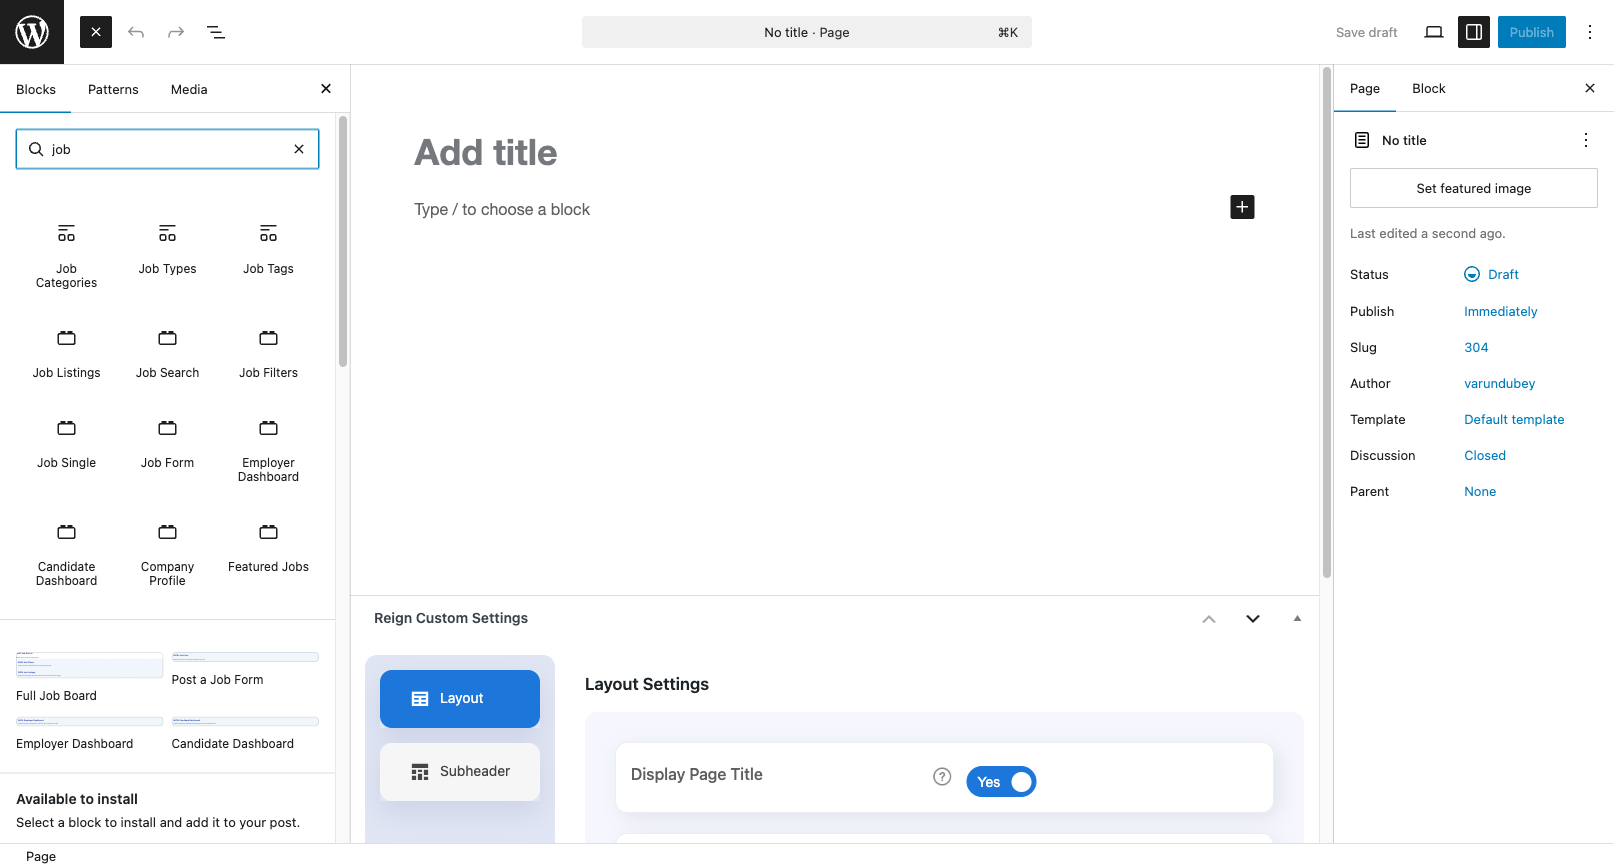
WP Career Board is a complete job board plugin for WordPress built natively on the WordPress Interactivity API. It lets you launch a full-featured job marketplace on any WordPress site — no shortcodes, no page reloads, no jQuery.

WP Career Board — Job Board Overview

What You Get

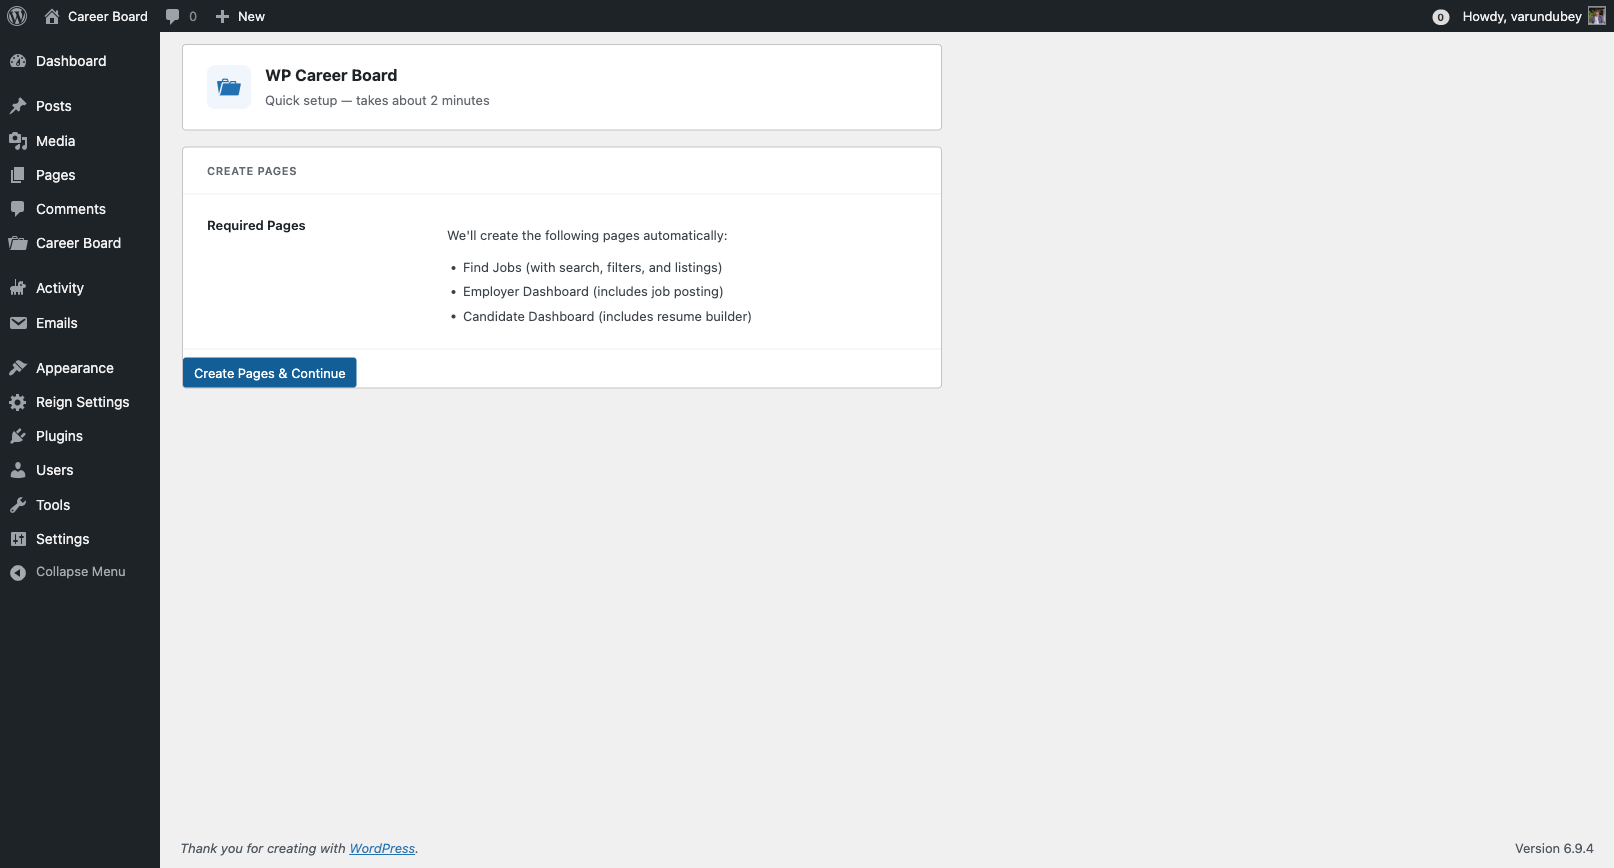
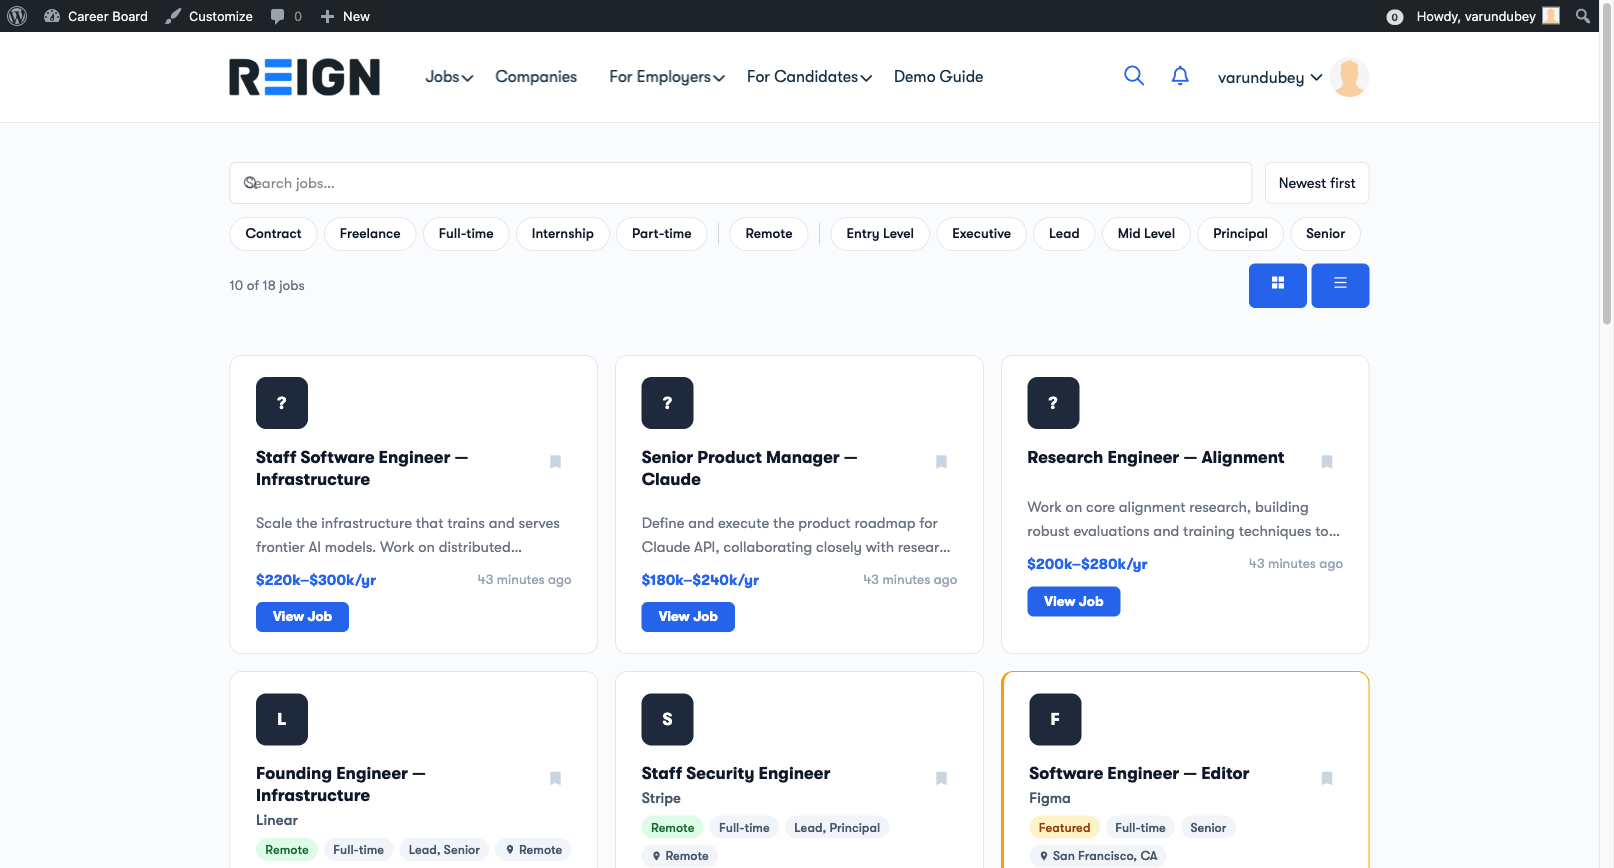
For your site visitors:

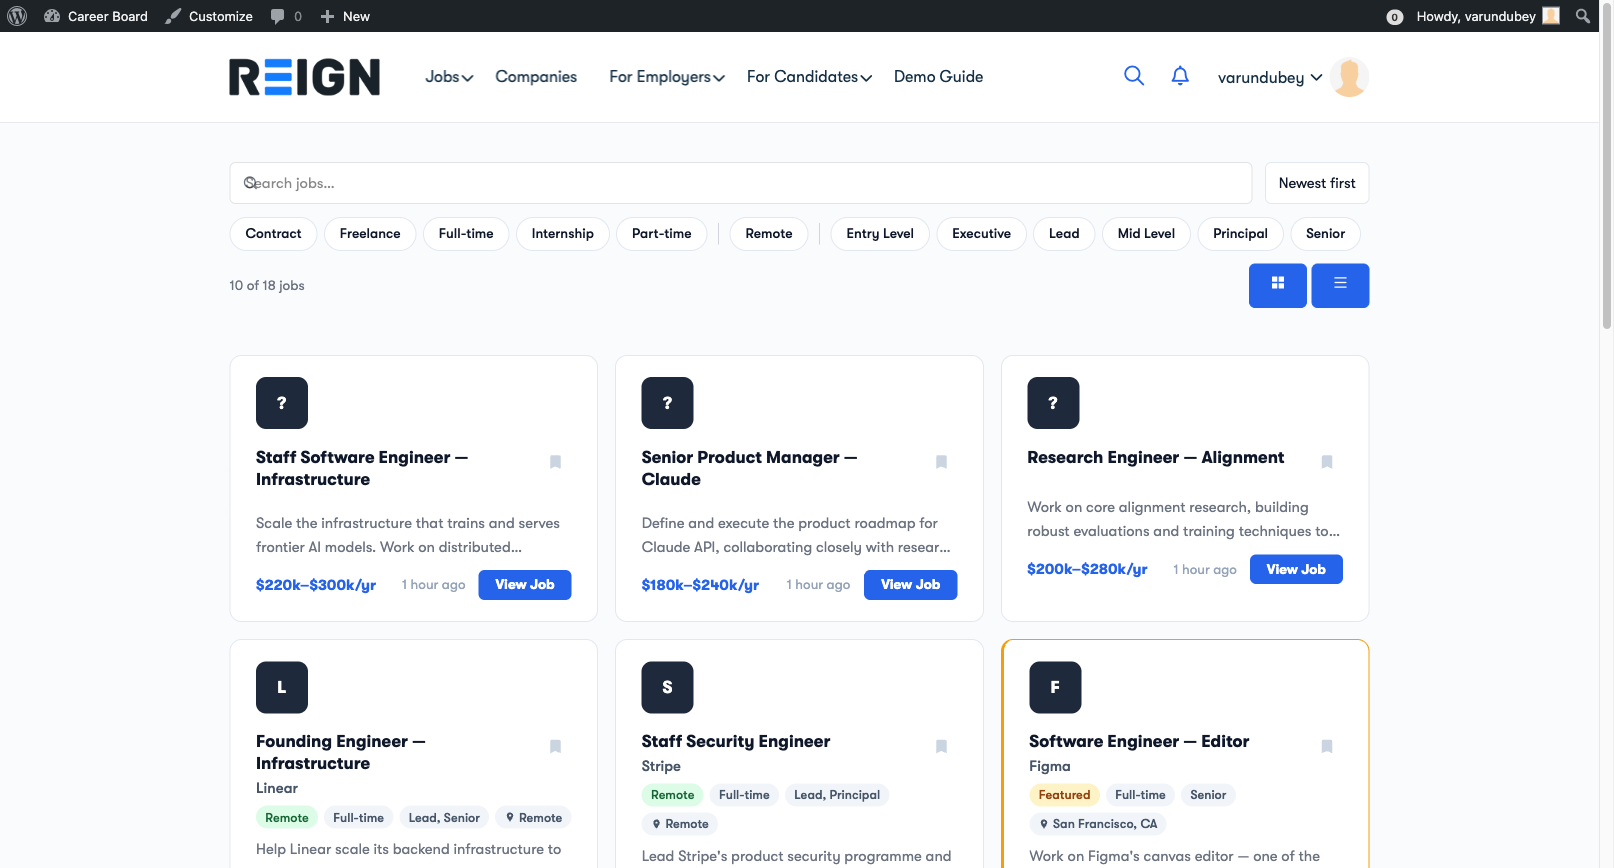
  • A fast, reactive job board that updates without page reloads
  • Search and filter jobs by keyword, category, job type, location, and experience level
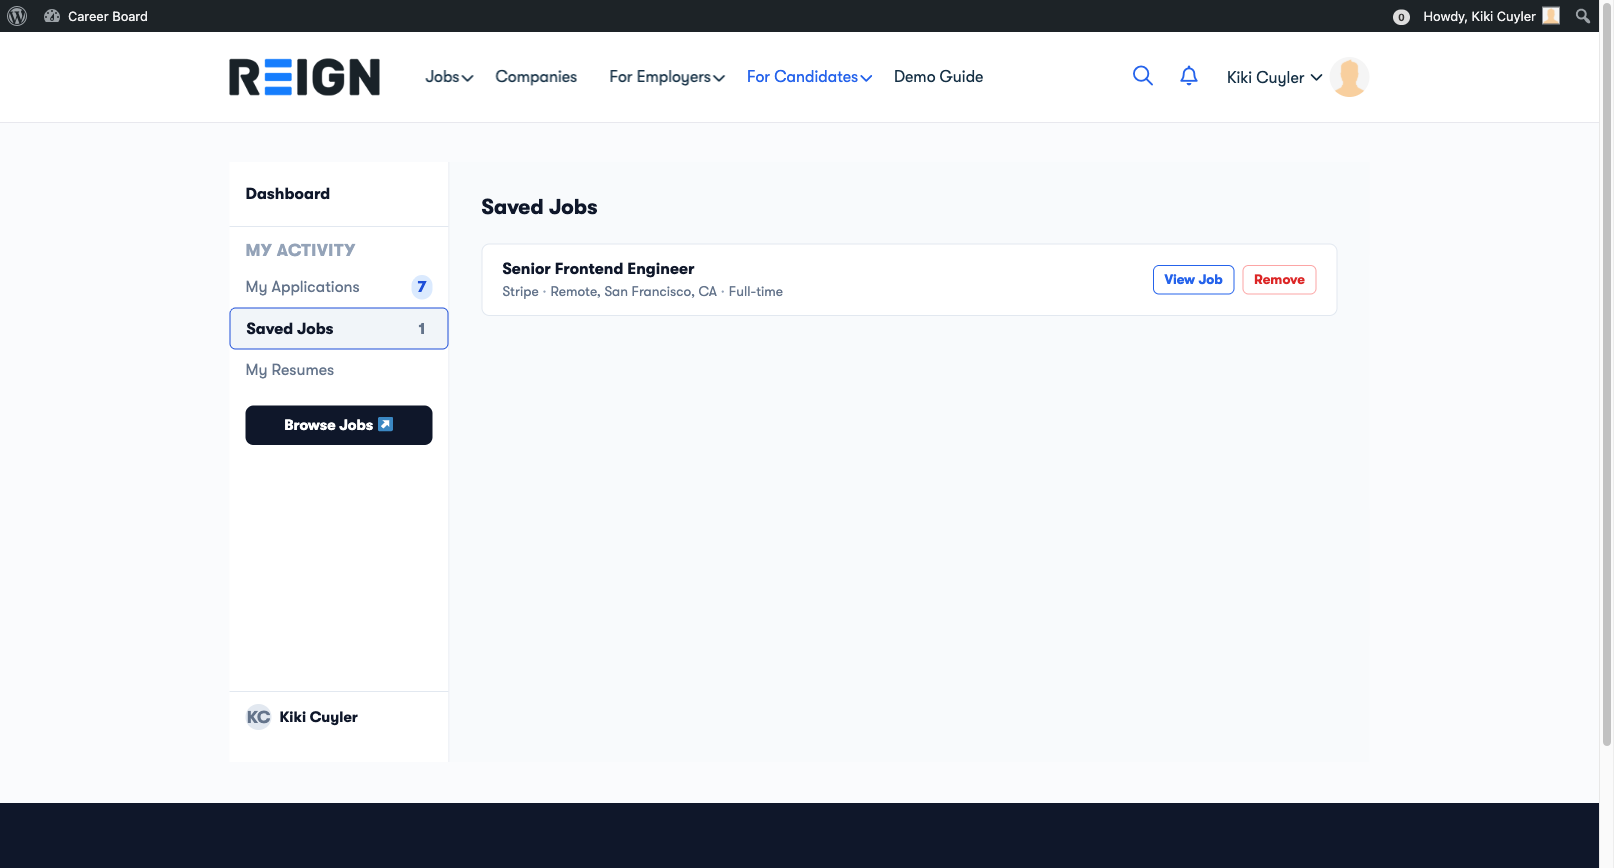
  • Bookmark jobs to apply later
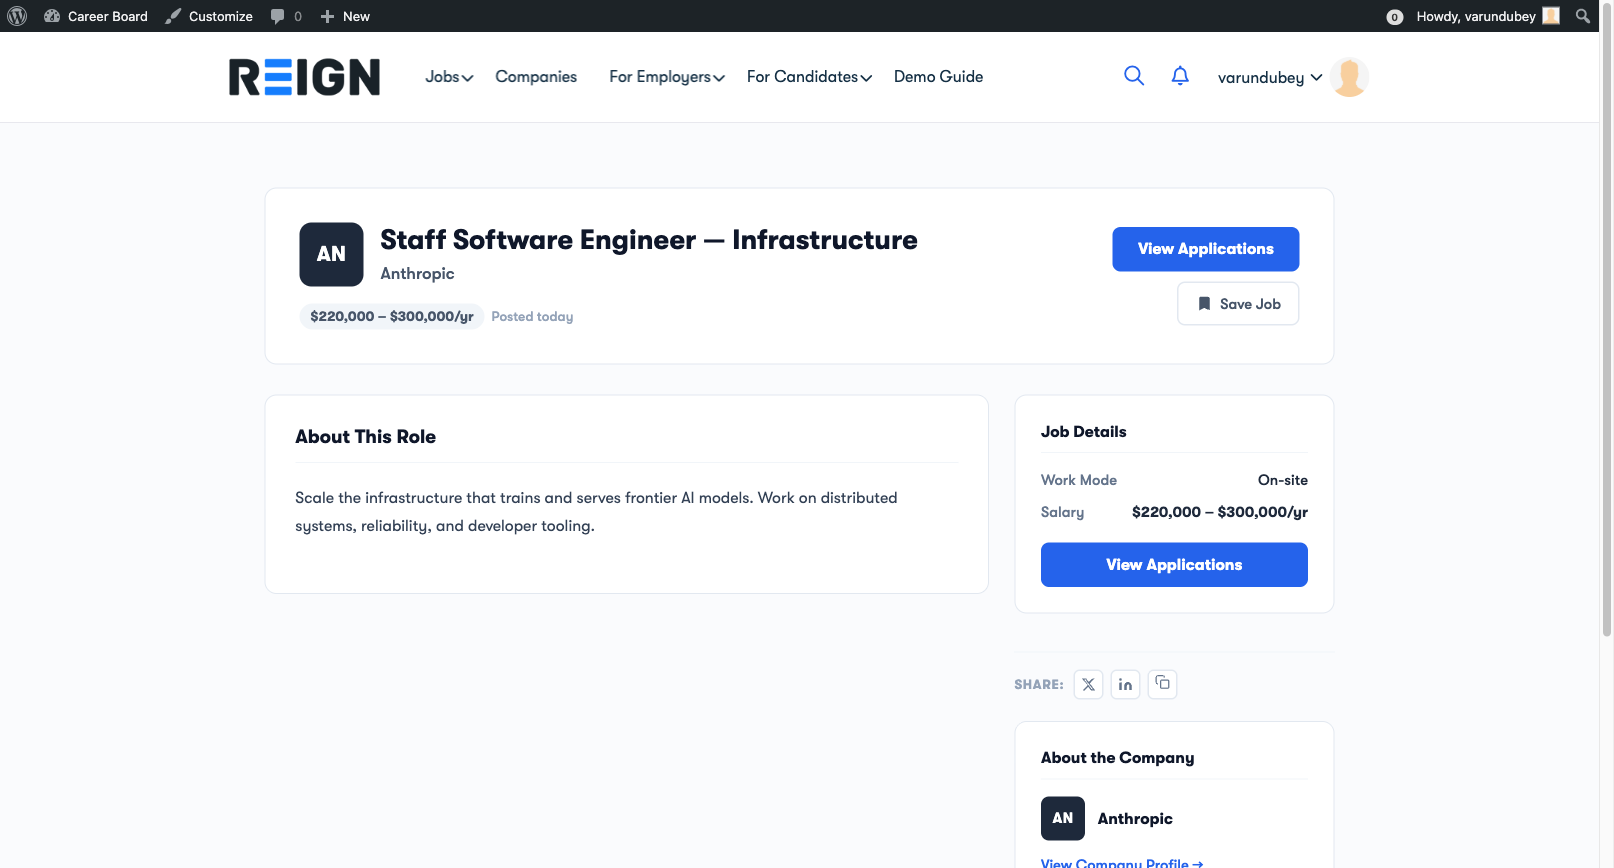
  • Full job detail pages with company information

For employers:

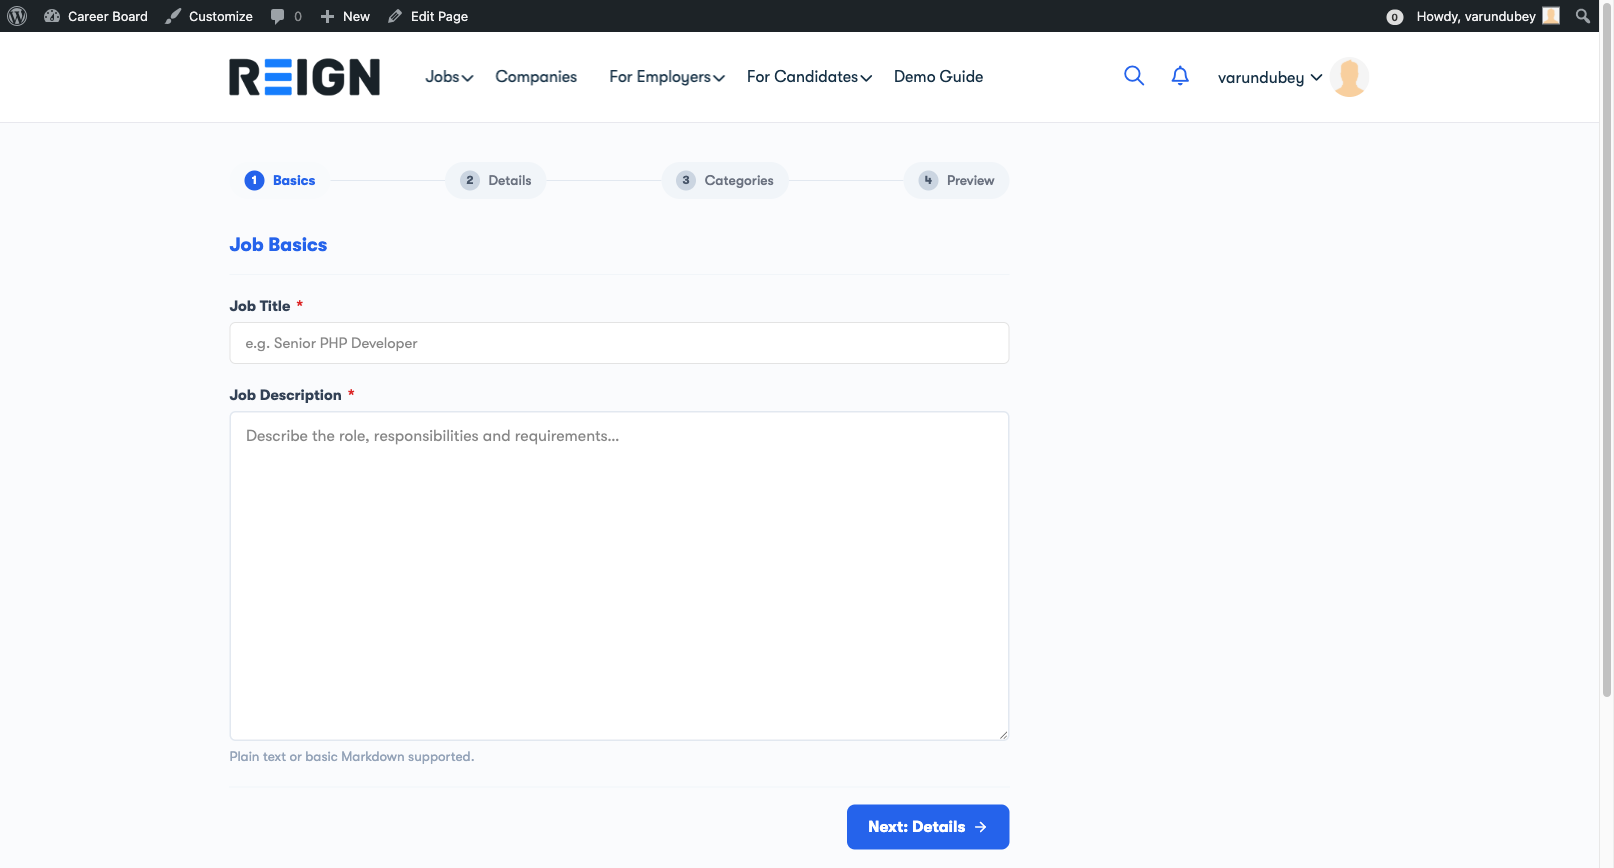
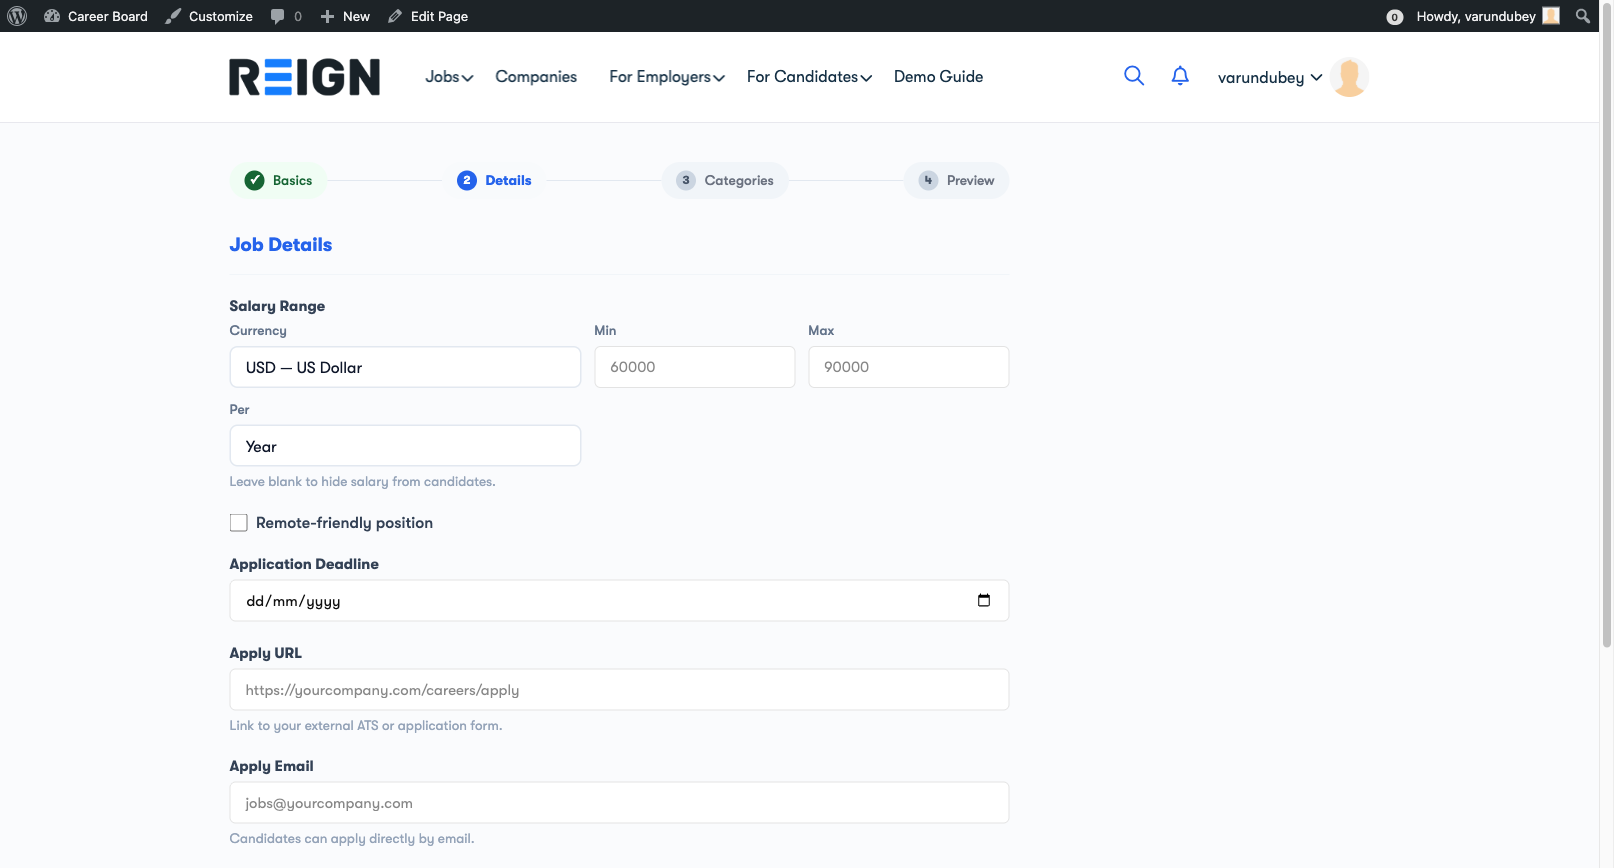
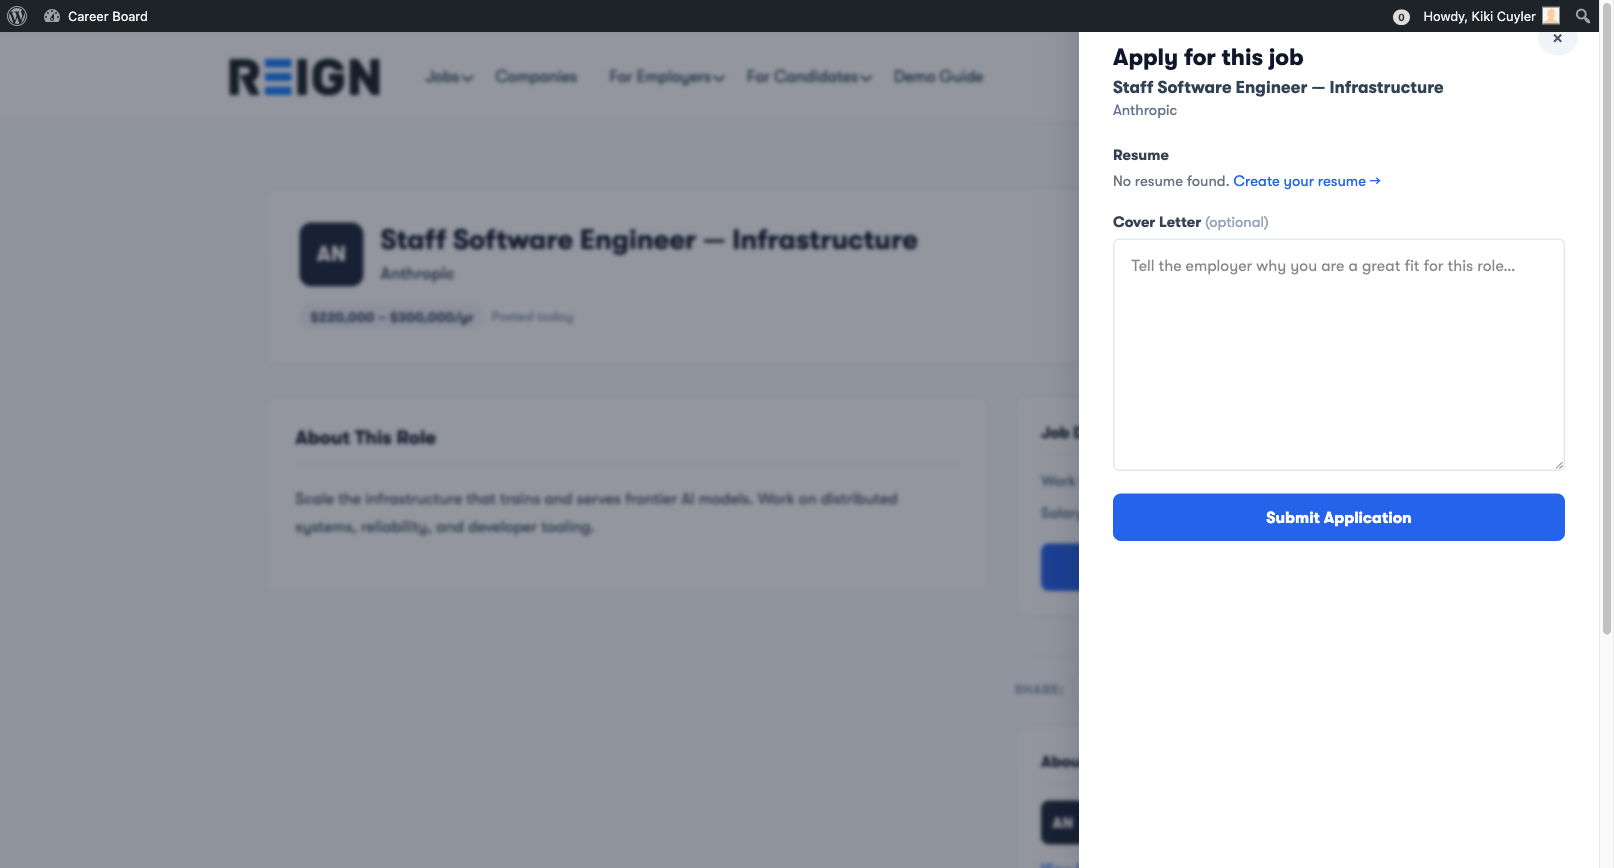
  • Self-service job posting with a guided multi-step form
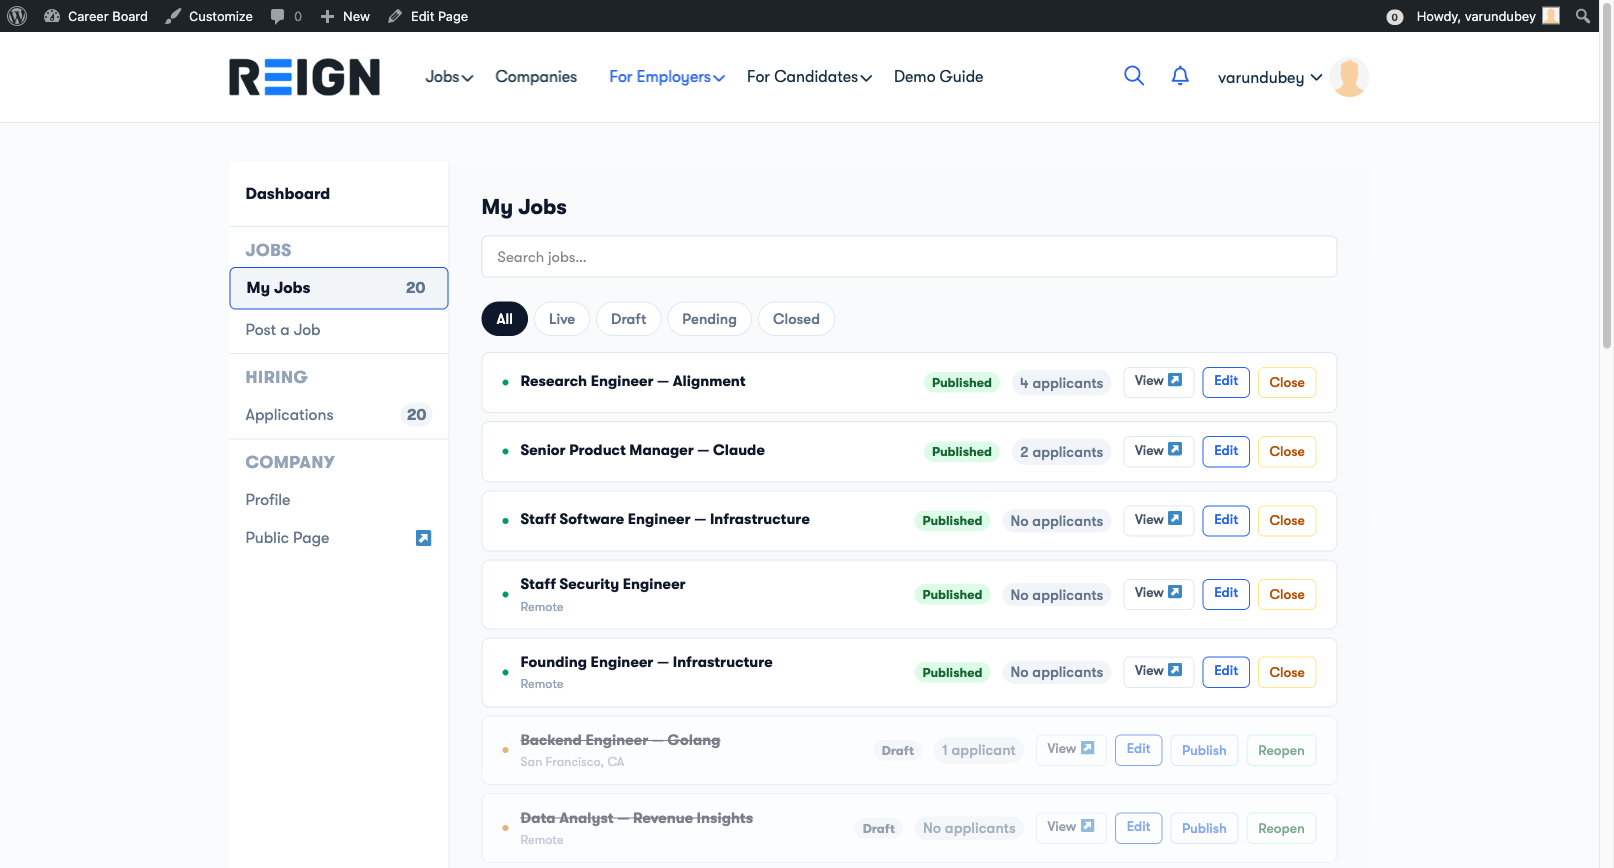
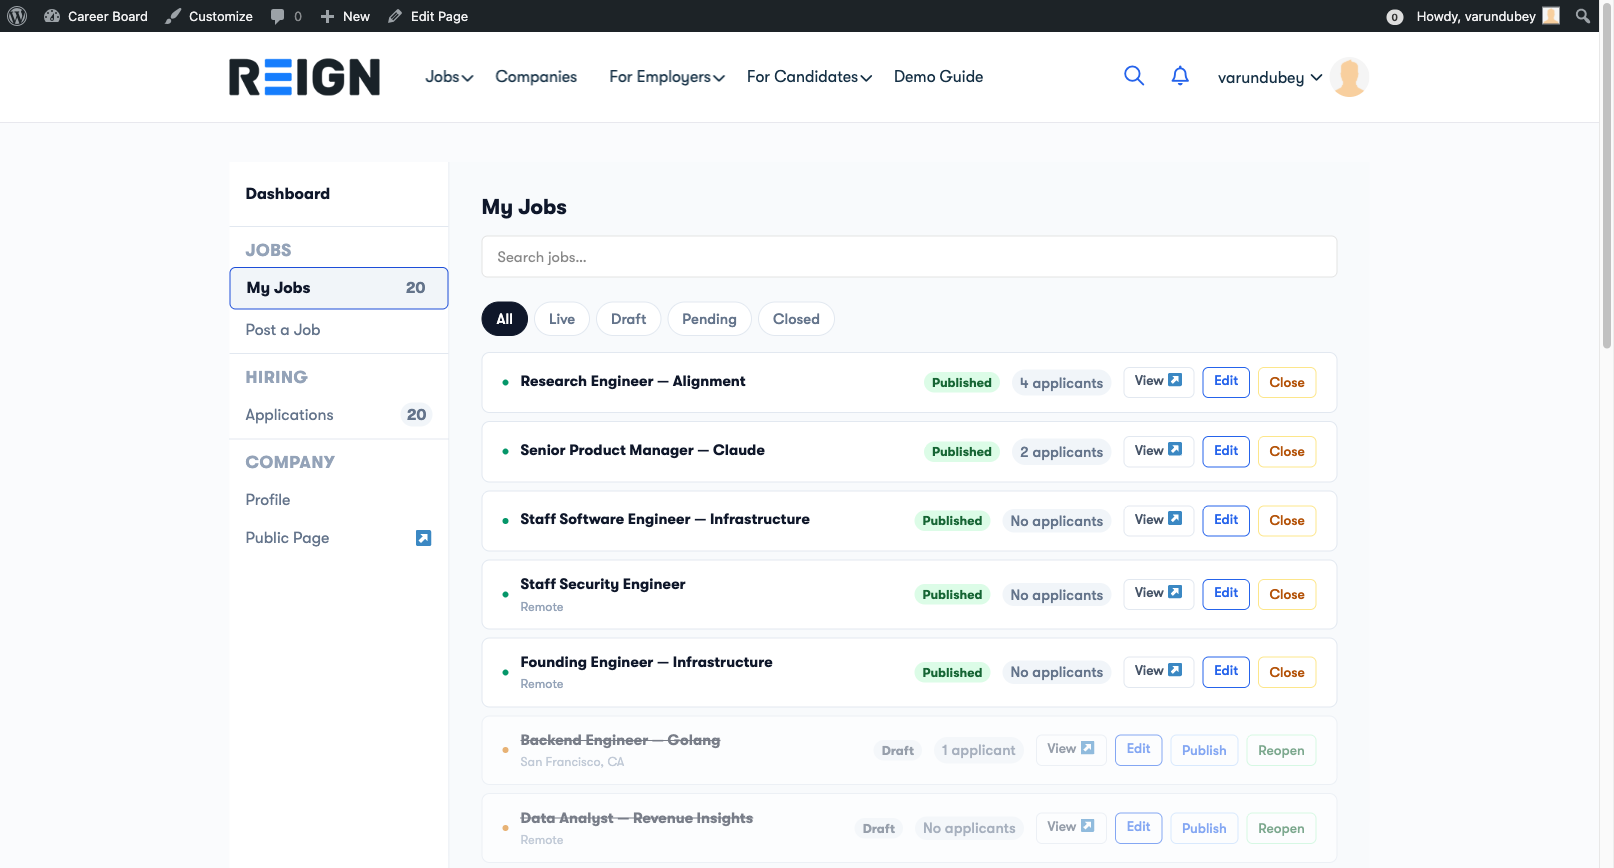
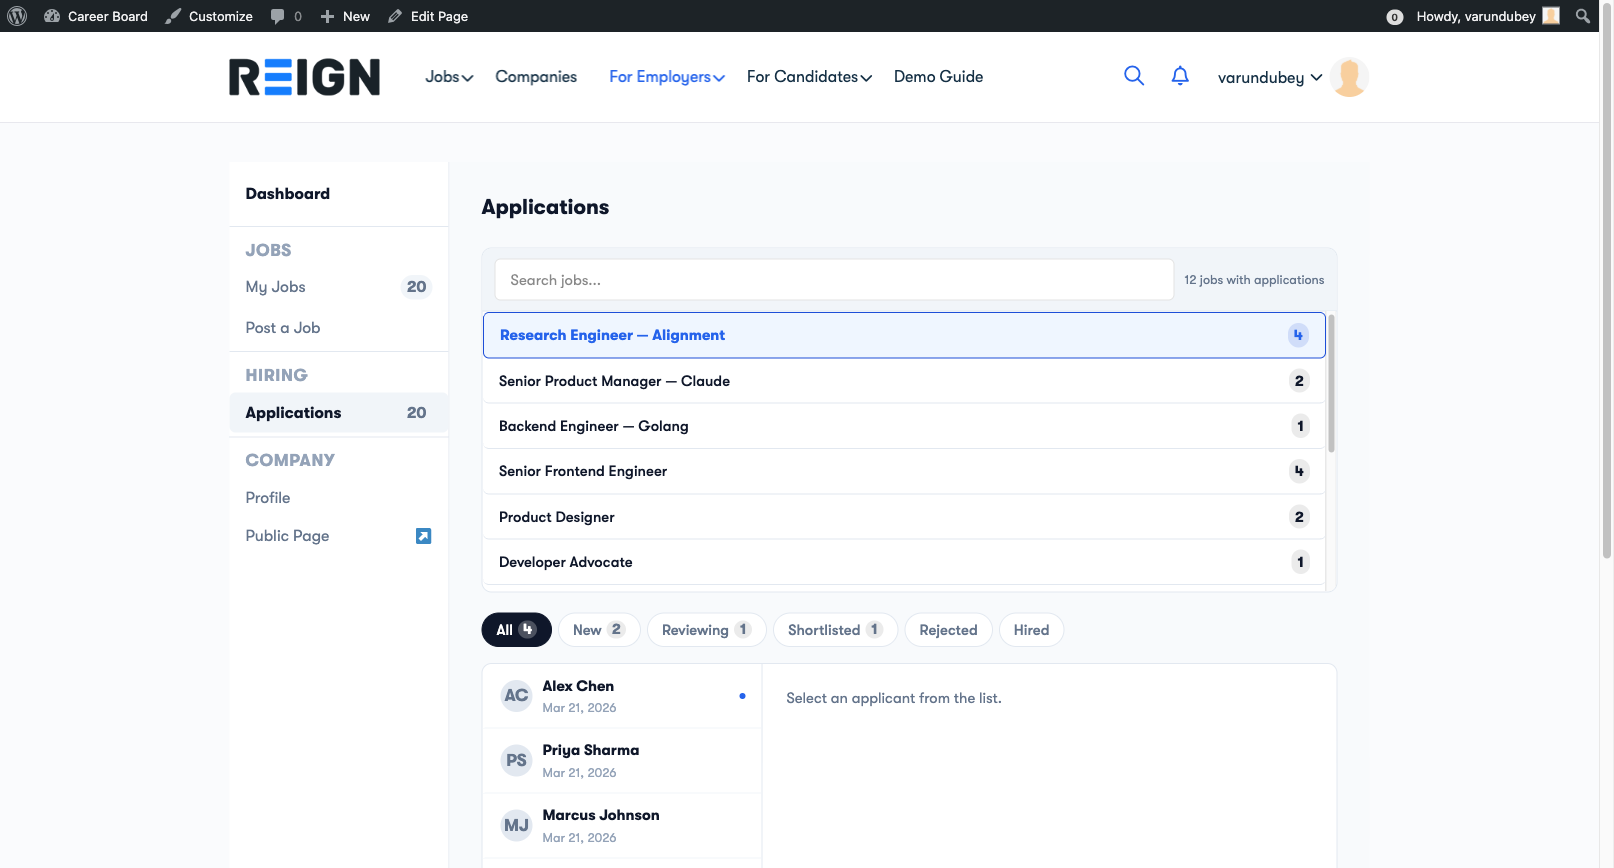
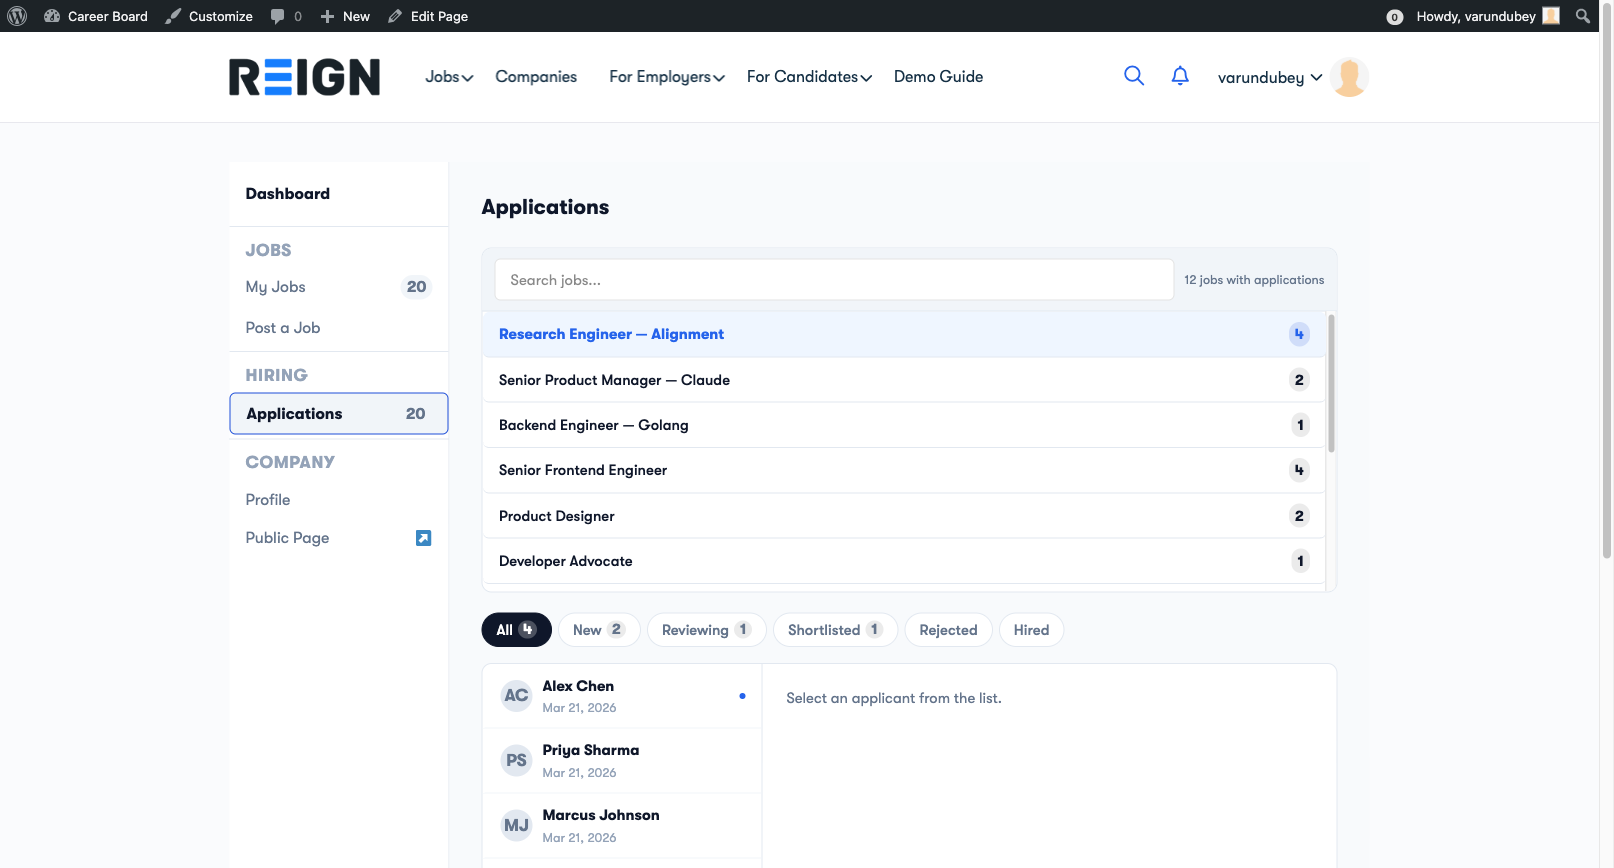
  • Employer dashboard to manage all posted jobs and applications
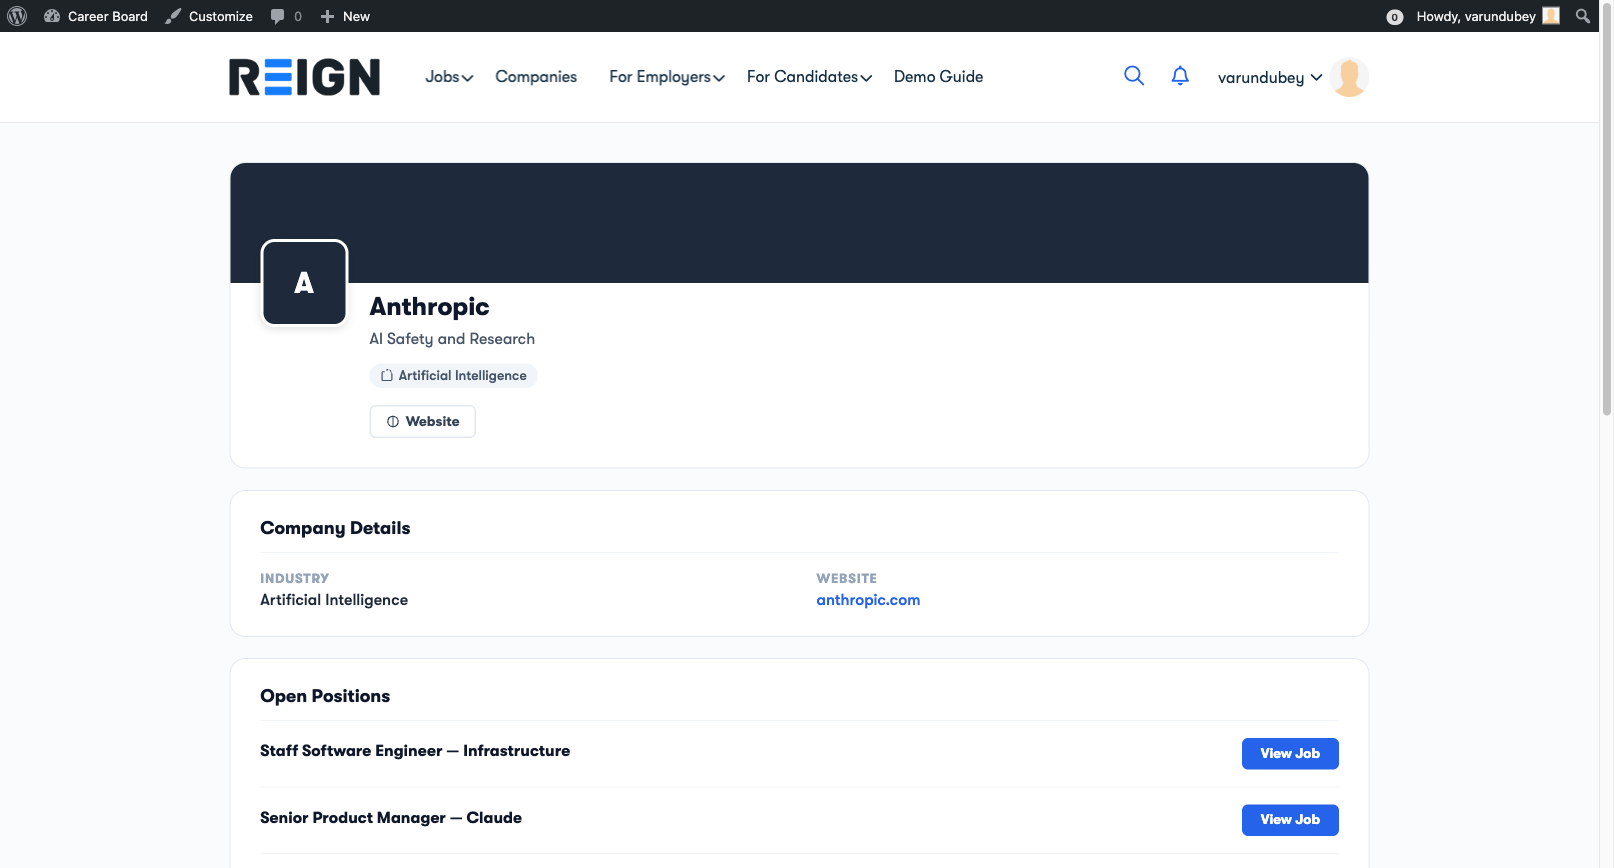
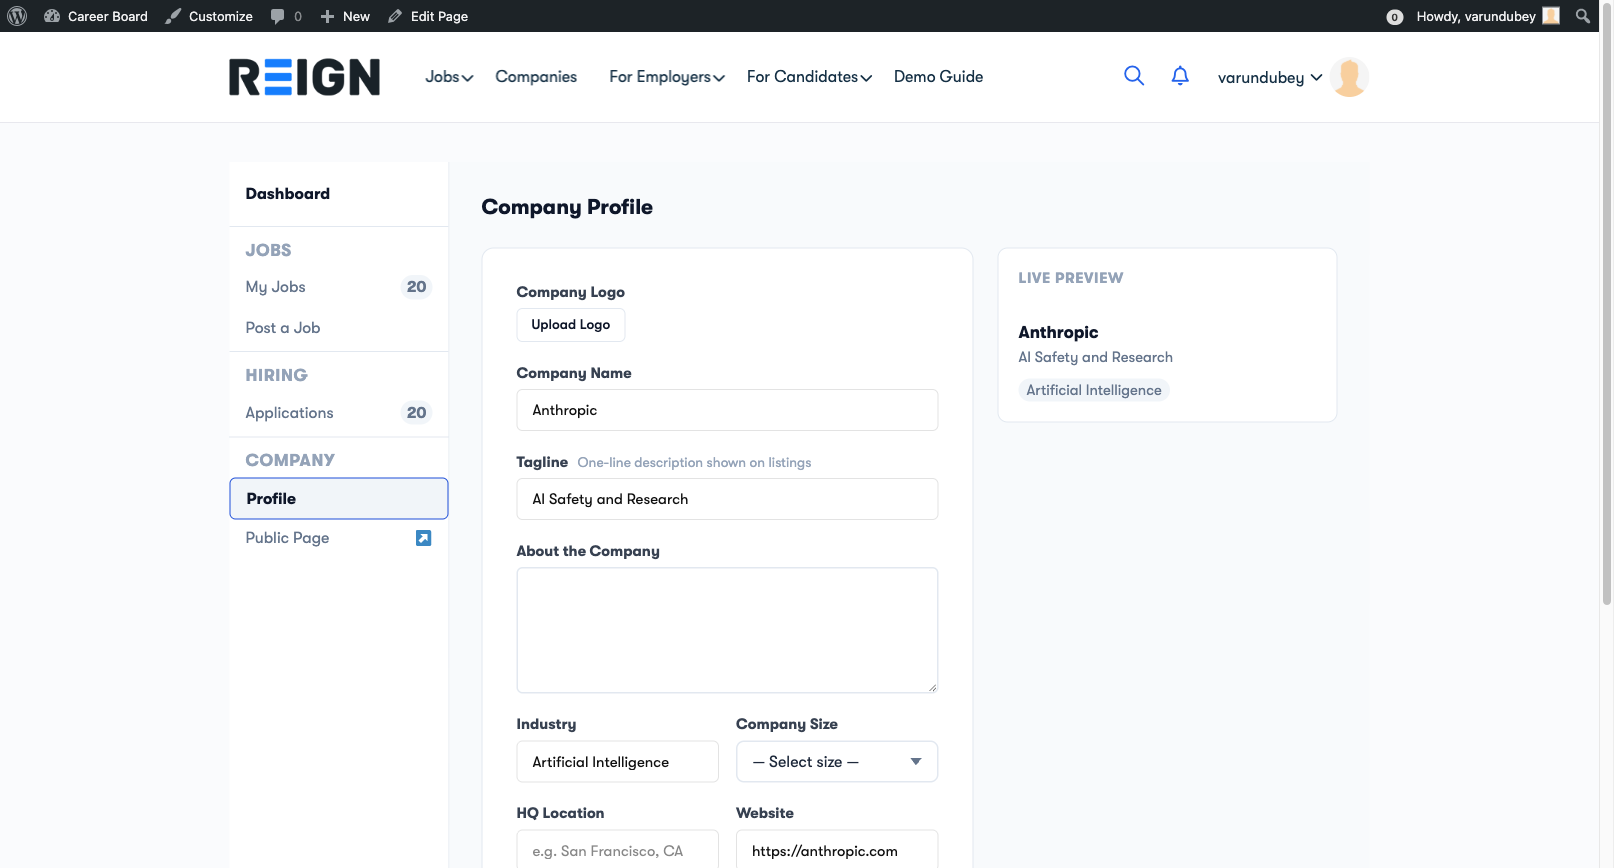
  • Company profile page visible to all candidates
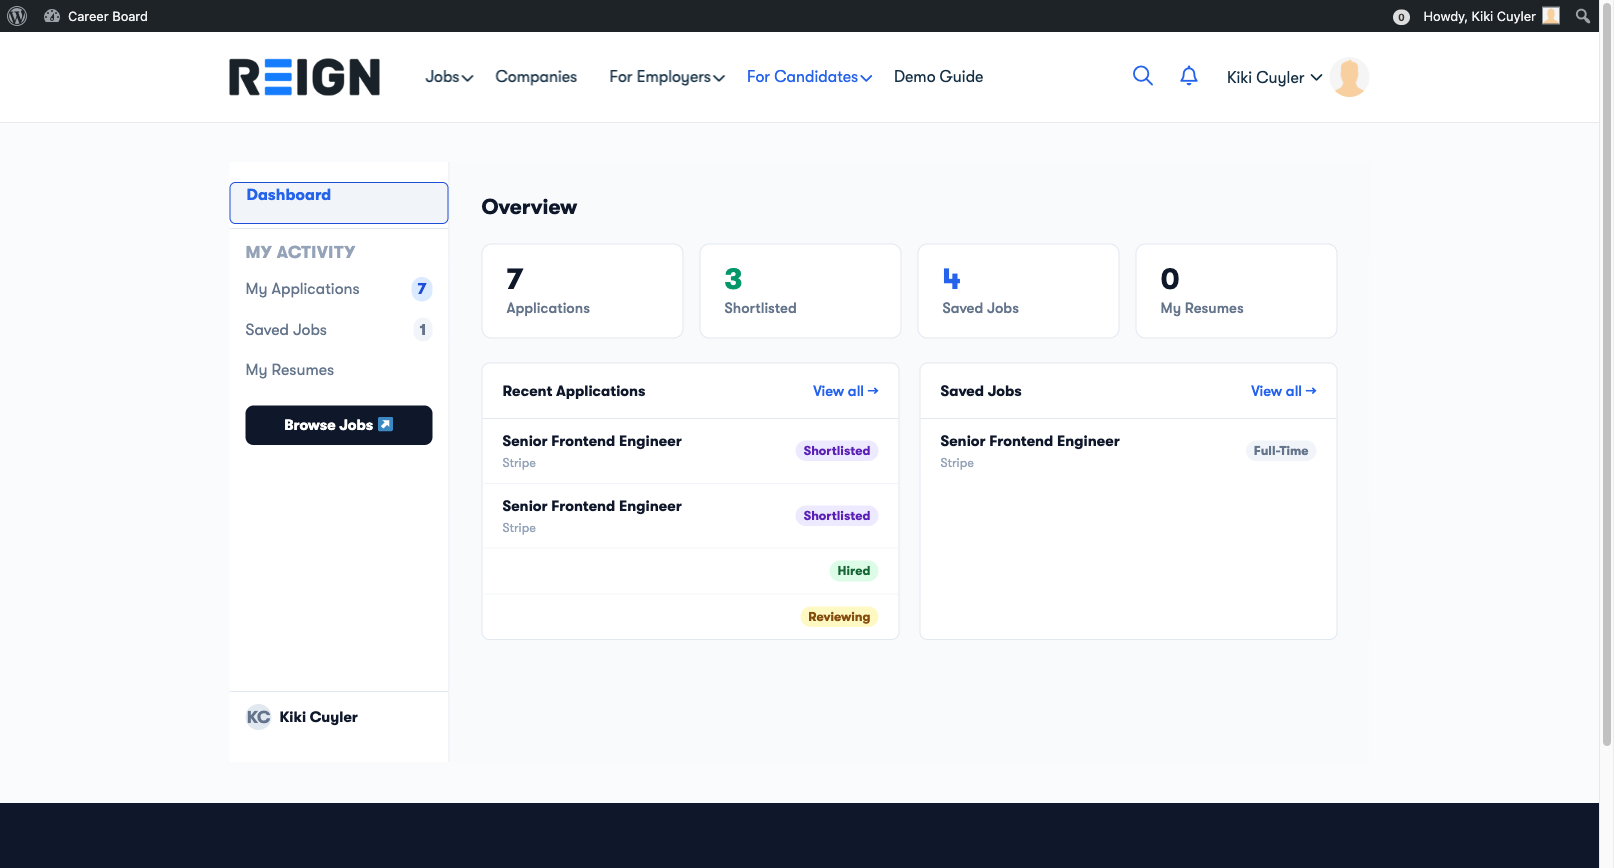
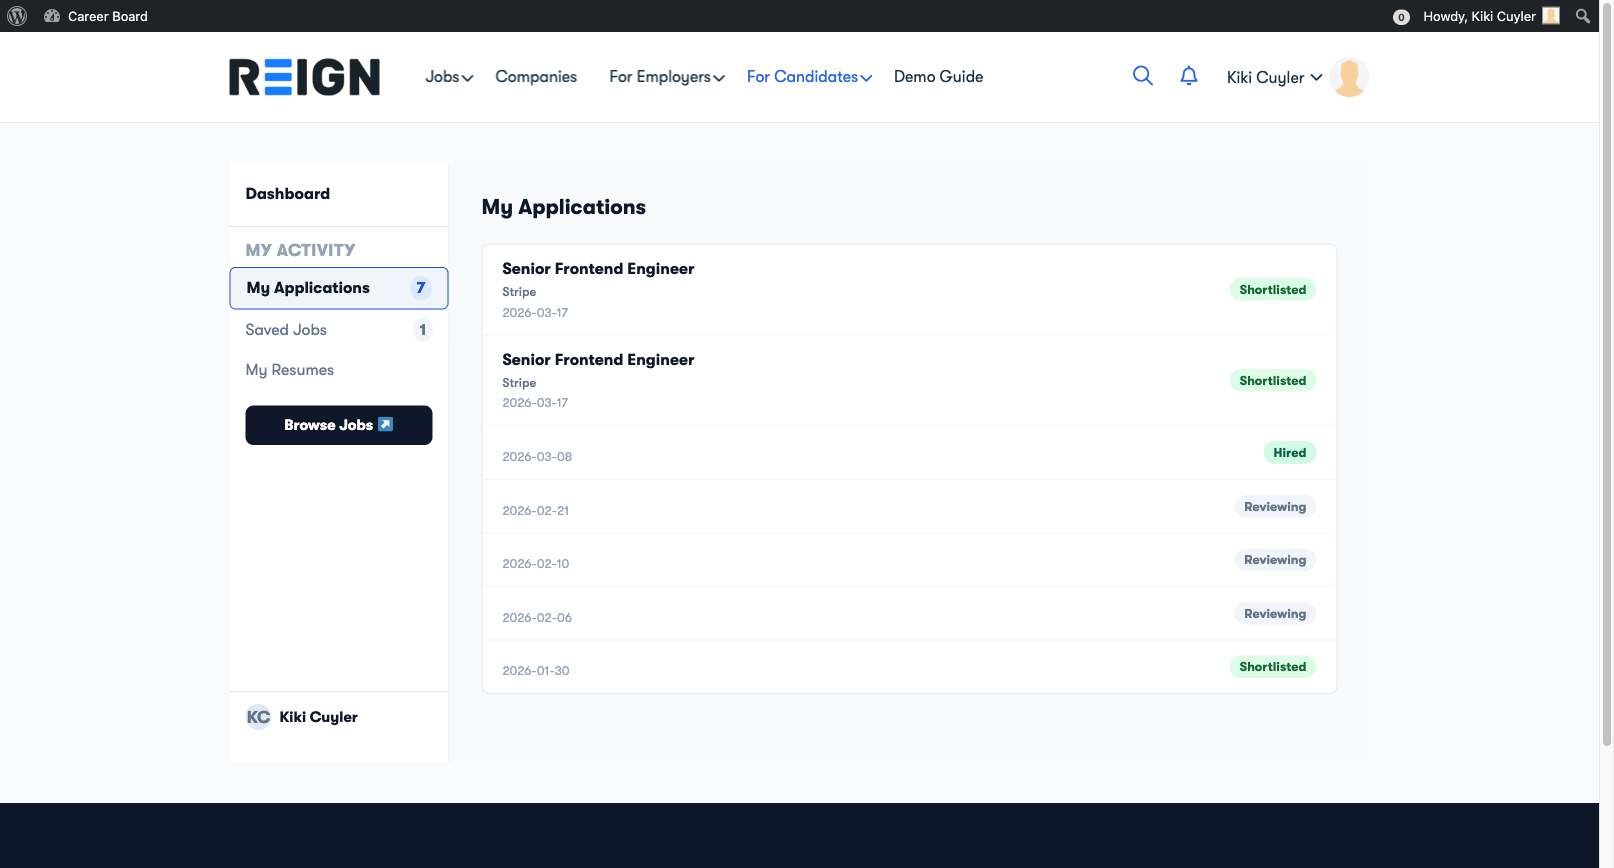
For candidates:

  • Candidate dashboard to track all applications in one place
  • Saved jobs list (bookmarks)
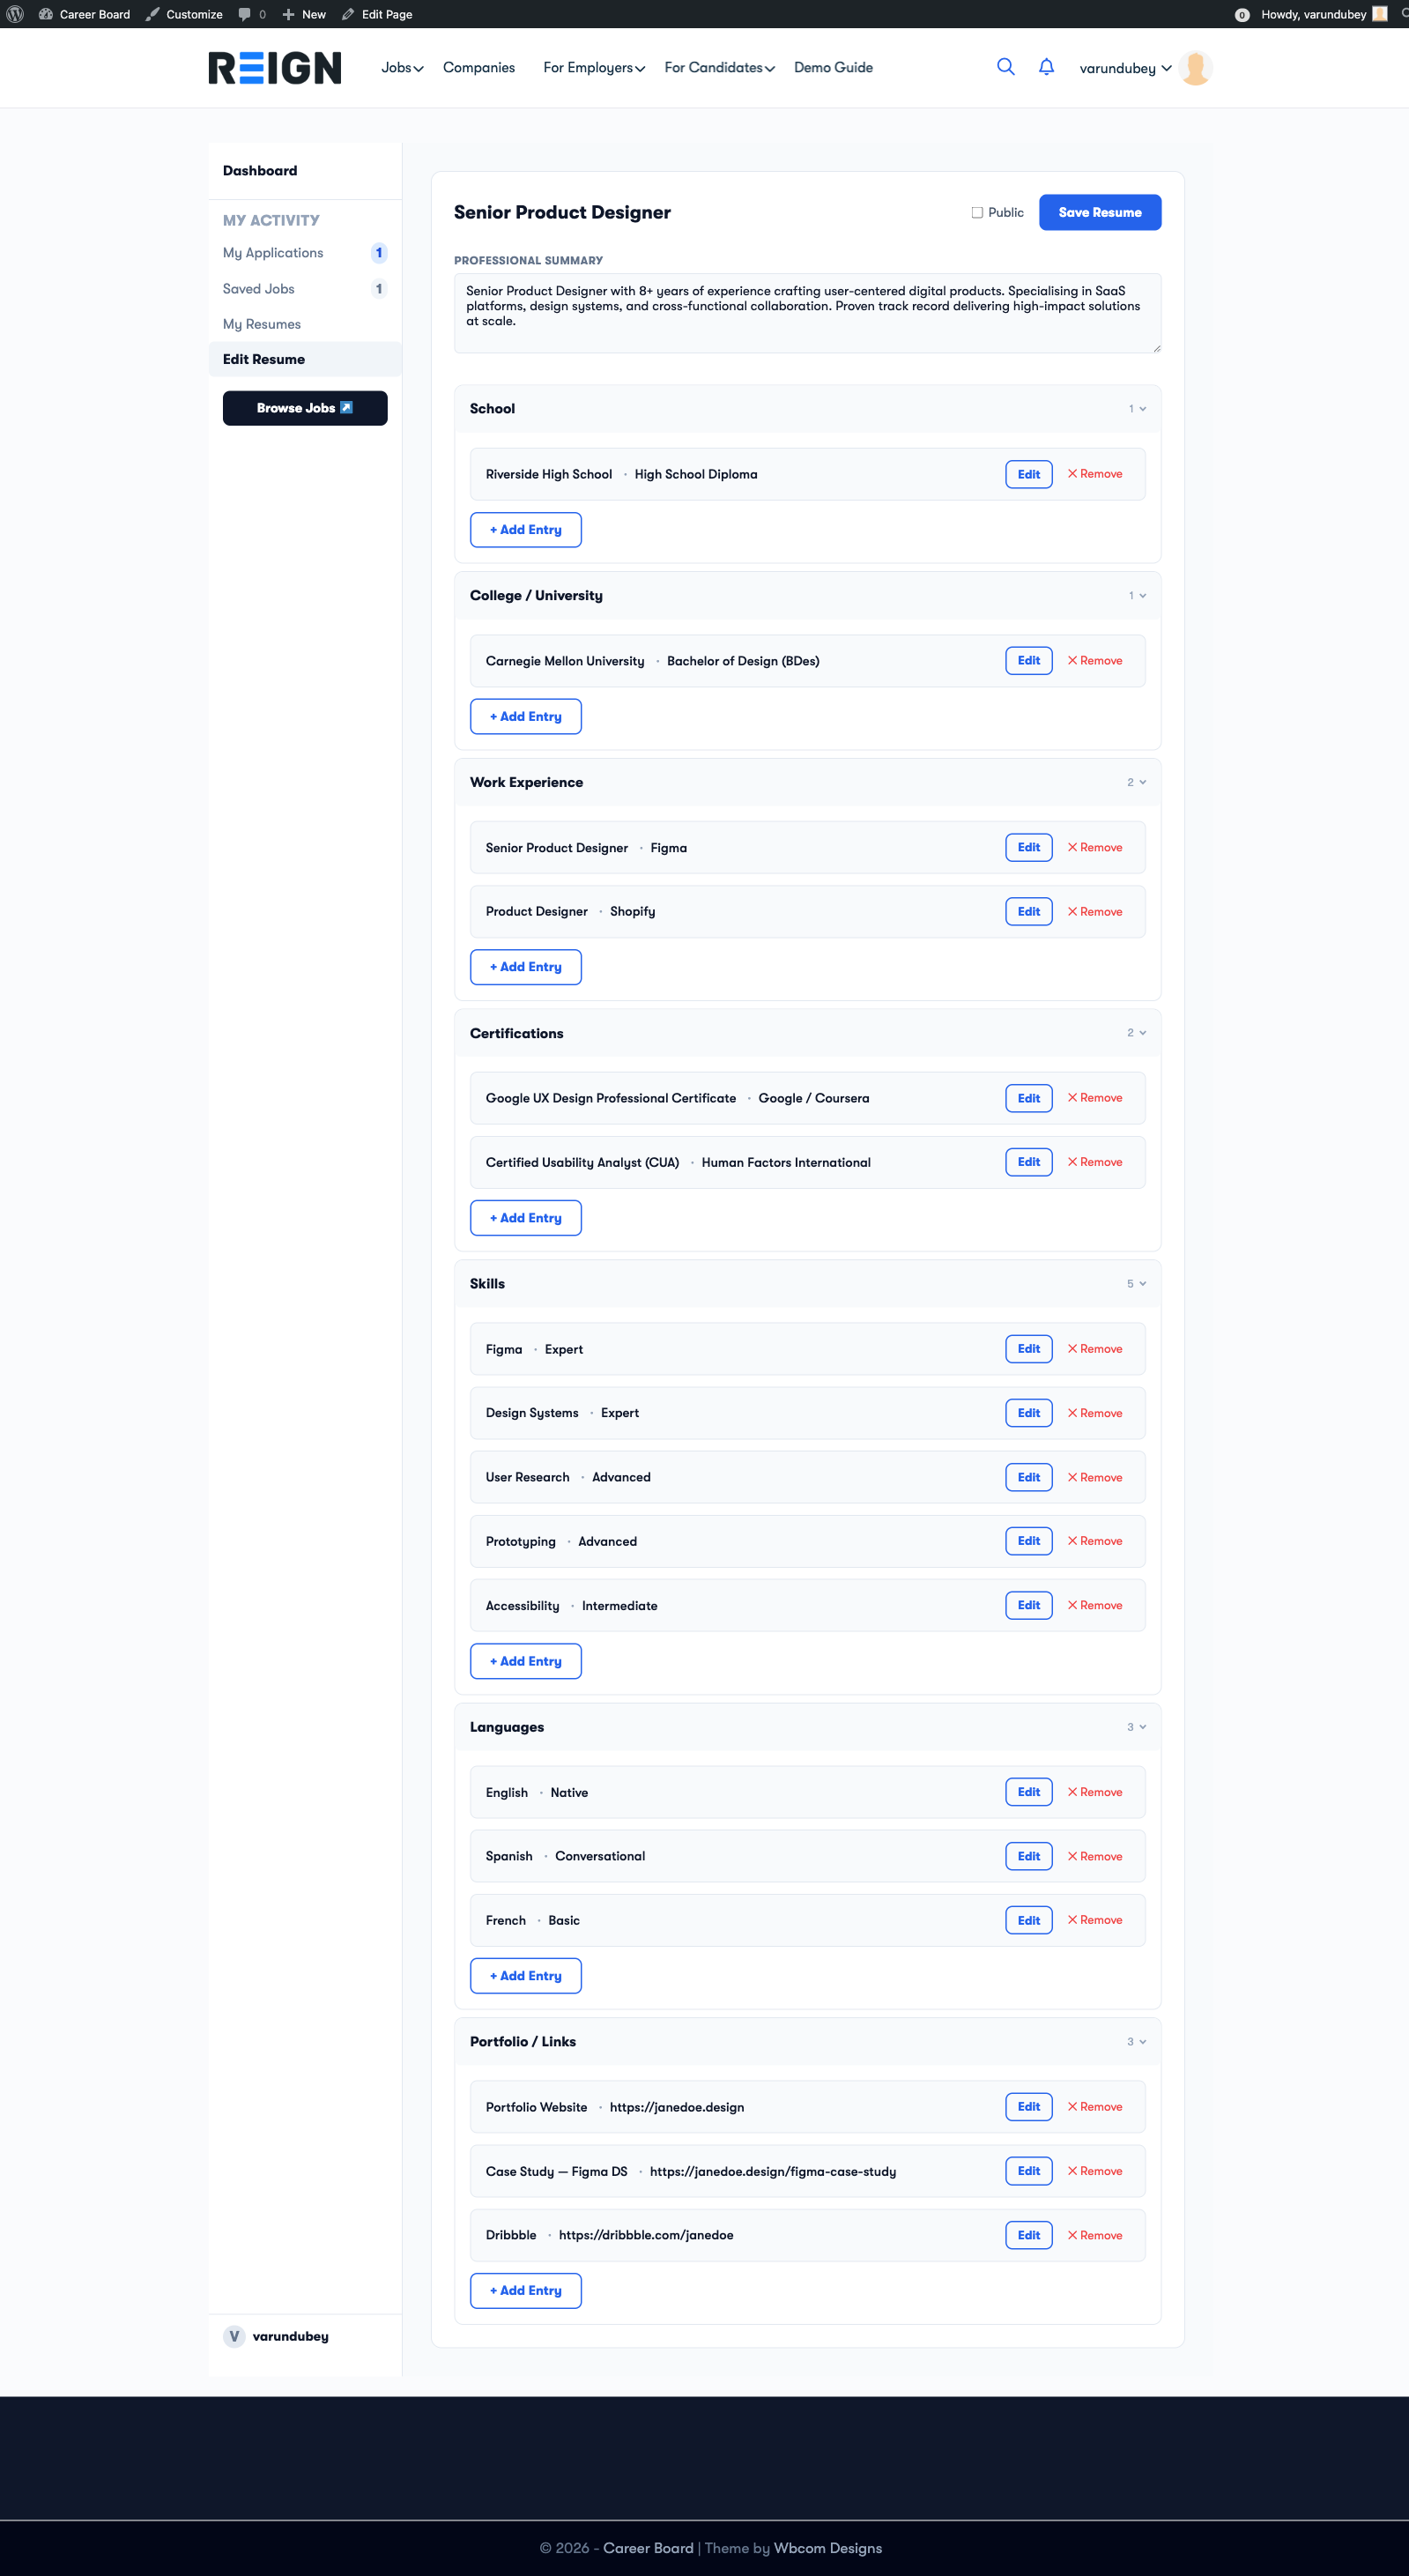
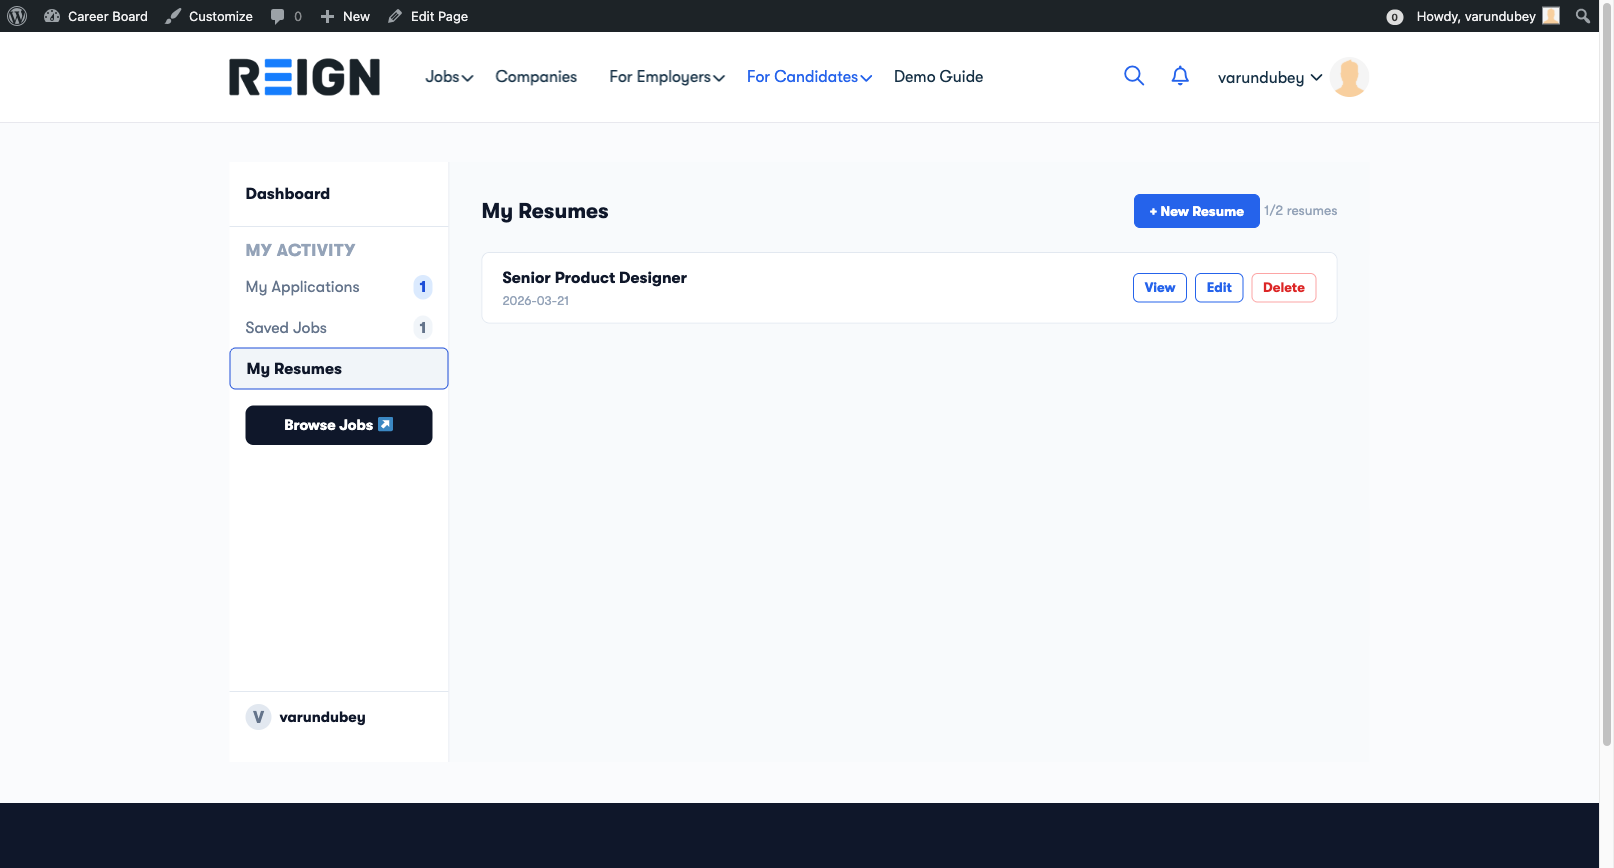
  • Resume management (with WP Career Board Pro)
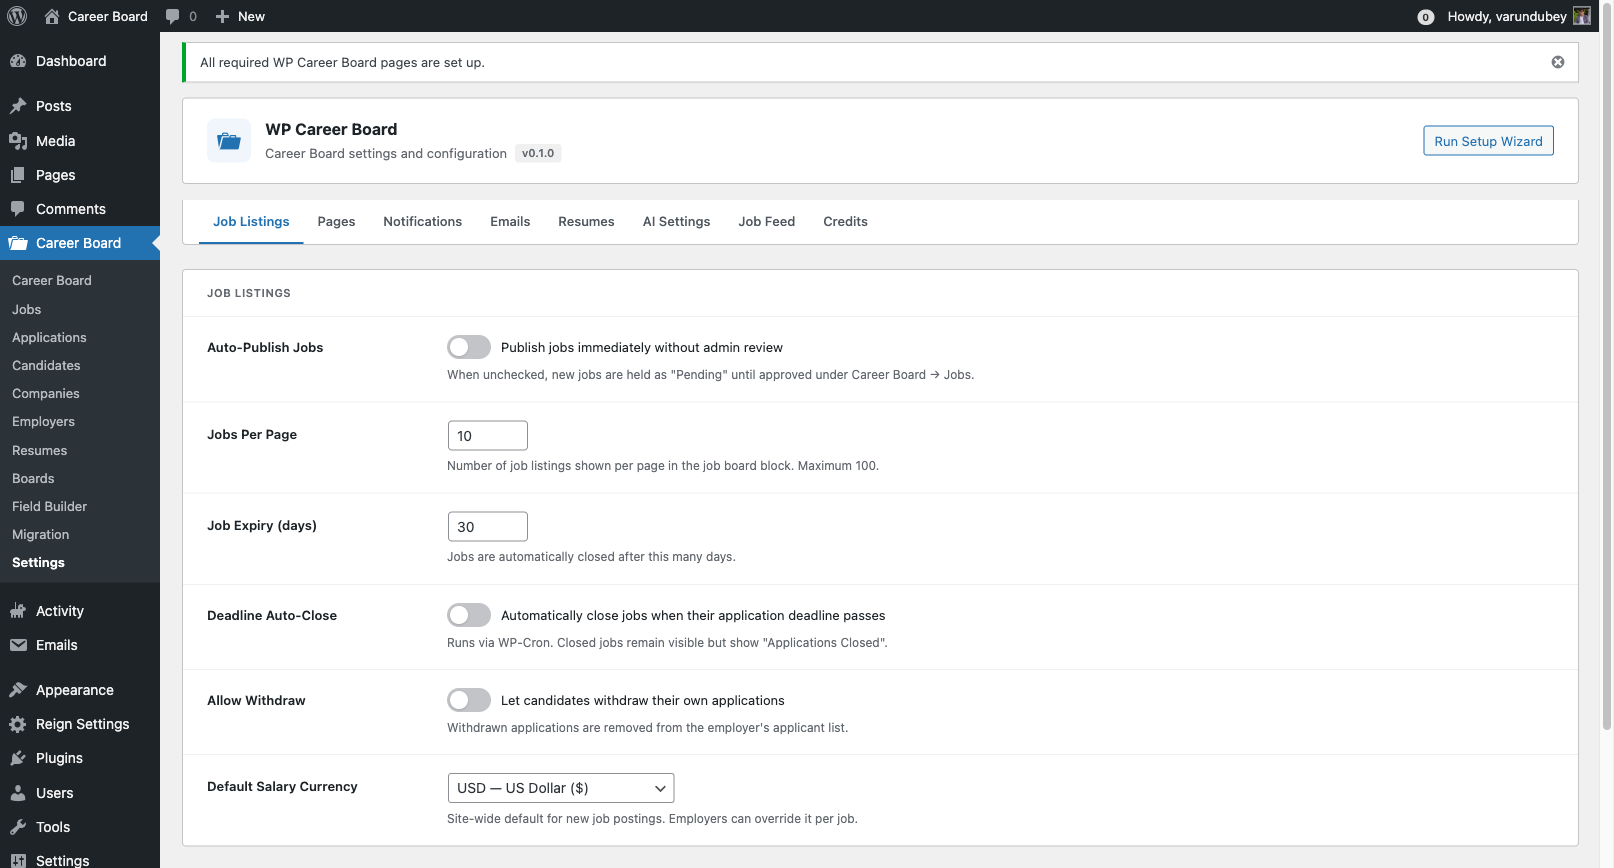
For admins:

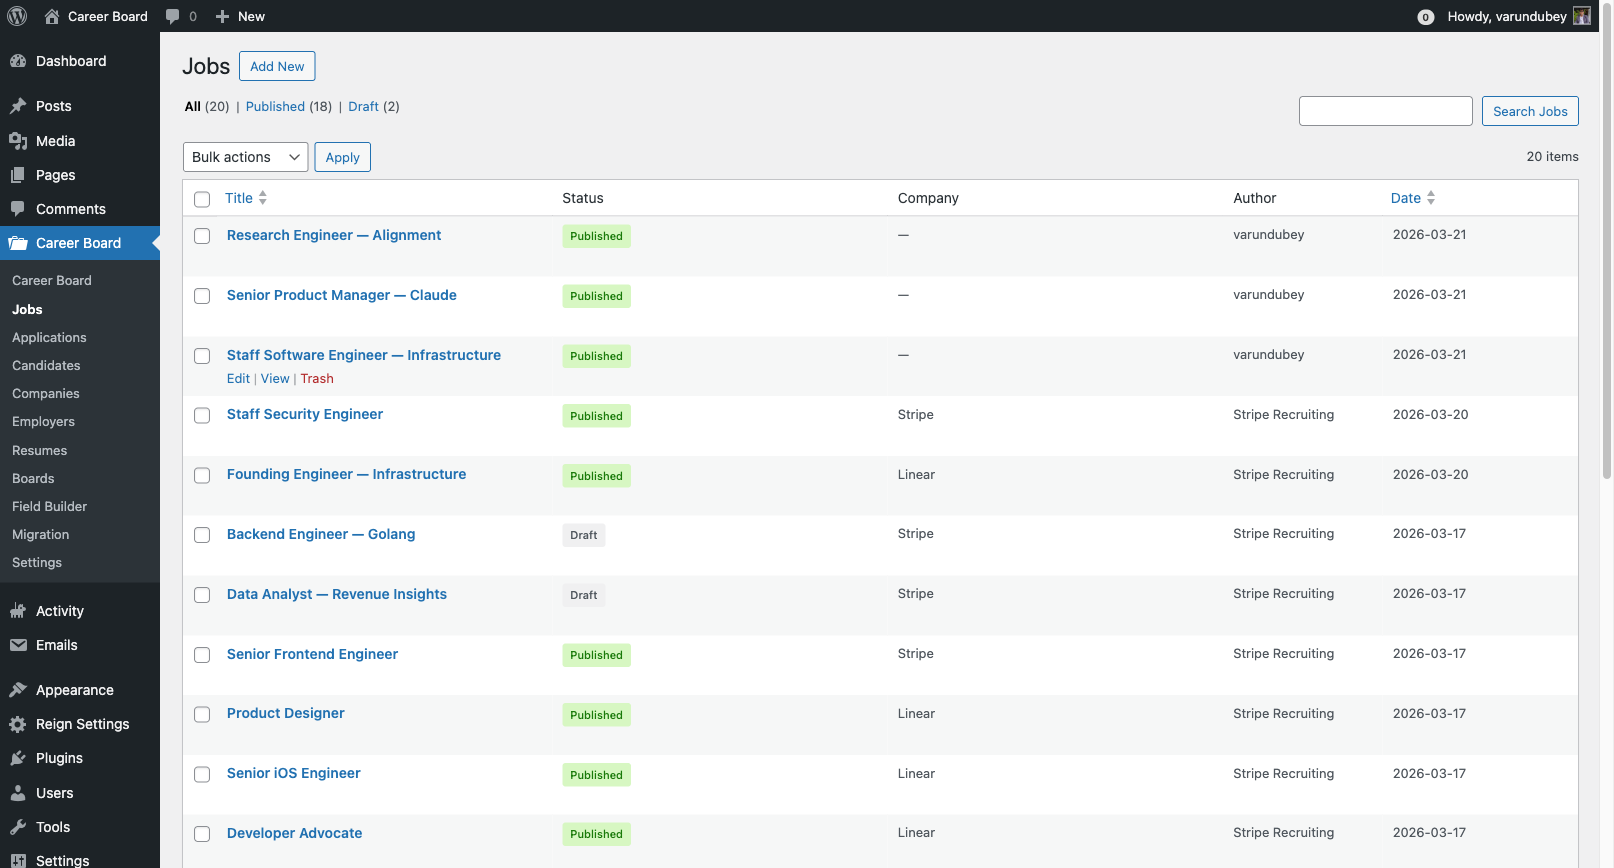
  • Full admin control over jobs, applications, employers, and candidates
  • Moderation queue to approve jobs before they go live
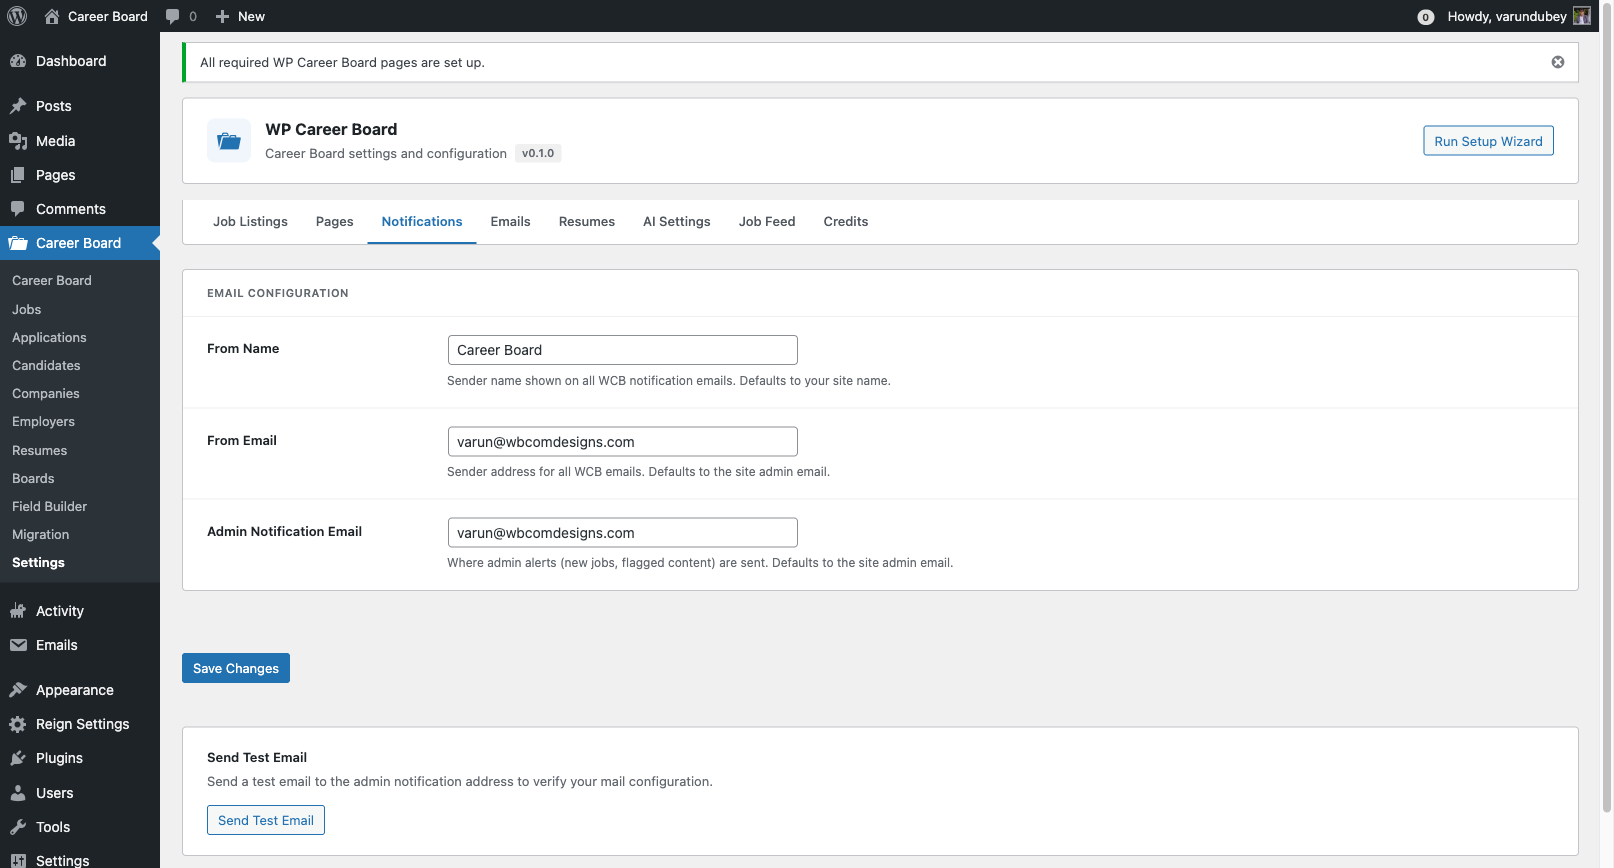
  • Email notification system for all key events
  • GDPR-compliant data export and erasure tools

Key Differences From Other Job Board Plugins

Feature WP Career Board Traditional plugins
Page reloads on filter/apply No Yes
Built on WordPress Interactivity API Yes No
BuddyX Pro + Reign first-class support Yes No
No shortcodes required Yes Rarely
PHP 8.1 + WP 6.9 native Yes No

Requirements

  • WordPress: 6.9 or higher
  • PHP: 8.1 or higher
  • Browser: Any modern browser (Chrome, Firefox, Safari, Edge)
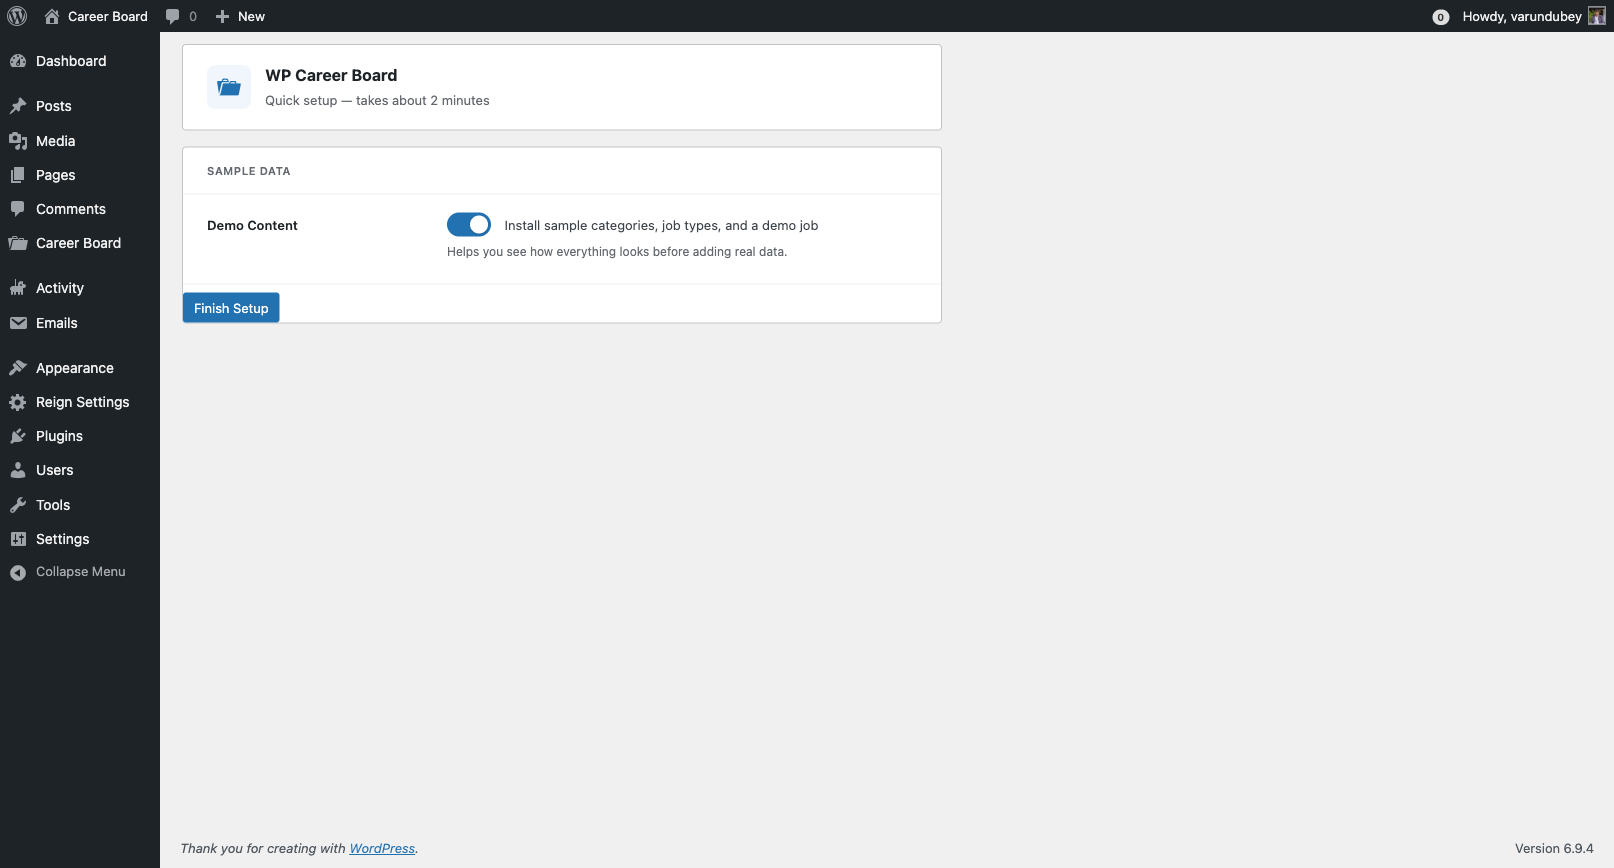
Free vs Pro

WP Career Board is free and fully functional as a standalone job board. WP Career Board Pro extends it with:

  • Resume builder with structured sections
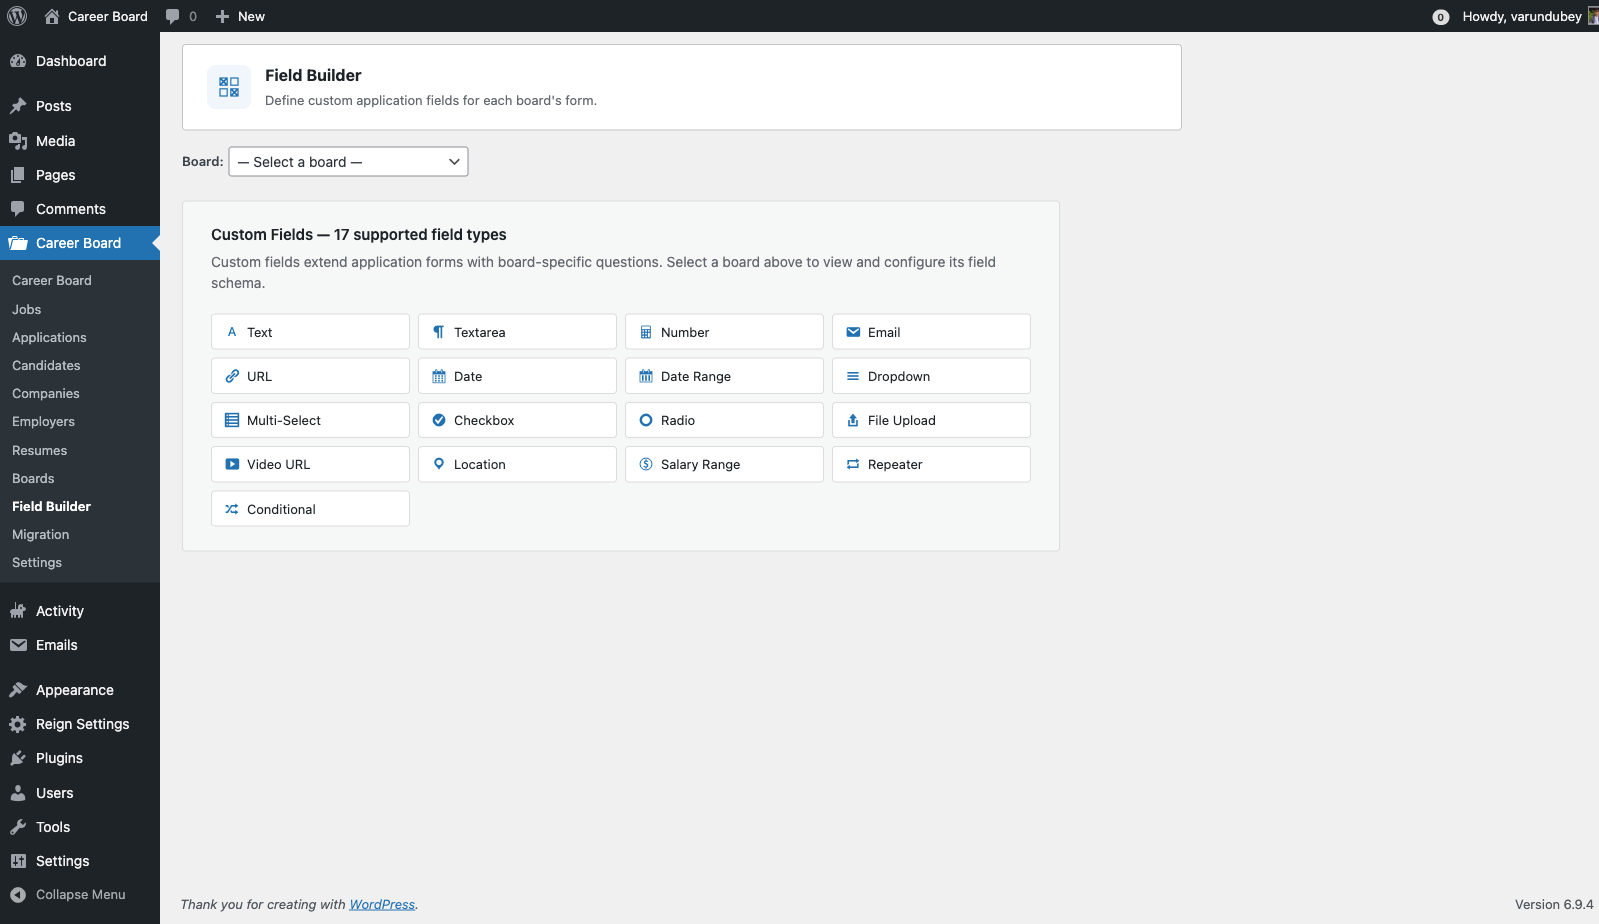
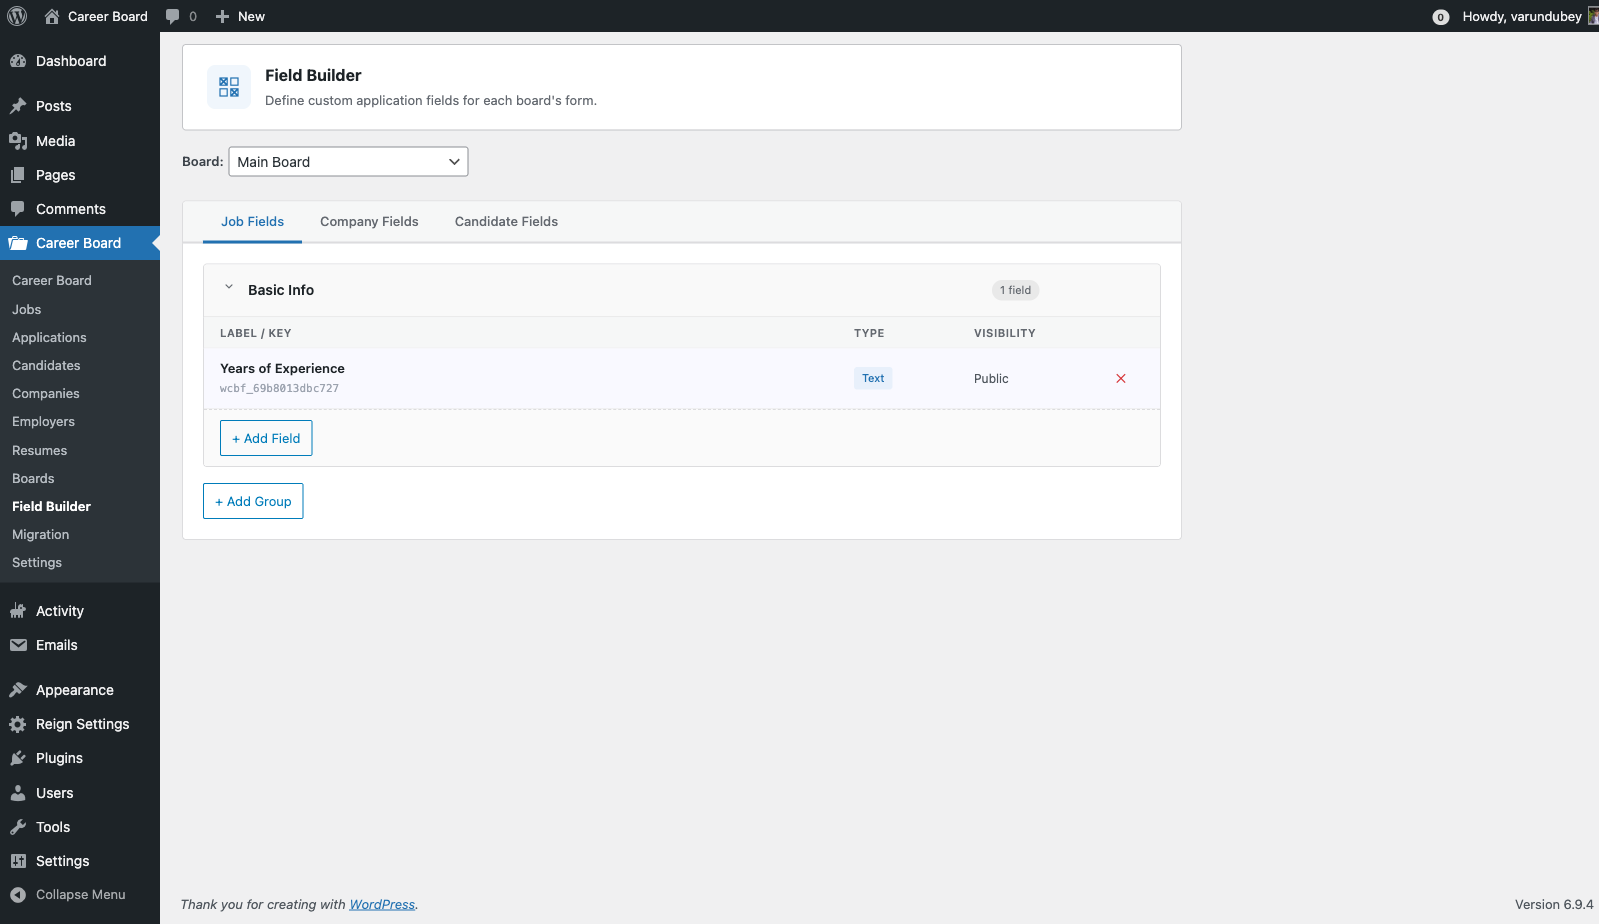
  • Custom field builder for jobs, companies, and candidates
  • Application pipeline (ATS-style stage tracking)
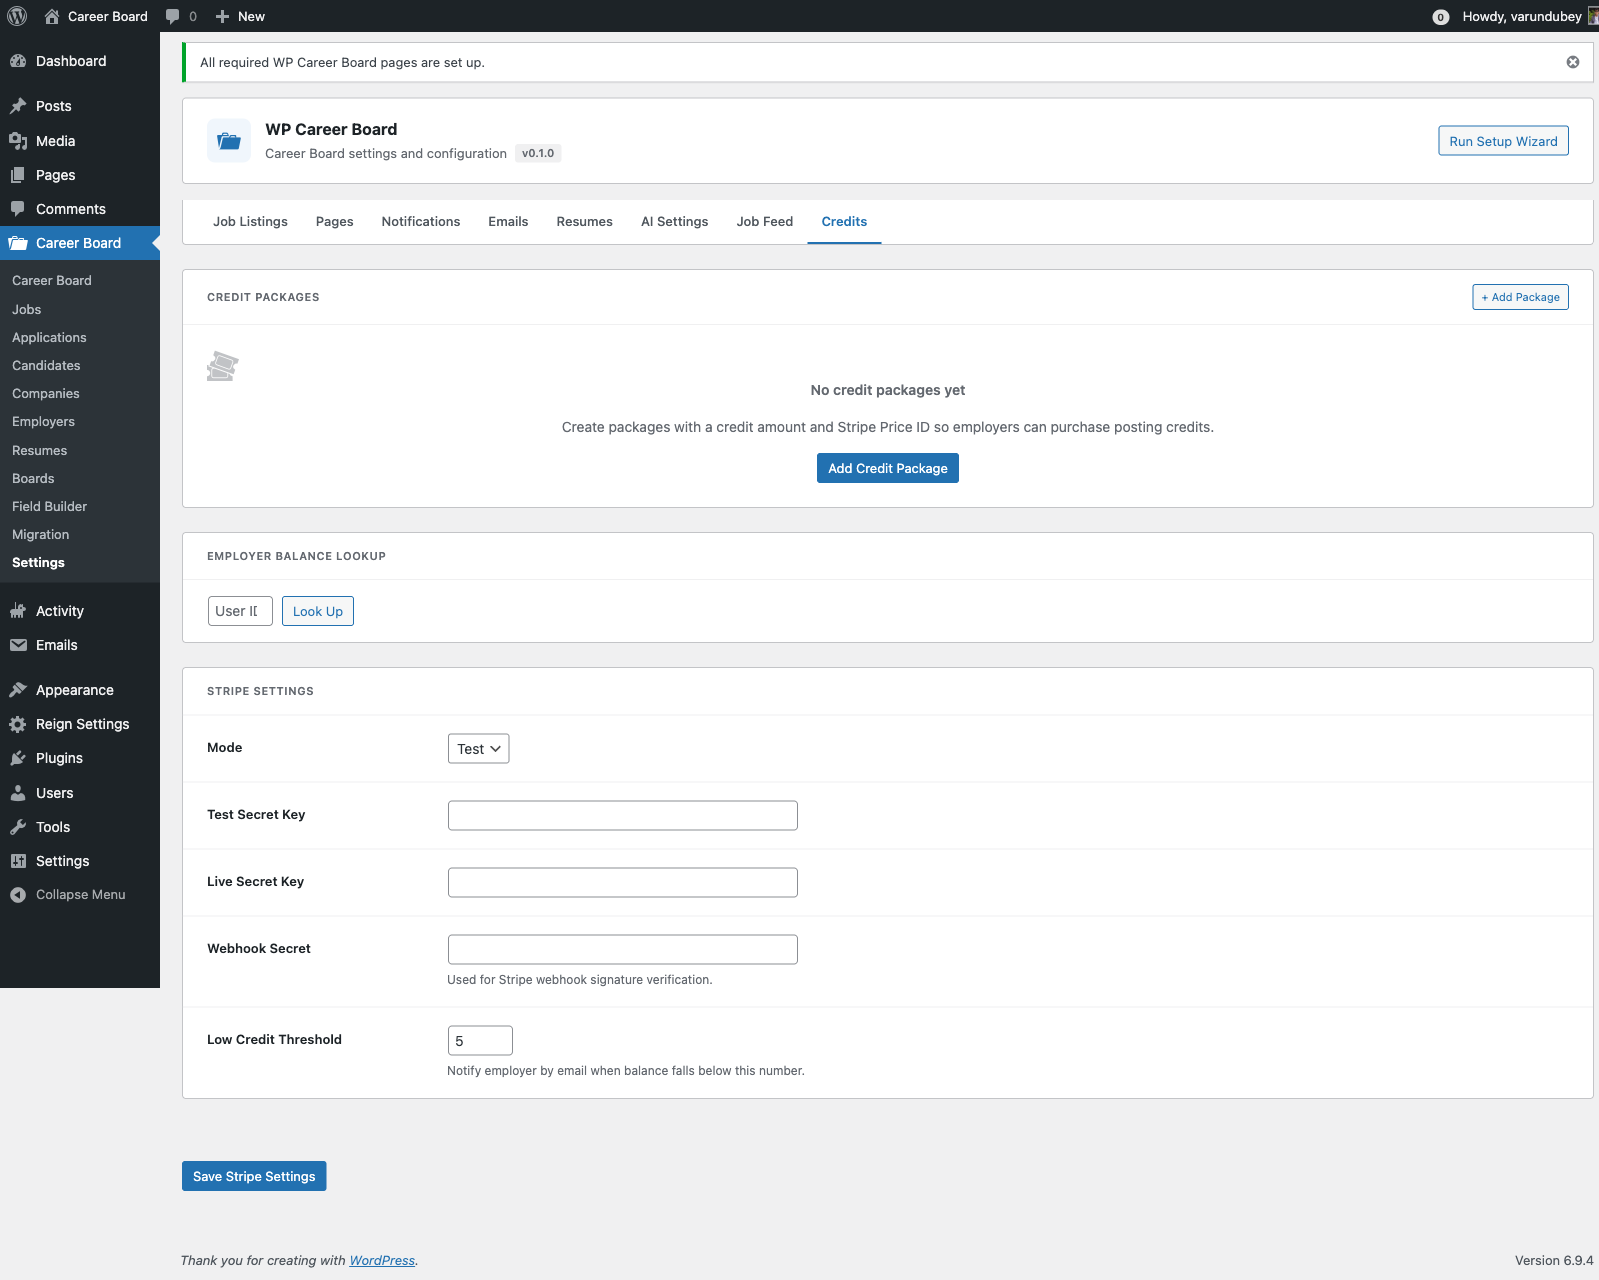
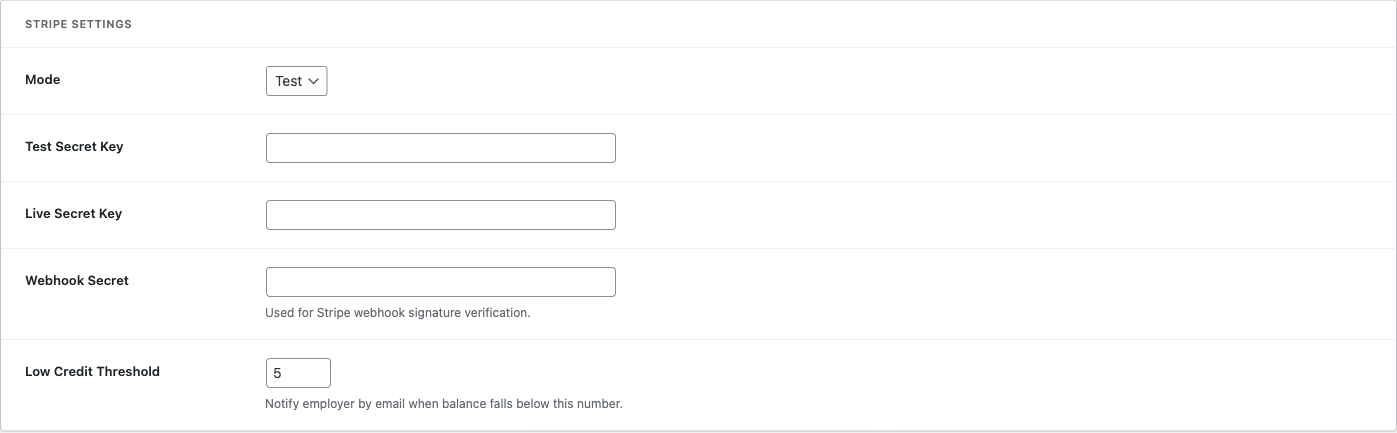
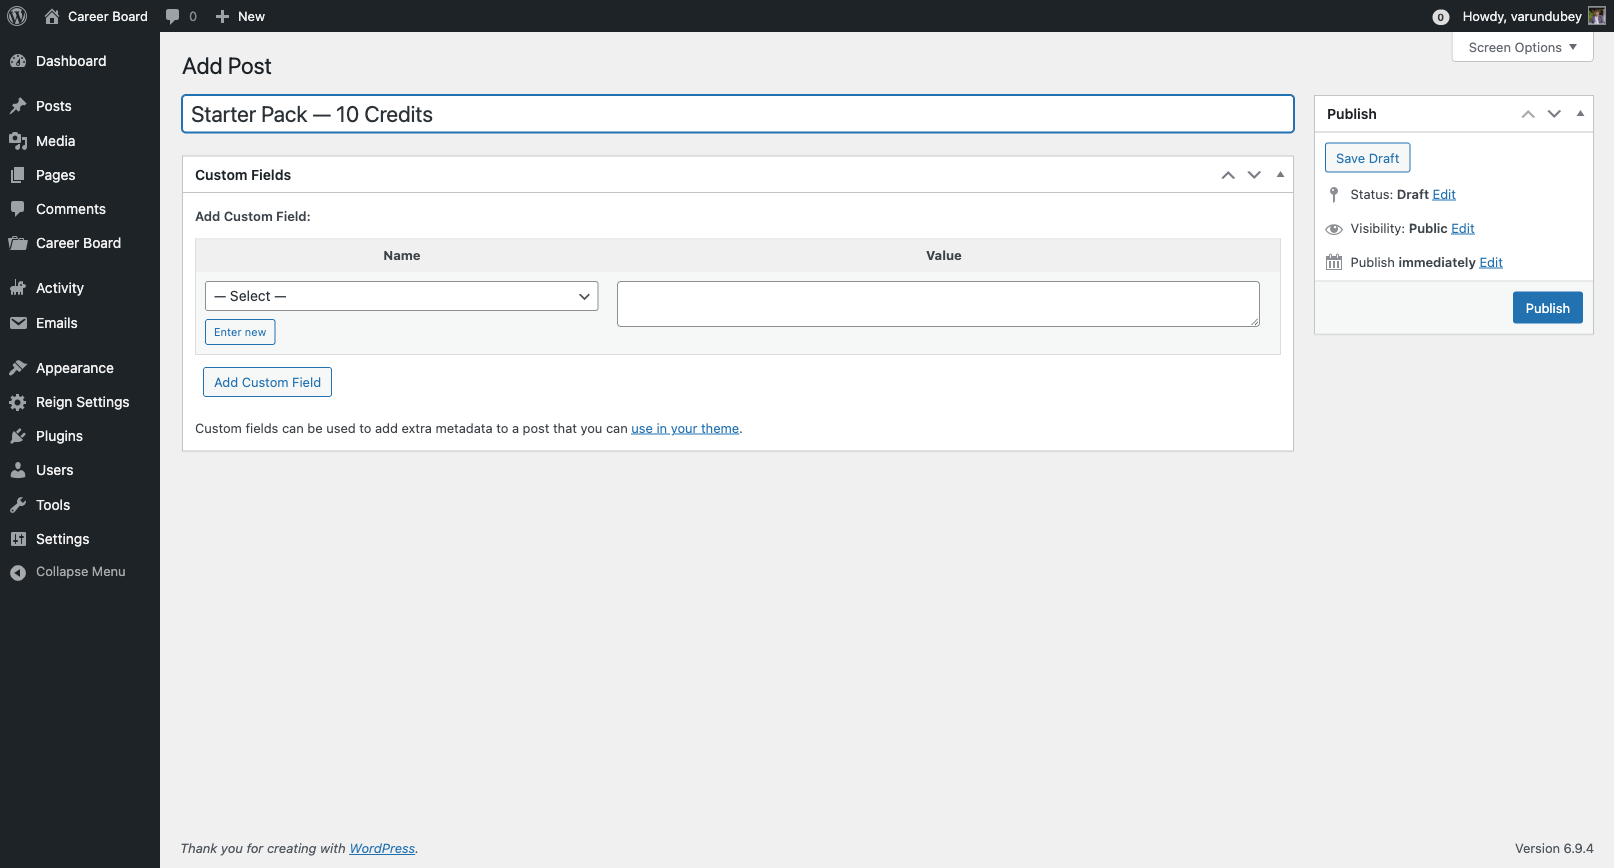
  • Credit system with Stripe payments
  • Multi-board engine
  • Job alerts (saved searches sent by email)
  • AI-powered job matching
  • Map view and radius search
  • Advanced notifications (push, SMS, WhatsApp)

Start free. You can install WP Career Board and run a complete job board at no cost. Upgrade to Pro when you need advanced features.

Installation

WP Career Board is distributed exclusively via wbcomdesigns.com. It is not available on WordPress.org.

Before You Begin

Make sure your site meets these requirements:

  • WordPress 6.9 or higher
  • PHP 8.1 or higher
  • A modern block theme or classic theme (Reign or BuddyX Pro recommended)

Install the Plugin

  1. Log in to your WordPress admin (/wp-admin)
  2. Go to Plugins → Add New → Upload Plugin
  3. Click Choose File and select the wp-career-board.zip file you downloaded from wbcomdesigns.com
  4. Click Install Now
  5. Click Activate Plugin

Plugin Upload Screen

After activation, you will see the WP Career Board menu item in your admin sidebar.

What Gets Created on Activation

When you activate the plugin for the first time, WP Career Board automatically:

  • Creates three custom post types: Jobs, Companies, and Applications
  • Registers job taxonomies: Category, Job Type, Location, Experience Level, and Tag
  • Creates two user roles: Employer and Candidate
  • Adds the WP Career Board top-level menu to wp-admin
  • Launches the Setup Wizard to help you create your pages

After Activation

You will be redirected to the Setup Wizard. The wizard creates all required pages with the correct blocks in about 30 seconds. See Setup Wizard for the full walkthrough.

If you dismiss the wizard, you can run it again any time from WP Career Board → Settings → Run Setup Wizard (the button in the page header).

Updating the Plugin

  1. Download the latest version from your account at wbcomdesigns.com
  2. Go to Plugins → Add New → Upload Plugin
  3. Upload the new zip — WordPress will ask if you want to replace the current version
  4. Click Replace current with uploaded

Note: Your settings, jobs, applications, and user data are preserved on updates.

Setup Wizard

The Setup Wizard is the fastest way to get your job board up and running. It creates all the pages you need in one click.

Setup Wizard — Welcome Screen

What the Wizard Does

The wizard creates the following pages automatically, each with the correct block placed and configured:

Page Block Purpose
Jobs Job Search + Job Filters + Job Listings Main job board browse page
Post a Job Job Form Employers post new jobs
Employer Dashboard Employer Dashboard Employer manages jobs + applications
Candidate Dashboard Candidate Dashboard Candidate tracks applications + saved jobs

It also optionally loads sample data — a set of demo jobs, companies, and applications — so you can see how the board looks with real content before going live.

Running the Wizard

  1. After plugin activation, the wizard launches automatically
  2. Click Get Started
  3. The wizard creates all pages in one step — you will see a progress indicator
  4. Optionally click Load Sample Data to add demo content
  5. Click Go to Dashboard to finish

Setup Wizard — Pages Created

Running the Wizard Again

If you dismissed the wizard or need to reset your pages:

  1. Go to WP Career Board → Settings
  2. Click Run Setup Wizard in the header

Safe to re-run. The wizard checks for existing pages first. If a page with the correct block already exists, it will not create a duplicate.

After the Wizard

Once complete, your site has a working job board. Next steps:

Adding Blocks to Pages

WP Career Board uses WordPress blocks to display everything on the frontend. Each block handles a specific part of the job board experience.

Available Blocks

Block What It Does
Job Listings Reactive grid of jobs — updates on filter/search without page reload
Job Search Keyword search bar for the listings grid
Job Filters Dropdown filters for category, job type, location, and experience level
Job Single Full job detail page with an inline application panel
Job Form Multi-step form for employers to post jobs
Featured Jobs Static grid of featured jobs — good for homepage use
Employer Dashboard Tabbed dashboard: My Jobs, Applications, Company Profile
Candidate Dashboard Tabbed dashboard: My Applications, Saved Jobs, My Resumes (Pro)
Company Profile Public company profile with active job listings
Company Archive Searchable directory of all companies

WP Career Board Pro adds 9 additional blocks: Resume Builder, Find Resumes, Resume Single, Job Map, Job Alerts, AI Chat Search, Application Kanban, Board Switcher, and Credit Balance. See the Pro Blocks Reference for details.

Adding a Block to a Page

  1. Open any page in the WordPress editor (Gutenberg)
  2. Click the + button to add a block
  3. Search for "Career Board" or the block name
  4. Click the block to insert it

Block Inserter — Career Board Blocks

The Job Board Page (Recommended Layout)

For the main jobs page, use this block arrangement in order:

  1. Job Search — sits at the top, provides the search input
  2. Job Filters — sits below search, provides the filter dropdowns
  3. Job Listings — sits below filters, displays the results

All three blocks are connected — they automatically coordinate with each other on the same page. No configuration required.

Jobs Page Layout

Configuring Block Settings

Some blocks have settings you can adjust in the block sidebar:

Job Listings:

  • Jobs per page — how many jobs to show before the "Load more" button (default: 10)
  • Layout — grid (default) or list view

Featured Jobs:

  • Jobs per page — how many featured jobs to display

Company Archive:

  • Companies per page — how many companies per page
  • Layout — grid or list

To access these settings, click the block in the editor and look at the Block panel in the right sidebar.

The Setup Wizard vs Manual Setup

The Setup Wizard creates pages with the correct blocks already placed. You only need to add blocks manually if:

  • You want to embed the job board on an existing page
  • You want a custom layout or custom page template
  • You dismissed the wizard

Tip: If the Setup Wizard already created your pages, you don't need to add blocks manually. Check WP Career Board → Settings → Pages to see which pages are currently assigned.

Installing & Activating WP Career Board Pro

Pro feature — Requires a WP Career Board Pro license from wbcomdesigns.com.

WP Career Board Pro is an add-on plugin. It requires the free WP Career Board plugin to be installed and active first.

Step 1: Install the Pro Plugin

  1. Log in to your account at wbcomdesigns.com
  2. Go to My Account → Downloads
  3. Download wp-career-board-pro.zip
  4. In your WordPress admin, go to Plugins → Add New → Upload Plugin
  5. Select the downloaded zip and click Install Now
  6. Click Activate Plugin

If the free plugin is not active, activation will be blocked with an error message. Install and activate WP Career Board (free) first, then retry.

Step 2: Activate Your License

  1. Go to WP Career Board → Settings → License
  2. Paste your license key in the License Key field
  3. Click Activate License

A confirmation shows your license status, expiry date, and how many sites are using this license.

License Statuses

Status Meaning
Active Valid license, updates available
Expired License period ended — plugin still works but no updates
Inactive Key entered but not yet activated on this site
Invalid Key does not match any license
No activations left All license slots used — deactivate from another site first

License Tiers

Tier Sites
Single Site 1 site
Business 5 sites
Agency Unlimited sites

Deactivating

To move your license to a different site:

  1. Go to WP Career Board → Settings → License
  2. Click Deactivate License
  3. Activate on the new site

You can also manage all site activations from your account at wbcomdesigns.com.

Renewing

The plugin continues to work after expiry — you just stop receiving updates. To renew, log in to wbcomdesigns.com → My Account → Licenses → Renew.

What Activates with Pro

On activation, WP Career Board Pro:

  • Creates additional Pro database tables
  • Adds Pro settings tabs to WP Career Board → Settings
  • Registers 9 additional blocks in the block inserter
  • Enables the Resume Builder, Field Builder, Pipeline, Credit System, Multi-Board, Job Alerts, Job Map, and AI Search modules

For Employers

Post jobs, manage listings, review applications, and build your company profile

Employer Overview

Employers are businesses or individuals who post jobs and manage applications on your job board. This section covers everything an employer can do.

Employer Dashboard Overview

What Employers Can Do

  • Register an account with the Employer role
  • Post new jobs using a guided multi-step form
  • Manage all their job listings (edit, close, re-open, publish)
  • Review and filter incoming applications
  • Set up and edit a public company profile
  • Receive email notifications for new applications

The Employer Role

When a user registers as an employer, they get the Employer role. This gives them access to:

  • The Post a Job page
  • The Employer Dashboard
  • Their own company profile

Admins can also manually assign the Employer role to any user from Users → Edit User in wp-admin.

How Applications Reach Employers

When a candidate applies to a job, the employer sees the application immediately in their dashboard. They get:

  • Applicant name and email
  • Application status (Submitted → Reviewed → Closed)
  • Submission date
  • A direct link to the applicant's profile (if they are a registered candidate)

Section Contents

Post a Job

Employers post jobs using the Job Form block on the Post a Job page. The form is a multi-step wizard that walks through each section of the listing.

Job Form — Step 1

Before You Post

Make sure you are logged in as a user with the Employer role. If you are not logged in, the page will show a prompt to register or log in.

Step-by-Step: Posting a Job

Step 1 — Job Details

Fill in the core information about the role:

  • Job Title — the position name (required)
  • Job Description — full description of the role, responsibilities, and requirements
  • Job Type — Full-time, Part-time, Contract, Freelance, or Internship
  • Experience Level — Entry, Mid, Senior, Lead, or Executive
  • Job Category — select the industry or function category

Step 2 — Location & Salary

  • Location — city, state/country, or Remote
  • Salary — optional; enter a range or a fixed amount
  • Application Deadline — optional; date after which the job closes automatically

Step 3 — Review & Submit

Review all the information you entered. Click Submit Job to post.

Job Form — Review Step

After Submitting

If moderation is ON (default): your job is submitted for admin review. You will see a "Pending review" message. The job goes live after the admin approves it.

If moderation is OFF: your job is published immediately and appears on the job board.

You will receive a confirmation email when your job goes live.

Editing a Submitted Job

You can edit a pending or published job from your Employer Dashboard → My Jobs → Edit. Changes to a published job may require re-approval depending on your admin's settings.

Job Expiry

If your admin has set an expiry period (e.g., 30 days), your job will automatically close on that date. You will receive an email notification before it expires, and you can re-open it from your dashboard.

Manage Your Jobs

The My Jobs tab in the Employer Dashboard shows all the jobs you have posted, with quick actions to manage each one.

Employer Dashboard — My Jobs Tab

Accessing Your Jobs

  1. Go to the Employer Dashboard page (created by the Setup Wizard)
  2. The My Jobs tab is active by default
  3. You will see a list of all your jobs with their current status

Job Statuses

Status Meaning
Published Live on the job board, visible to candidates
Draft Saved but not yet submitted for review
Pending Submitted, waiting for admin approval
Closed No longer accepting applications; hidden from the board
Expired Passed the expiry date; same as Closed

Actions per Job

Each job card shows these quick-action buttons:

  • View ↗ — opens the public job listing in a new tab
  • Edit — opens the job for editing in the job form
  • Close — closes the job and stops accepting applications (published jobs only)
  • Reopen — puts a closed job back on the board (closed jobs only)
  • Publish — submits a saved draft for approval (draft jobs only)

Job Card Actions

Editing a Job

  1. Click Edit on any job
  2. The multi-step Job Form opens pre-filled with the current data
  3. Make your changes and click Update Job

Note: If moderation is enabled, edits to a published job may require re-approval. The job stays live while under review.

Closing a Job

Click Close to stop accepting new applications. The job is removed from the job board listing but the data is preserved. You can reopen it later.

Use this when:

  • You have filled the position
  • You want to temporarily pause applications

Application Count

Each job card shows the number of applications received. Click the count to jump directly to the Applications view for that job.

Review Applications

The Applications view in the Employer Dashboard shows every application received across all your jobs. You can filter by job and update the status of each applicant.

Employer Dashboard — Applications View

Accessing Applications

  1. Open the Employer Dashboard
  2. Click the Applications tab in the top navigation

You will see a list of all applicants across your jobs.

What You See per Applicant

Each application card shows:

  • Applicant name and initials avatar
  • Email address
  • Which job they applied to
  • Application date
  • Current status — see statuses below

Filtering by Job

If you have multiple jobs, use the Filter by job dropdown at the top to see only the applications for a specific listing.

Application Statuses

Status When to use
Submitted Application received — not yet reviewed
Reviewing You are actively reviewing this candidate
Shortlisted Candidate is worth moving forward
Rejected No longer considering this applicant
Hired Offer accepted — position filled
Withdrawn Candidate withdrew their own application

Updating Application Status

Click the status dropdown on any application card to change it. Status changes are saved immediately — no page reload required.

With WP Career Board Pro: the status system is replaced by a fully customizable stage pipeline (Screening → Interview → Offer → Hired/Rejected) with a Kanban board view. See Application Pipeline.

Contacting Applicants

Click the applicant's email address to open a new email in your mail client. All communication happens outside the plugin — WP Career Board does not have a built-in messaging system in the free version.

When Candidates Withdraw

If a candidate withdraws their application, it will be marked as Withdrawn and removed from your active applicant list. The record is still visible in your history.

Company Profile

Every employer gets a public Company Profile page that candidates can browse. It shows your company information and all your active job listings in one place.

Company Profile — Public Page

What the Company Profile Shows

  • Company name and logo
  • Industry and company size
  • Website link
  • "About the Company" description
  • All currently active job listings from this company

Candidates can click through to any individual job listing directly from your company page.

Setting Up Your Profile

You can edit your company profile from two places:

From the Employer Dashboard:

  1. Open the Employer Dashboard
  2. Click the Company Profile tab
  3. Fill in your company details
  4. Click Save

Inline on the public profile page:

  1. Visit your company's public profile page while logged in
  2. Click the Edit icon next to any field
  3. Edit inline and save

Company Profile — Inline Edit

Profile Fields

Field Required Notes
Company Name Yes Displayed as the page title
Logo No Recommended size: 200×200px
Industry No Shown as a tag on company cards
Company Size No e.g., 1–10, 11–50, 51–200
Website No Shown as a clickable link
About the Company No Multi-paragraph description

Company Profile URL

Your company profile URL is automatically generated from your company name: yourdomain.com/company/your-company-name/

Who Sees the Company Profile

The Company Profile page is public — any visitor can see it, even without an account. The Company Archive page (if enabled) lets visitors browse all companies on your board.

Tip: A complete company profile with a logo and description significantly increases candidate trust and application rates.

Application Pipeline

Pro feature — Requires WP Career Board Pro.

The Application Pipeline replaces the free version's status system (Submitted / Reviewing / Shortlisted / Rejected / Hired) with a fully customizable ATS-style stage workflow and a visual Kanban board.

Application Pipeline — Kanban Board

Free vs Pro

Free Pro
Application statuses Submitted, Reviewing, Shortlisted, Rejected, Hired Any custom stages you define
Pipeline view List only Kanban board + list
Terminal outcomes Rejected / Hired Hired / Rejected (configurable, per-board)
Stage history No Yes

Default Stages

When you first enable the Pipeline, these stages are created automatically:

  1. Submitted (starting stage)
  2. Screening
  3. Interview
  4. Offer
  5. Hired (terminal — outcome: Hired)
  6. Rejected (terminal — outcome: Rejected)

You can rename, add, reorder, or delete any of these.

Configuring Your Stages

Go to WP Career Board → Boards, then open the board you want to configure and click the Stages tab.

Adding a Stage

  1. Click + Add Stage
  2. Enter the stage name (e.g., "Technical Test")
  3. Choose a color for the stage badge
  4. Toggle Terminal stage on if this is a final outcome
  5. If terminal, select the outcome: Hired or Rejected
  6. Click Save

Stage Colors

Choose colors that give instant visual meaning:

  • Green tones → positive stages (Offer, Hired)
  • Red tones → rejections
  • Blue/gray tones → neutral stages (Screening, Interview)

Terminal Stages

When you move a candidate to a terminal stage:

  • Their application status is automatically set to Closed
  • If outcome is Hired — the job's hired counter increments
  • If outcome is Rejected — the candidate receives a rejection email (if enabled)

You must have at least one Hired terminal stage and one Rejected terminal stage.

Reordering and Deleting

  • Reorder: Drag and drop stage rows — order determines Kanban column order (left to right)
  • Delete: If applications are in that stage, you'll be asked to move them to another stage first

Using the Kanban Board

  1. Open Employer Dashboard → Applications
  2. Click Kanban View in the top right

Each column is a stage. Drag applicant cards between columns to move candidates through your pipeline. Click any card to open the full application details.

Bulk Moving

In list view, select multiple candidates with checkboxes, then use the Move to Stage dropdown to move all at once.

Per-Board Stages

If you use the Multi-Board Engine, each board has its own stage configuration. Go to WP Career Board → Boards, select the board, and configure its stages independently.

Find Resumes

Pro feature — Requires WP Career Board Pro.

The Find Resumes block displays a public-facing archive of candidate resumes. Employers and admins can browse candidate profiles filtered by skills, location, and job title — without waiting for candidates to apply.

How It Works

Candidates build their resumes using the Resume Builder. When a candidate sets a resume to Public, it appears in the Find Resumes archive. Resumes set to Private are never shown here.

Employers can browse the archive, filter by skills and location, and click through to a full resume page.

Adding Find Resumes to a Page

  1. Create a new page (e.g., "Find Candidates" or "Resume Database")
  2. In the WordPress editor, add the Find Resumes block
  3. Publish the page

No settings configuration is required — the block renders all public resumes automatically.

Filtering

Visitors can filter resumes by:

  • Skills — matches against the Skills section of each resume
  • Location — matches against the candidate's listed location
  • Job Title — keyword match against the candidate's most recent job title

Filters update the list without a page reload.

Candidate Privacy

Candidates control their resume visibility:

  • Private (default) — visible only to employers who receive an application from that candidate
  • Public — visible in the Find Resumes archive

Candidates can change visibility at any time from the Resume Builder or their dashboard.

Linking to Resume Single Page

When a visitor clicks a resume in the archive, they are taken to the Resume Single page — a full formatted view of that candidate's resume. The Resume Single block handles this display.

To enable this:

  1. Create a page with the Resume Single block
  2. Assign it in WP Career Board → Settings → Pages → Resume Page

For Candidates

Find jobs, apply, track applications, and manage your candidate profile

Candidate Overview

Candidates are job seekers who browse listings and apply on your job board. They get a personal dashboard to manage all their activity in one place.

Candidate Dashboard Overview

What Candidates Can Do

  • Browse and search job listings
  • Filter jobs by category, type, location, and experience level
  • Bookmark jobs to review and apply later
  • Apply for jobs with a cover letter
  • Track all applications and their statuses from a single dashboard
  • Receive email notifications when their application status changes

The Candidate Role

When a user registers as a candidate, they get the Candidate role. This gives access to:

  • The Candidate Dashboard
  • The ability to apply for jobs
  • The saved jobs (bookmarks) list

Admins can manually assign the Candidate role from Users → Edit User in wp-admin.

Guest Applications

Candidates can apply without creating an account. Guest applicants provide their name and email during the application. They receive email updates but do not have a dashboard.

Tip for your users: Creating an account gives candidates the ability to track all applications, save jobs, and build a profile. Encourage registration.

Section Contents

Finding Jobs

The job board gives candidates a fast, reactive way to browse and narrow down listings — no page reloads, no waiting.

Job Listings Page

Browsing the Job Board

Visit the Jobs page on your site. You will see a grid of all currently active job listings, each showing:

  • Job title
  • Company name and logo
  • Location
  • Job type (Full-time, Part-time, etc.)
  • Posted date
  • Salary (if provided by the employer)

Click any card to open the full job detail page.

Searching by Keyword

Use the Search bar at the top of the job board to find jobs by keyword. The search looks through job titles and descriptions. Results update as you type.

Job Search Bar

Filtering Jobs

Use the Filter dropdowns to narrow results by:

Filter Options
Category Industry or function (e.g., Engineering, Marketing, Design)
Job Type Full-time, Part-time, Contract, Freelance, Internship
Location Country, state, or city
Experience Level Entry, Mid, Senior, Lead, Executive

You can combine multiple filters. Results update instantly after each selection.

To remove all filters at once, click Clear all in the filter bar.

Loading More Jobs

The job board loads a set number of jobs at a time (set by your admin). When you reach the bottom, click Load more to see additional listings.

Viewing a Job

Click any job card to open the full detail page. You will see:

  • Full job description
  • Company information with a link to the company profile
  • Application deadline (if set)
  • Salary range
  • Job type, location, and experience level
  • An Apply Now button to start the application

Job Single Page

Saving a Job for Later

Click the bookmark icon on any job card or job detail page to save it. Saved jobs appear in your Candidate Dashboard → Saved Jobs tab.

You can remove a saved job at any time from the dashboard.

Applying for Jobs

Applying is quick — candidates fill out a short form that slides in from the right side of the job listing page. No redirects, no new pages.

Application Panel — Slide-in Form

Before You Apply

You can apply as a guest (no account required) or as a registered candidate.

Registered candidates get:

  • A dashboard to track all their applications
  • Saved application history
  • Email updates on every status change

How to Apply

  1. Open a job listing page
  2. Click Apply Now — an application panel slides in from the right
  3. Fill in the form fields
  4. Click Submit Application

Application Form Fields

Field Requirement
Full Name Required (pre-filled if logged in)
Email Address Required (pre-filled if logged in)
Cover Letter Optional — but strongly recommended
Attach Resume Shown if the employer requires it

With WP Career Board Pro: candidates can attach resumes they built inside the platform, and employers can add custom screening questions to each job.

What Happens After You Apply

  1. You receive a confirmation email with the job title and company name
  2. The employer receives a notification email about your application
  3. Your application appears in your Candidate Dashboard → My Applications with status Submitted

Withdrawing an Application

If you change your mind:

  1. Go to your Candidate Dashboard → My Applications
  2. Find the application you want to withdraw
  3. Click Withdraw

The employer will see your application marked as Withdrawn. You cannot resubmit after withdrawing.

Application Limits

There is no limit to how many jobs a candidate can apply for on the free version.

Applying Without an Account

Guest applicants (no account):

  • Enter their name and email in the application form
  • Receive email confirmation
  • Cannot track their application status (no dashboard access)
  • Cannot withdraw their application

To track your application status, register as a candidate before applying.

My Applications

The My Applications tab in the Candidate Dashboard shows every job you have applied for and its current status.

Candidate Dashboard — My Applications Tab

Accessing My Applications

  1. Go to the Candidate Dashboard page
  2. The My Applications tab is active by default
  3. You will see all your applications listed newest first

What You See per Application

Each application card shows:

  • Job title and company name
  • Application date
  • Current status — updated by the employer
  • A link to view the original job listing

Application Statuses

Status What It Means
Submitted Your application was received; the employer hasn't reviewed it yet
Reviewing The employer is actively looking at your application
Shortlisted You're being considered — the employer is interested
Rejected The employer is no longer considering your application
Hired Congratulations — you got the job
Withdrawn You withdrew your application

Status updates: You will receive an email notification whenever your application status changes.

Withdrawing an Application

To withdraw from a role you are no longer interested in:

  1. Find the application in the list
  2. Click the Withdraw button
  3. Confirm in the prompt

Once withdrawn, you cannot resubmit. The employer will see the application marked as Withdrawn.

Overview Panel

The Overview tab at the top of the dashboard shows a summary of your recent activity:

  • Total applications submitted
  • Number of shortlisted applications
  • 4 most recent applications
  • Recently saved jobs

This gives you a quick snapshot without switching between tabs.

Saved Jobs

Save any job listing to your personal list so you can come back to apply when ready.

Candidate Dashboard — Saved Jobs Tab

Saving a Job

You can bookmark a job from two places:

From the job listings grid:

  • Click the bookmark icon in the top-right corner of any job card

From the job detail page:

  • Click the Save Job button on the listing page

Both require you to be logged in as a candidate. If you are not logged in, clicking the bookmark will prompt you to register or log in.

Viewing Your Saved Jobs

  1. Open the Candidate Dashboard
  2. Click the Saved Jobs tab

You will see all your bookmarked jobs listed with:

  • Job title and company name
  • Location and job type
  • Date saved
  • A Remove button

Removing a Saved Job

Click Remove on any saved job to delete it from your list. This does not affect any application you may have already submitted.

Applying from Saved Jobs

Saved jobs include a direct Apply Now link so you can apply without going back to the main listings page.

Tip: Use Saved Jobs as your personal shortlist. Browse the board first, bookmark the ones that interest you, then review your list and apply to the best matches.

Limit

There is no limit to how many jobs you can save.

Resume Builder

Pro feature — Requires WP Career Board Pro.

The Resume Builder lets candidates create structured, multi-section resumes directly on your WordPress site — no PDF uploads, no external tools required.

Resume Builder — Full View

What Candidates Can Build

A resume is made up of sections. Each section holds structured entries:

Section What it stores
Professional Summary A free-text overview paragraph
Work Experience Job title, company, dates, description
Education Degree, institution, dates
Skills Skill name and optional proficiency level
Languages Language name and proficiency
Certifications Certificate name, issuing body, date
Links Portfolio, GitHub, LinkedIn, etc.

Admin Setup

Before candidates can use the Resume Builder, set it up in two steps:

  1. Create a page and add the Resume Builder block to it
  2. Go to WP Career Board → Settings → Pages and assign that page to the Resume Builder Page field

Once assigned, the Candidate Dashboard's My Resumes tab will link to this page automatically.

My Resumes Tab

Candidates access their resumes from Candidate Dashboard → My Resumes.

My Resumes Tab — Dashboard

From this tab, candidates can:

  • See all saved resumes with their last-updated date
  • Click Edit to open a resume in the builder
  • Click Create New Resume to start a new one
  • Click Delete to permanently remove a resume

Using the Resume Builder

The builder is organized into collapsible sections. Click any section header to expand it.

Resume Builder — Sections

Adding Entries

  1. Open any section (e.g., Work Experience)
  2. Click + Add Entry
  3. Fill in the fields
  4. Click Save on the entry

The entry appears as a compact row. Click it to expand and edit again.

Entry Fields

Work Experience: Job Title, Company, Start Date, End Date, "Currently working here" toggle, Description

Education: Degree / Qualification, Institution, Start Year, End Year, Field of Study

Skills: Skill name, Proficiency level (Beginner / Intermediate / Advanced / Expert)

Languages: Language name, Proficiency (Native / Fluent / Conversational)

Certifications: Certificate name, Issuing organization, Issue date

Links: URL, Label (e.g., "Portfolio", "GitHub")

Auto-Save

The Resume Builder saves each entry individually when you click Save on that entry. There is no global save button. A "Saved" confirmation briefly appears after each save.

Multiple Resumes

Candidates can create more than one resume — for example, one for engineering roles and one for management roles. The dashboard lists all resumes with their last-updated date.

Attaching a Resume to an Application

When a candidate applies for a job, they can select one of their saved resumes to attach. The employer sees the full structured resume on the application — not a PDF attachment.

Resume Visibility

  • Private (default) — visible only to the candidate and employers who receive applications from them
  • Public — visible in the Find Resumes employer archive

Candidates toggle visibility in the Resume Builder header.

Job Alerts

Pro feature — Requires WP Career Board Pro.

Job Alerts let candidates subscribe to saved searches and receive email notifications when new matching jobs are posted. Candidates set a frequency — instant, daily, or weekly — and WP Career Board sends digests automatically.

How It Works

  1. A candidate searches or filters jobs on your board
  2. They click Save Alert in the Job Alerts block
  3. New jobs that match their saved filters trigger an email at their chosen frequency
  4. Every alert email includes an unsubscribe link

Adding the Job Alerts Block

Add the Job Alerts block to your jobs page. The recommended placement is below the Job Filters block:

[ Job Search ]
[ Job Filters ]
[ Job Alerts  ]  ← subscribe to current search
[ Job Listings ]

The block automatically reads the current search state — whatever filters the visitor has applied become the alert criteria when they subscribe.

Alert Frequency Options

Frequency When the email sends
Instant As soon as a matching job is posted
Daily Once per day (morning digest)
Weekly Once per week

Candidates choose their preferred frequency at the time of subscription and can change it from their dashboard.

Candidate Experience

Logged-In Candidates

Logged-in candidates see a Save as Alert button in the Job Alerts block. After clicking:

  1. A frequency selector appears (Instant / Daily / Weekly)
  2. They click Save Alert
  3. The alert is active immediately

Guest Visitors

Guests are asked for their email address. After submitting, they receive a confirmation email with a double opt-in link. The alert only activates after they confirm.

Managing Alerts

Candidates manage their active alerts from Candidate Dashboard → My Alerts:

  • View all active alerts with their saved filters
  • Change frequency
  • Delete an alert

Admin: Viewing Alerts

Admins can view all active alerts per user from WP Career Board → Candidates → [candidate name] → Alerts.

Email Delivery

Alert emails are sent via the Notifications settings configured in WP Career Board → Settings → Notifications (From Name, From Email). Configure an SMTP plugin for reliable delivery.

Admin Guide

Settings, moderation, email notifications, GDPR, and troubleshooting

Settings

Configure WP Career Board from WP Career Board → Settings in wp-admin. Settings are organized into tabs.

Settings Page — Job Listings Tab

Job Listings Tab

Controls how jobs behave on your board.

Setting Default Description
Auto-Publish Jobs Off When on, submitted jobs go live immediately without admin approval
Jobs Per Page 10 Number of jobs shown per page in the listings grid
Job Expiry (days) 30 Jobs close automatically after this many days; 0 = no expiry
Deadline Auto-Close Off Automatically closes jobs when their application deadline passes
Allow Withdraw Off Lets candidates withdraw their own applications
Default Salary Currency USD Site-wide default currency for new job postings; employers can override per job

Pages Tab

Links each feature to its dedicated page. If the Setup Wizard ran successfully, these are filled in automatically.

Setting Purpose
Jobs Page The main job board browse page
Post a Job Page The page with the Job Form block
Employer Dashboard Page The employer's management page
Candidate Dashboard Page The candidate's tracking page

If a page assignment is blank, the related functionality (e.g., "View your dashboard" links in emails) won't work correctly. Always fill these in.

With WP Career Board Pro: a "Resume Builder Page" setting is also shown here.

Notifications Tab

Controls the sender name, from email, and admin notification email address used by all WCB emails. See Email Notifications for the full guide.

Emails Tab

Lets you enable or disable each individual email notification and customize its subject line and body. See Email Notifications for placeholders and customization options.

Pro-Only Tabs

When WP Career Board Pro is active, three additional tabs appear:

Tab What It Controls
Resumes Enables the resume builder, sets the Resume Builder page
AI Settings Configures the AI provider key for AI Chat Search
Job Feed RSS/JSON feed settings for job listings
Credits Stripe API keys, webhook secret, and credits-per-job-post value

Saving Settings

Click Save Changes at the bottom of any tab. Settings are saved per-tab — you don't need to switch tabs before saving.

Email Notifications

WP Career Board sends automatic emails for key events. All emails use WordPress's built-in wp_mail() function and are fully customizable.

Email Notifications Settings

Notification Events

Email Sent To Trigger
New Application Received Employer A candidate submits an application
Application Status Changed Candidate Employer updates application status (Reviewed, Shortlisted, Closed)
Application Withdrawn Employer Candidate withdraws their application
Job Approved Employer Admin approves a pending job listing
Job Rejected Employer Admin rejects a pending job listing
Job Expiry Reminder Employer Job is about to expire (sent 3 days before)
Job Expired Employer Job has expired and been closed
New Employer Registration Admin A new user registers as an employer
New Candidate Registration Admin A new user registers as a candidate

Managing Notifications

Go to WP Career Board → Settings → Emails.

Each notification can be:

  • Enabled or disabled — toggle the switch to turn it on or off
  • Customized — edit the email subject and body text

Click the email name to expand the editor for that notification.

Email Placeholders

Use these placeholders in email subjects and bodies — they are replaced with real values when the email sends:

Placeholder Value
{job_title} The job listing title
{company_name} The employer's company name
{candidate_name} The applicant's full name
{application_status} Current status of the application
{dashboard_url} Link to the employer or candidate dashboard
{job_url} Link to the job listing page
{site_name} Your WordPress site name

Email From Name and Address

Go to WP Career Board → Settings → Notifications to set:

  • From Name — the sender name shown in inboxes (e.g. "Career Board")
  • From Email — the reply-to address for all WCB emails
  • Admin Notification Email — where new job and registration alerts are sent

SMTP / Deliverability

For reliable email delivery, use an SMTP plugin (WP Mail SMTP, FluentSMTP, or similar). WordPress's built-in mail function can land in spam without SMTP configuration.

With WP Career Board Pro: advanced notification channels are available — SendGrid, Mailgun, Amazon SES, Twilio SMS, and browser push notifications via VAPID keys.

Moderation

Moderation controls whether jobs need admin approval before they go live. It prevents spam and low-quality listings on your board.

How Moderation Works

When Auto-Publish Jobs is turned off (the default), every job submitted by an employer goes to a Pending state and must be approved by an admin before it appears on the job board.

When Auto-Publish Jobs is turned on, submitted jobs go live immediately without review.

To toggle moderation: WP Career Board → Settings → Job Listings → Auto-Publish Jobs

Reviewing Pending Jobs

  1. Go to WP Career Board → Jobs in wp-admin
  2. Click the Pending filter at the top of the list
  3. Click any job title to open the full edit screen and review the content

Admin Jobs — Pending Filter

Approving a Job

Quick approval (from the list):

  1. Hover over the job in the list
  2. Click Approve under the title

Full review (from the edit screen):

  1. Open the job in the wp-admin editor
  2. Review all details
  3. Change the status to Published in the Post Status panel
  4. Click Update

When a job is approved, the employer receives an email notification.

Rejecting a Job

  1. Open the job in the wp-admin editor
  2. Change the status to Draft or Trash
  3. Optionally email the employer with a reason (done manually outside the plugin)

Managing Existing Jobs

Admins have full control over all jobs from WP Career Board → Jobs:

  • Edit any job (correct errors, add missing info)
  • Close a job that is running too long
  • Delete spam or low-quality listings

Admin Notifications

Admins receive an email when:

  • A new employer registers
  • A new candidate registers

These keep you informed of who is joining your board. Notification content can be customized in Settings → Notifications.

GDPR & Privacy

WP Career Board integrates with WordPress's built-in privacy tools to help you comply with GDPR and similar data protection regulations.

What Data WP Career Board Stores

Per employer:

  • Company name, logo, description, website, size, industry
  • Posted job listings

Per candidate:

  • Name and email address
  • Cover letters submitted
  • Application history and status

System logs:

  • Application timestamps

Data Export

WordPress has a built-in personal data export tool. WP Career Board integrates with it so all job board data for a user is included.

To export a user's data:

  1. Go to Tools → Export Personal Data in wp-admin
  2. Enter the user's email address
  3. Click Send Request
  4. The user receives an email with a link to download their data export

The export includes all applications, cover letters, and profile data associated with that email address.

Data Erasure

To erase a user's personal data:

  1. Go to Tools → Erase Personal Data in wp-admin
  2. Enter the user's email address
  3. Click Send Request
  4. The user confirms via email
  5. After confirmation, WordPress erases all personal data including WP Career Board records

Note: Erasing a user's data removes their applications and profile. Job listings posted by an employer are not automatically deleted — you may need to manually remove those.

Privacy Policy Page

Add the following to your privacy policy to inform users what data WP Career Board collects:

  • Account registration data (name, email)
  • Job applications including cover letters
  • Activity logs for job board interactions
  • No payment data is stored (payments processed by Stripe in Pro version)

Cookie Usage

WP Career Board does not set any cookies in the free version. Session state (e.g., active dashboard tab) is stored in sessionStorage (browser memory only, not a cookie, cleared when the browser tab closes).

Custom Field Builder

Pro feature — Requires WP Career Board Pro.

The Field Builder lets you add custom fields to job listings, company profiles, and candidate profiles — no code required. Fields appear automatically in the relevant forms and public pages.

Field Builder — Admin Interface

What You Can Add

  • Fields to job listings — e.g., Remote Policy, Visa Sponsorship, Tech Stack
  • Fields to company profiles — e.g., Funding Stage, Team Size, Benefits
  • Fields to candidate profiles — e.g., Notice Period, Preferred Work Style, Portfolio URL

Accessing the Field Builder

Go to WP Career Board → Field Builder in wp-admin.

You will see three tabs:

  • Job Fields — fields added to job listings
  • Company Fields — fields added to company profiles
  • Candidate Fields — fields added to candidate profiles

Creating a Field Group

Fields are organized into groups — collapsible sections with a label (e.g., "Compensation Details").

  1. Click Add Group
  2. Enter a group label
  3. Click Save Group

You can create multiple groups to organize related fields.

Adding a Field

  1. Expand the group where you want to add the field
  2. Click + Add Field
  3. Configure the field:
Setting Description
Field Label The label shown on the form and public page
Field Type Text, Textarea, Number, Select, Checkbox, Date, URL, File Upload
Required Whether the field must be filled in
Visibility Public, Logged In Only, Employer Only, Candidate Only
Placeholder Hint text shown inside the input
Options The choices available (for Select and Checkbox fields)
  1. Click Save Field

Adding a Custom Field

Field Types

Type Use for
Text Short values — tech stack, notice period, LinkedIn URL
Textarea Longer text — benefits overview, culture note
Number Salary, team size, years of experience
Select Single-choice dropdown — Remote Policy, Visa Sponsorship
Checkbox Group Multiple choices — Benefits, required skills
Toggle Single on/off — "Visa sponsorship available?"
Date Application deadline, estimated start date
URL Portfolio, GitHub, external job link
File Upload Attach a PDF, document, or image

Visibility Rules

Each field can be set to:

  • Public — visible to all visitors including guests
  • Logged in only — visible to registered users only
  • Employer only — visible only to employers (e.g., on the job form)
  • Candidate only — visible only to candidates

Reordering

Drag and drop fields within a group to reorder them. Drag and drop groups to change their order. Changes save automatically.

Deleting a Field

Click Delete on any field. This permanently removes the field and all stored values across all posts. This cannot be undone.

Where Fields Appear

Field Type Appears in Displayed on
Job Fields Multi-step Job Form Job single page
Company Fields Company Profile editor Public company page
Candidate Fields Candidate profile settings Candidate profile

Credit System

Pro feature — Requires WP Career Board Pro.

The Credit System lets you charge employers credits to post jobs. You sell credit packages, employers buy credits via Stripe Checkout, and credits are deducted automatically when jobs go live.

How It Works

  1. Admin sets the price — configure how many credits a job post costs
  2. Admin creates packages — define credit bundles to sell (e.g., "5 credits for $49")
  3. Employer buys credits — pays via Stripe Checkout, credits added instantly
  4. Credits held on submit — when the employer submits a job, the required credits are reserved
  5. Credits deducted on approval — when the job goes live, credits are consumed
  6. Refund on rejection — if the admin rejects a job, held credits are returned

Credit Ledger

Every transaction is logged in an append-only audit trail:

Type Effect
Top-up Credits added (from a purchase)
Hold Credits reserved (job submitted, awaiting approval)
Deduct Credits consumed (job approved and live)
Refund Credits returned (job rejected or cancelled)

Step 1: Configure Stripe

WP Career Board Pro uses Stripe Checkout to process purchases. Your site must be on HTTPS.

Getting Your Stripe Keys

  1. Log in to your Stripe Dashboard
  2. Go to Developers → API Keys
  3. Copy your Publishable key and Secret key

Use Test mode keys while testing, then switch to live keys when ready.

Adding Keys to WP Career Board

  1. Go to WP Career Board → Settings → Credits
  2. Paste your Publishable Key and Secret Key
  3. Click Save Changes

Credits Settings — Stripe Keys

Setting Up the Webhook

Stripe sends a webhook to your site when a payment completes. This is how credits are added after a purchase.

  1. In your Stripe Dashboard, go to Developers → Webhooks → Add Endpoint
  2. Enter your webhook URL:
    https://yourdomain.com/wp-json/wcb/v1/stripe/webhook
    
  3. Select events: checkout.session.completed, payment_intent.succeeded, payment_intent.payment_failed
  4. Click Add Endpoint, then copy the Webhook Signing Secret
  5. Paste the signing secret into WP Career Board → Settings → Credits → Webhook Secret

Stripe Webhook Configuration

Test a Purchase

Use Stripe's test card 4242 4242 4242 4242 (any future expiry, any CVC) to verify credits are added correctly before going live.

Step 2: Create Credit Packages

Go to WP Career Board → Credit Packages → Add New.

Credit Packages — Add New

Field Description
Package Name Shown to employers (e.g., "Starter Pack")
Credits Included How many credits this package provides
Price The purchase price
Description Optional short note (e.g., "Best for small businesses")
Featured Highlight this package in the purchase UI

Example tiered structure:

Package Credits Price
Starter 3 credits $29
Growth 10 credits $79
Agency 25 credits $149

Step 3: Set Job Post Cost

  1. Go to WP Career Board → Settings → Credits
  2. Set Credits per Job Post
  3. Click Save Changes

Setting this to 0 makes job posting free — the credit system stays active but no credits are consumed.

Employer Experience

Employers see their credit balance in:

  • The Employer Dashboard header
  • The Confirm & Submit step of the Job Form

When their balance is too low, they see a "Buy Credits" prompt with your available packages. The purchase flow runs via Stripe Checkout without leaving your site.

Employer Dashboard — Credit Balance

Granting Credits Manually

  1. Go to WP Career Board → Employers
  2. Click the employer's name
  3. In the Credits section, enter the number to add and an optional note
  4. Click Add Credits

Useful for compensating employers after a rejected job or offering trial credits.

Viewing the Credit Ledger

The full transaction history for any employer is visible from their admin profile — every top-up, hold, deduction, and refund with timestamps and notes.

Troubleshooting & FAQ

Common issues and how to resolve them.


Setup Wizard

The wizard says "Failed to create pages" and won't advance

The wizard calls the WordPress REST API to create pages. This can fail when:

  • Pretty permalinks are off — go to Settings → Permalinks, select any option other than Plain, and save.
  • REST API is blocked — a security plugin, firewall, or hosting rule is blocking /wp-json/. Temporarily deactivate security plugins and try again.
  • Auth cookie not sent — if your site uses basic HTTP auth (common on staging), the REST request won't carry your session. Disable basic auth temporarily or add an exception for /wp-json/.

After fixing the underlying issue, go to WP Career Board → Settings → Run Setup Wizard to run the wizard again.


Pages were created but they're blank or show a 404

The pages were created but may not have the correct block assigned. Edit each page in the block editor and insert the matching block:

Page Block to insert
Jobs Job Listings
Post a Job Post a Job Form
Candidate Dashboard Candidate Dashboard
Employer Dashboard Employer Dashboard

Then go to Settings → Permalinks and click Save Changes to flush rewrite rules.


Jobs Not Appearing

The Job Listings block shows "No jobs found"

  1. Confirm you have published jobs — go to WP Career Board → Jobs and check the status column.
  2. If jobs are pending review, go to WP Career Board → Settings → Job Listings and check whether Auto-Publish Jobs is enabled. If off, you need to approve each job manually from the Jobs list.
  3. Check your active filters in the block — the Job Type, Category, or Location filters may be set to a value that returns no results.
  4. Go to Settings → Permalinks and click Save Changes to flush rewrite rules.

Jobs appear in wp-admin but not on the frontend

This is almost always a permalink flush issue. Go to Settings → Permalinks and click Save Changes.


Application Form

The "Apply" button does nothing / the application form doesn't open

  • Make sure the candidate is logged in. Guest applications are only available if enabled in WP Career Board → Settings → Job Listings → Guest Applications.
  • If using a page caching plugin (WP Rocket, W3 Total Cache), purge the cache after activating WP Career Board.
  • Check the browser console for JavaScript errors — a JavaScript conflict with another plugin can prevent the form from loading.

Candidates can't submit the application form

  • The job may have a deadline that has already passed. Check the job listing's deadline field.
  • If the job requires a resume upload and the candidate has no resume, the form will block submission. Check if Require Resume is enabled for that job type.
  • Make sure file upload limits in your hosting's php.ini (upload_max_filesize, post_max_size) are large enough for resume files (recommend at least 5 MB).

Email Notifications

Emails are not being sent

WP Career Board uses wp_mail() to send emails. If emails aren't arriving:

  1. Check spam — the notification emails from a local WordPress install often land in spam.
  2. Install an SMTP plugin — the default wp_mail() uses PHP's mail() function, which most shared hosts reject. Install an SMTP plugin (e.g. WP Mail SMTP, FluentSMTP) and connect it to a transactional email service (Mailgun, SendGrid, Postmark).
  3. Verify the sender address — go to WP Career Board → Settings → Notifications and confirm the From email matches your domain. Some hosts reject mail from mismatched domains.
  4. Check notification toggles — each notification type can be toggled off in Settings → Notifications. Confirm the relevant notification is enabled.

The wrong email address is receiving notifications

Admin notification emails go to the address set in Settings → Notifications → Admin Email. This defaults to the WordPress admin email but can be overridden.


Employer & Candidate Accounts

A user registered but isn't showing up as an Employer or Candidate

The role is assigned at registration based on which registration form the user used:

  • Employers register via the Employer Dashboard page (which contains the Employer Dashboard block).
  • Candidates register via the Candidate Dashboard page.

If a user registered via the standard WordPress login page, they won't have a job board role. Go to WP Career Board → Employers or Candidates and manually assign the user.

An employer can't post jobs

  1. Check the employer's account in WP Career Board → Employers — confirm they have the Employer role.
  2. If the Credit System is active (Pro), confirm the employer has available credits. A zero balance blocks job posting.
  3. Confirm the Post a Job page has the Post a Job Form block inserted.

Credit System (Pro)

The Stripe payment isn't completing

  1. Confirm you are using the correct API keys for your environment — test keys for staging, live keys for production.
  2. Go to WP Career Board → Settings → Credits and verify the Stripe Secret Key and Publishable Key are entered correctly.
  3. Webhooks — Stripe requires a webhook endpoint to confirm payment. The webhook URL is shown in Settings → Credits. Paste it into your Stripe Dashboard under Developers → Webhooks and enable the checkout.session.completed event.
  4. Test with Stripe's built-in test card numbers (4242 4242 4242 4242) before going live.

Credits were paid but not added to the employer's balance

This is almost always a webhook delivery failure. In the Stripe Dashboard, go to Developers → Webhooks, find your endpoint, and check the event log. Re-deliver failed events manually if needed.


Block Issues

The block editor shows "Your block contains unexpected or invalid content"

This usually means the block's HTML was hand-edited or copied incorrectly. Click Attempt Block Recovery when prompted — this will restore the block from its saved attributes.

The block renders but looks completely unstyled

WP Career Board enqueues its CSS only on pages that contain its blocks. If you are embedding a shortcode or pasting raw HTML outside a block, styles won't load. Use the block editor and insert the correct block instead.


Performance

The jobs page is slow

  • Enable object caching on your server (Redis or Memcached) — WP Career Board caches job queries.
  • If using a page caching plugin, configure it to exclude the Candidate Dashboard and Employer Dashboard pages (they are user-specific and must not be served from cache).
  • The job search uses a live REST API call on every keystroke (with debounce). If the REST API is slow, check for slow database queries using Query Monitor.

Still Stuck?

If none of the above resolves your issue:

  1. Enable WP_DEBUG and WP_DEBUG_LOG in wp-config.php and check wp-content/debug.log for PHP errors.
  2. Deactivate all plugins except WP Career Board to rule out conflicts, then reactivate one by one.
  3. Open a support ticket at wbcomdesigns.com/support with your WordPress version, PHP version, active theme, and a description of what you tried.

Pro Features

Job Map, Multi-Board Engine, and other Pro-only features

Job Map

Pro feature — Requires WP Career Board Pro.

The Job Map block displays an interactive map of job locations alongside your listings. As candidates filter jobs, the map updates in real time — no page reload.

How It Works

The Job Map shares the same search state as the Job Listings and Job Filters blocks. When a visitor searches by keyword, filters by category, or selects a job type, the map instantly updates to show only matching pins.

Clicking a pin on the map opens a small popup with the job title and a "View Job" link.

Requirements

  • Jobs must have a Location set (city, region, or full address)
  • The location is geocoded automatically when the job is saved

No API key is required. The map uses Leaflet with OpenStreetMap tiles — it works out of the box.

Adding the Job Map

  1. Open your jobs page in the WordPress editor
  2. Click + and search for "Job Map"
  3. Insert the block

Recommended layout — two columns with Map on the left, Listings on the right:

[ Job Search ] [ Job Filters ]
[ Job Map     ] [ Job Listings ]

This gives candidates both a spatial view and a list view simultaneously.

Block Settings

Setting Default Description
Map Height 480px Height of the map canvas in pixels

Remote Jobs

Jobs posted as Remote appear in a special "Remote" cluster rather than a specific geographic pin, keeping the map accurate for fully remote roles.

Multi-Board Engine

Pro feature — Requires WP Career Board Pro.

The Multi-Board Engine lets you run multiple independent job boards from a single WordPress install. Each board has its own set of jobs, employers, and settings — all managed from one admin.

What You Get

  • Multiple boards — create as many boards as you need (e.g. "Tech Jobs", "Marketing Jobs", "Remote Only")
  • Board isolation — jobs posted to one board don't appear on others
  • Board Switcher block — a tab bar that lets visitors switch between boards on a single page
  • Per-board settings — each board can have its own pipeline stages, credit pricing, and custom fields

Creating a Board

  1. Go to WP Career Board → Boards in wp-admin
  2. Click Add New Board
  3. Fill in:
Field Description
Board Name Visible to employers when posting (e.g. "Tech Jobs")
Slug URL-friendly identifier, auto-generated from the name
Description Optional internal note
  1. Click Save

Assigning Jobs to a Board

When an employer posts a job, they see a Board dropdown in the job form (if more than one board exists). The job is assigned to their selected board.

Admins can also reassign jobs from WP Career Board → Jobs → Edit Job.

Board Switcher Block

Add the Board Switcher block to your jobs page so visitors can tab between boards:

  1. Open your jobs page in the WordPress editor
  2. Insert the Board Switcher block above the Job Listings block
  3. Save

Page layout with Board Switcher:

[ Board Switcher: All Jobs | Tech | Marketing | Remote ]
[ Job Search ] [ Job Filters ]
[ Job Listings ]

Clicking a tab updates the Job Listings block to show only that board's jobs — no page reload.

Default Board

The first board you create becomes the default. Jobs posted without a board selection go to the default board.

To change the default: go to WP Career Board → Boards and click Set as Default.

Per-Board Pipeline Stages

Each board can have its own application pipeline stages. Go to WP Career Board → Boards, open the board, and configure its stages independently.

Employer Access

Admins assign employers to one or more boards:

  1. Go to WP Career Board → Employers
  2. Click the employer's name
  3. In the Boards section, check the boards they can post to

Employers only see jobs and applications for their assigned boards.

Integrations

Reign Theme, BuddyX Pro, and BuddyPress integration guides

BuddyX Pro Integration

WP Career Board includes first-class support for the BuddyX Pro theme. When BuddyX Pro is active, the job board automatically adopts BuddyX's design system — colors, typography, card styles, and layout — without any extra configuration.

What You Get

  • Job listings cards styled with BuddyX Pro's card component
  • Dashboard panels that match BuddyX's sidebar and content layout
  • Job single page that fits seamlessly into a BuddyX Pro page template
  • Company profile page that uses BuddyX Pro's profile layout patterns
  • Button styles, form inputs, and badges inherit BuddyX Pro's design tokens

Requirements

  • BuddyX Pro theme active
  • WP Career Board 0.1.0 or higher

Setup

No configuration required. Activate both BuddyX Pro and WP Career Board, run the Setup Wizard, and the integration activates automatically.

The integration activates automatically — no additional confirmation step is required.

BuddyPress + BuddyX Pro

If you are also running BuddyPress with BuddyX Pro, WP Career Board can surface job board activity in BuddyPress activity streams and member profiles. See BuddyPress Integration for details.

Customizing the Design

All WP Career Board styles are applied via the .wcb-* CSS class namespace. You can override any style by adding custom CSS to your BuddyX Pro child theme or via Appearance → Customize → Additional CSS.

Reign Theme Integration

WP Career Board includes first-class support for the Reign theme by Wbcom Designs. When Reign is active, the job board integrates with Reign's Customizer panels and design system.

What You Get

  • Job board components styled to match Reign's visual design language
  • Customizer integration — control job board colors from Appearance → Customize
  • Job listing cards, dashboards, and forms that fit Reign's layout grid
  • Compatible with all Reign add-ons (LearnDash, BuddyPress, etc.)

Requirements

  • Reign theme active
  • WP Career Board 0.1.0 or higher

Setup

Activate Reign and WP Career Board, run the Setup Wizard, and the integration activates automatically. No additional settings required.

The integration activates automatically — no additional confirmation step is required.

Using Reign Customizer

With the integration active, you may find WP Career Board-specific options in Appearance → Customize under the Career Board section. These let you adjust primary colors, card border styles, and button variants to match your Reign theme configuration.

Reign Add-Ons Compatibility

WP Career Board works alongside all Reign add-ons. Running the LearnDash or BuddyPress add-ons does not affect the job board.

Custom CSS

Add overrides to your Reign child theme or via Appearance → Customize → Additional CSS. All WP Career Board styles use the .wcb-* prefix for easy targeting.

BuddyPress Integration

When BuddyPress is active on your site, WP Career Board automatically connects with it to enhance the community experience around your job board.

What You Get

  • Job board activity appears in BuddyPress activity streams
  • Employer and candidate roles map to BuddyPress member types
  • "Post a Job" and "Apply" activity updates can appear in community feeds
  • Candidate profiles link to their BuddyPress member profile

Requirements

  • BuddyPress (any recent version) active and configured
  • WP Career Board 0.1.0 or higher

Setup

No configuration required. Activate both plugins and the integration detects BuddyPress automatically.

The integration activates automatically — no additional configuration is required.

Activity Stream Integration

When a job is published, a BuddyPress activity item can appear in the site-wide activity stream, showing the company name and a link to the job. Candidates can comment, react, or share the listing through BuddyPress activity features.

Member Types

WP Career Board registers two BuddyPress member types:

  • Employer — users with the WP Career Board employer role
  • Candidate — users with the WP Career Board candidate role

This lets you filter members in the BuddyPress member directory by their job board role.

BuddyBoss Platform

BuddyBoss Platform is fully compatible. The same integration applies — member types, activity streams, and profile links all work the same way in BuddyBoss.

Disabling the Integration

If you want BuddyPress active but don't want job board activity in the activity stream, you can disable specific activity types from BuddyPress → Settings → Activity or filter them via the wcb_bp_activity_enabled filter hook.

Something unclear? Open a support ticket →

Buy WP Career Board