Hooks & Filters Reference
WB Member Wiki provides a comprehensive set of hooks and filters for developers to customize and extend wiki behavior. This reference documents all available extension points.
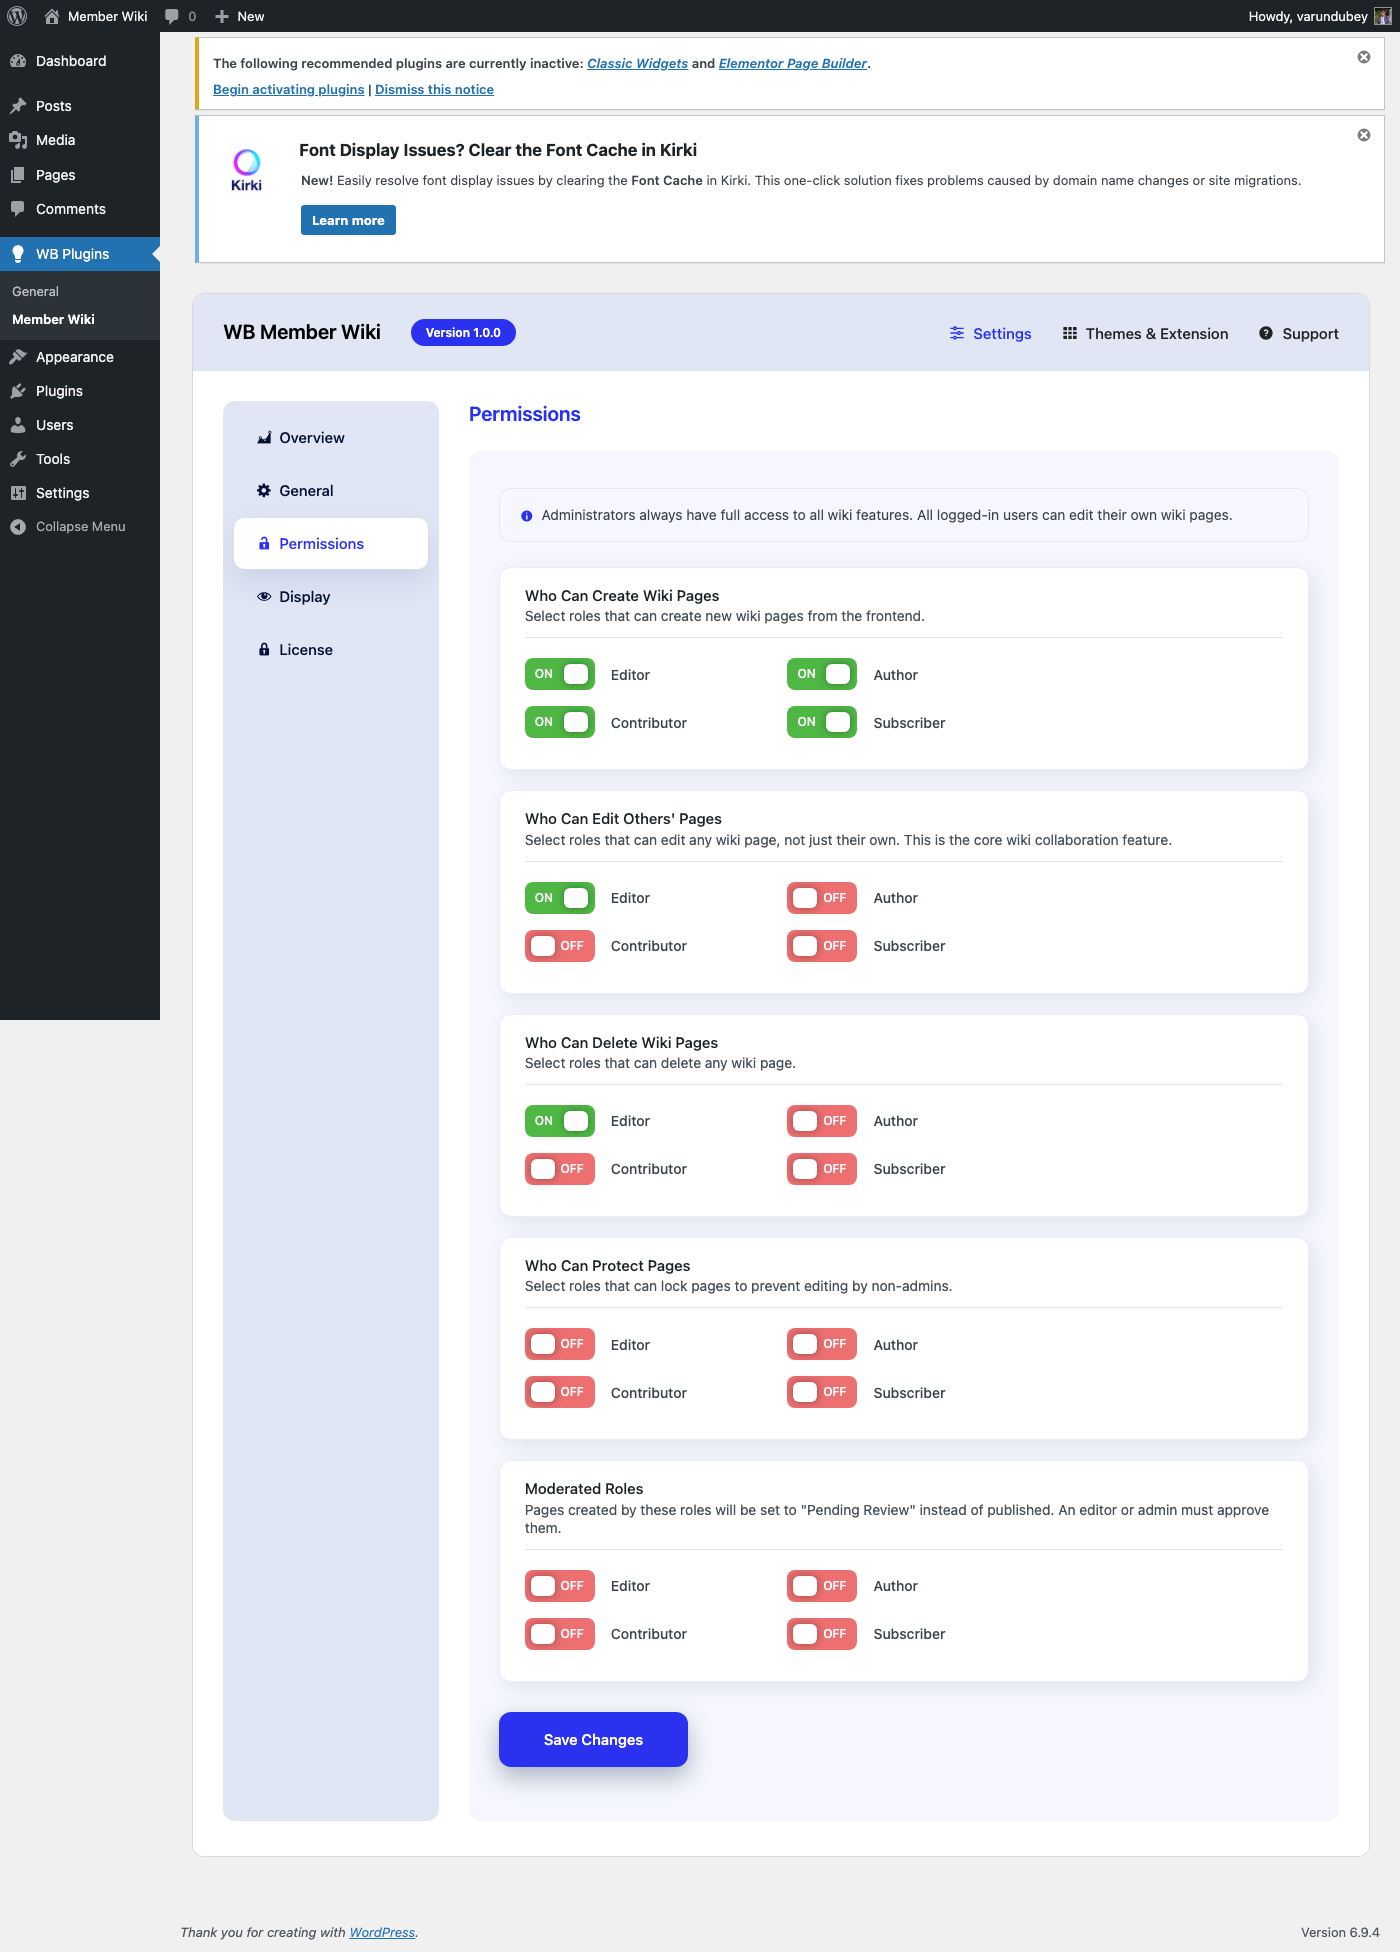
Permission Filters
These filters let you override the default role-based permission checks.
wbmw_can_view
Control whether a user can view a wiki page.
add_filter( 'wbmw_can_view', function( $can_view, $page_id, $user_id ) {
    // Example: Restrict viewing to logged-in users only
    return is_user_logged_in();
}, 10, 3 );
| Parameter |
Type |
Description |
$can_view |
bool |
Current permission result |
$page_id |
int |
Wiki page post ID |
$user_id |
int |
User ID being checked |
wbmw_can_create
Control whether a user can create new wiki pages.
add_filter( 'wbmw_can_create', function( $can_create, $user_id ) {
    // Example: Require a custom capability
    $user = get_userdata( $user_id );
    return $user && $user->has_cap( 'wiki_contributor' );
}, 10, 2 );
| Parameter |
Type |
Description |
$can_create |
bool |
Current permission result |
$user_id |
int |
User ID being checked |
wbmw_can_edit
Control whether a user can edit a specific wiki page.
add_filter( 'wbmw_can_edit', function( $can_edit, $page_id, $user_id ) {
    // Example: Allow all members of a BuddyPress group to edit
    if ( function_exists( 'groups_is_user_member' ) ) {
        $group_id = get_post_meta( $page_id, '_wiki_group_id', true );
        if ( $group_id && groups_is_user_member( $user_id, $group_id ) ) {
            return true;
        }
    }
    return $can_edit;
}, 10, 3 );
| Parameter |
Type |
Description |
$can_edit |
bool |
Current permission result |
$page_id |
int |
Wiki page post ID |
$user_id |
int |
User ID being checked |
wbmw_can_delete
Control whether a user can delete a specific wiki page.
add_filter( 'wbmw_can_delete', function( $can_delete, $page_id, $user_id ) {
    // Example: Prevent deletion of pages with children
    $children = get_children( array( 'post_parent' => $page_id, 'post_type' => 'wiki_page' ) );
    if ( ! empty( $children ) ) {
        return false;
    }
    return $can_delete;
}, 10, 3 );
| Parameter |
Type |
Description |
$can_delete |
bool |
Current permission result |
$page_id |
int |
Wiki page post ID |
$user_id |
int |
User ID being checked |
Content Filters
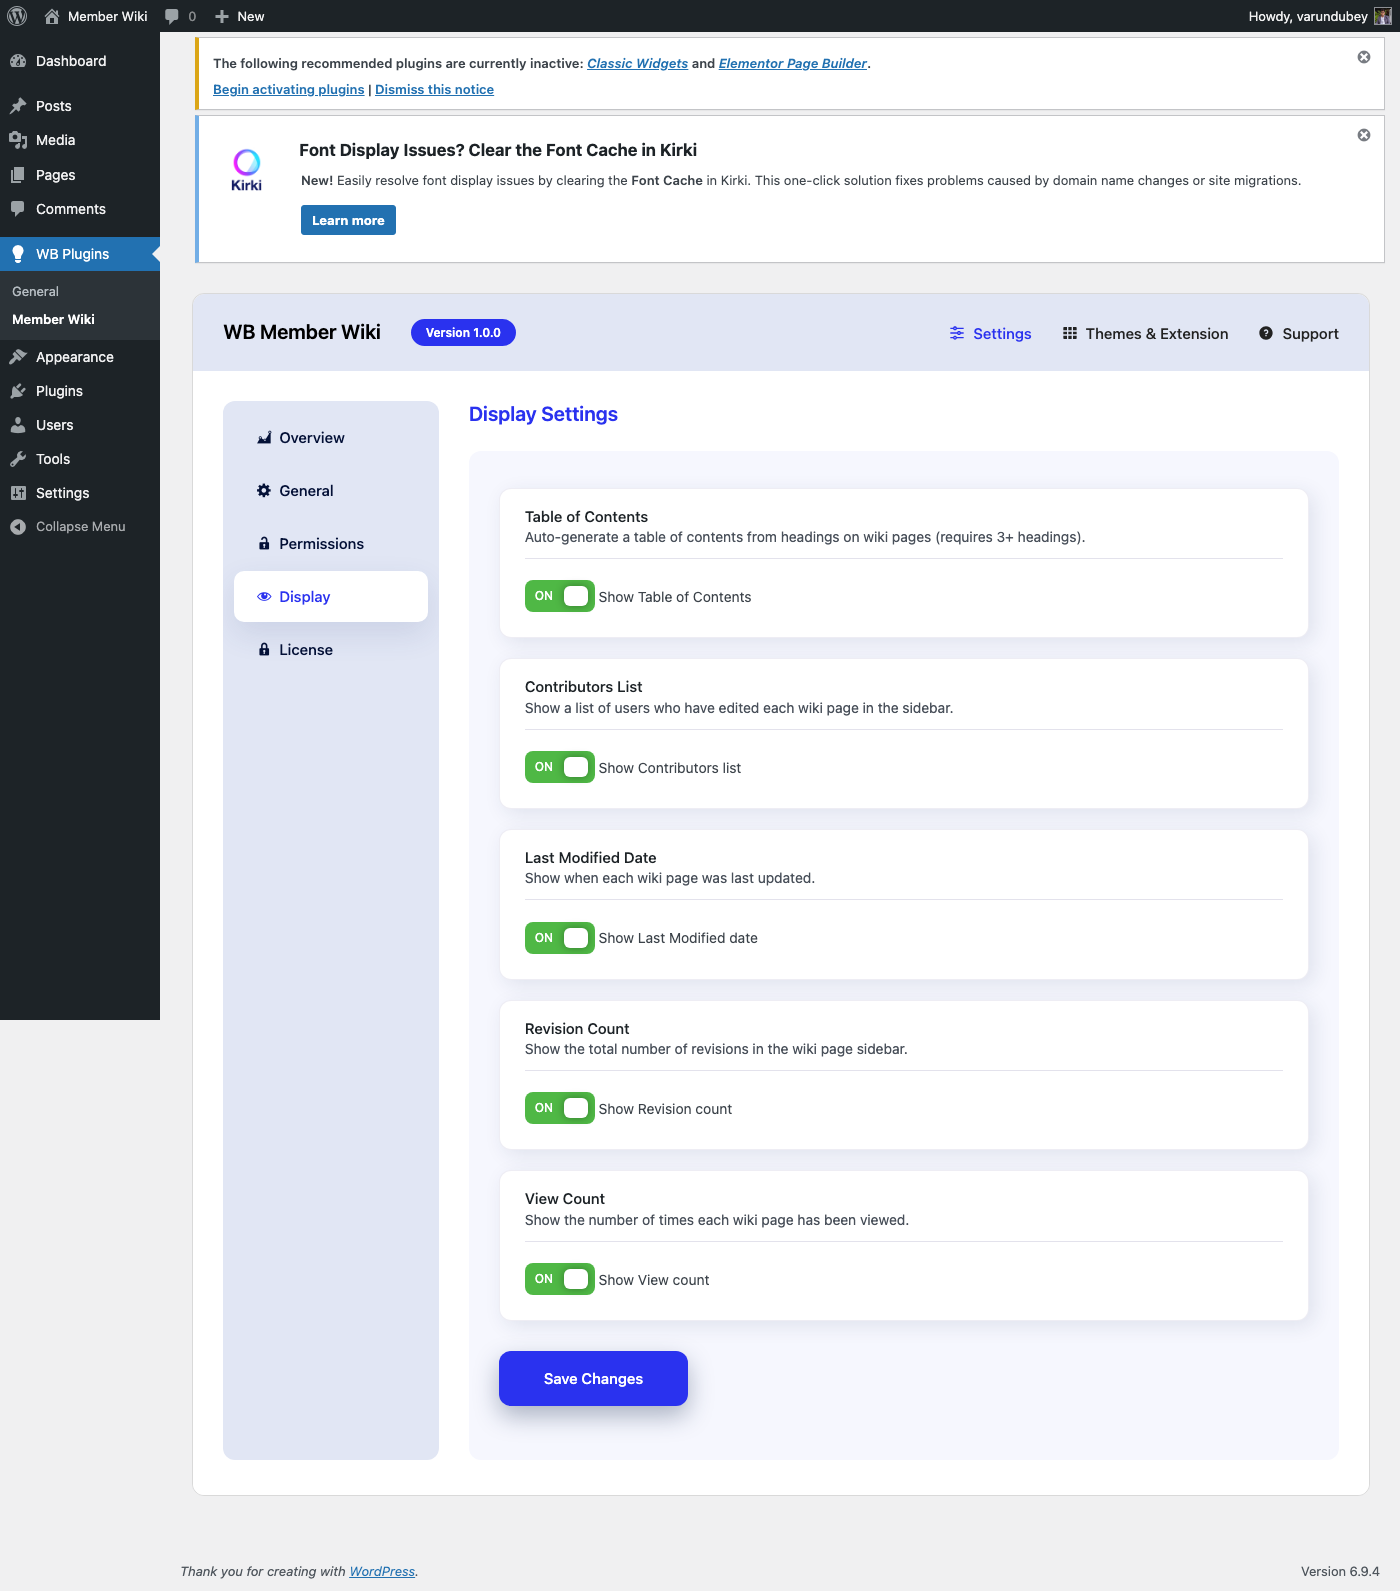
wbmw_toc_html
Modify the Table of Contents HTML before it's inserted into the page content.
add_filter( 'wbmw_toc_html', function( $toc_html, $headings ) {
    // Example: Add a custom class to the TOC container
    return str_replace( 'class="wbmw-toc"', 'class="wbmw-toc my-custom-toc"', $toc_html );
}, 10, 2 );
| Parameter |
Type |
Description |
$toc_html |
string |
Generated TOC HTML |
$headings |
array |
Array of extracted headings with tag, text, and id |
wbmw_search_args
Modify the WP_Query arguments used for wiki search.
add_filter( 'wbmw_search_args', function( $args, $query ) {
    // Example: Exclude protected pages from search
    $args['meta_query'] = array(
        array(
            'key'     => '_wbmw_protected',
            'compare' => 'NOT EXISTS',
        ),
    );
    return $args;
}, 10, 2 );
| Parameter |
Type |
Description |
$args |
array |
WP_Query arguments |
$query |
string |
Original search query string |
CPT Registration
wbmw_post_type_args
Modify the post type registration arguments for the wiki_page CPT.
add_filter( 'wbmw_post_type_args', function( $args ) {
    // Example: Change the menu icon
    $args['menu_icon'] = 'dashicons-book-alt';

    // Example: Disable archive page
    $args['has_archive'] = false;

    return $args;
} );
| Parameter |
Type |
Description |
$args |
array |
register_post_type() arguments |
wbmw_change_wiki_slug
Override the wiki URL slug dynamically.
add_filter( 'wbmw_change_wiki_slug', function( $slug ) {
    // Example: Use 'knowledge-base' instead of 'wiki'
    return 'knowledge-base';
} );
| Parameter |
Type |
Description |
$slug |
string |
Current wiki slug |
wbmw_change_wiki_label
Override the "Wiki" label used in platform navigation tabs (BuddyPress, PeepSo).
add_filter( 'wbmw_change_wiki_label', function( $label ) {
    return __( 'Knowledge Base', 'my-plugin' );
} );
| Parameter |
Type |
Description |
$label |
string |
Current tab label (default: "Wiki") |
wbmw_integration_mode
Override the auto-detected platform integration mode.
add_filter( 'wbmw_integration_mode', function( $mode ) {
    // Valid values: 'buddypress', 'buddyboss', 'peepso', 'standalone'
    return 'standalone';
} );
| Parameter |
Type |
Description |
$mode |
string |
Detected integration mode |
Lifecycle Actions
These actions fire during key wiki page lifecycle events.
wbmw_page_created
Fired after a new wiki page is created (not on updates).
add_action( 'wbmw_page_created', function( $page_id, $user_id ) {
    // Example: Log new page creation
    error_log( sprintf( 'User %d created wiki page %d', $user_id, $page_id ) );
}, 10, 2 );
| Parameter |
Type |
Description |
$page_id |
int |
Newly created wiki page ID |
$user_id |
int |
User who created the page |
wbmw_page_updated
Fired after a wiki page is saved (both create and update).
add_action( 'wbmw_page_updated', function( $page_id, $user_id ) {
    // Example: Send notification to admins
    $page_title = get_the_title( $page_id );
    $user       = get_userdata( $user_id );
    wp_mail(
        get_option( 'admin_email' ),
        'Wiki Page Updated: ' . $page_title,
        sprintf( '%s updated the wiki page "%s".', $user->display_name, $page_title )
    );
}, 10, 2 );
| Parameter |
Type |
Description |
$page_id |
int |
Wiki page post ID |
$user_id |
int |
User who made the edit |
wbmw_before_page_delete
Fired before a wiki page is trashed.
add_action( 'wbmw_before_page_delete', function( $page_id, $user_id ) {
    // Example: Archive page content before deletion
    $content = get_post_field( 'post_content', $page_id );
    update_option( 'wiki_archive_' . $page_id, $content );
}, 10, 2 );
| Parameter |
Type |
Description |
$page_id |
int |
Wiki page ID about to be deleted |
$user_id |
int |
User performing the deletion |
wbmw_page_deleted
Fired after a wiki page is trashed.
add_action( 'wbmw_page_deleted', function( $page_id, $user_id ) {
    // Example: Notify page author
    $author_id = get_post_field( 'post_author', $page_id );
    if ( $author_id !== $user_id ) {
        // Send notification to the original author
    }
}, 10, 2 );
| Parameter |
Type |
Description |
$page_id |
int |
Deleted wiki page ID |
$user_id |
int |
User who deleted the page |
wbmw_page_protected
Fired after a wiki page is protected.
add_action( 'wbmw_page_protected', function( $page_id, $user_id ) {
    // Example: Log protection changes
    error_log( sprintf( 'Wiki page %d protected by user %d', $page_id, $user_id ) );
}, 10, 2 );
| Parameter |
Type |
Description |
$page_id |
int |
Wiki page ID |
$user_id |
int |
User who protected the page |
wbmw_page_unprotected
Fired after a wiki page protection is removed.
add_action( 'wbmw_page_unprotected', function( $page_id, $user_id ) {
    // Example: Track unprotection events
}, 10, 2 );
| Parameter |
Type |
Description |
$page_id |
int |
Wiki page ID |
$user_id |
int |
User who unprotected the page |
wbmw_page_approved
Fired after a pending wiki page is approved and published.
add_action( 'wbmw_page_approved', function( $page_id, $user_id ) {
    // Example: notify the original author
    $author_id = get_post_field( 'post_author', $page_id );
    if ( $author_id && $author_id !== $user_id ) {
        $author = get_userdata( $author_id );
        wp_mail( $author->user_email, 'Your wiki page was approved', get_the_title( $page_id ) . ' is now published.' );
    }
}, 10, 2 );
| Parameter |
Type |
Description |
$page_id |
int |
Wiki page ID that was approved |
$user_id |
int |
User ID who performed the approval |
wbmw_page_rejected
Fired after a pending wiki page is rejected (moved to trash).
add_action( 'wbmw_page_rejected', function( $page_id, $user_id ) {
    // Example: log the rejection
    error_log( sprintf( 'Wiki page %d rejected by user %d', $page_id, $user_id ) );
}, 10, 2 );
| Parameter |
Type |
Description |
$page_id |
int |
Wiki page ID that was rejected |
$user_id |
int |
User ID who performed the rejection |
wbmw_revision_restored
Fired after a wiki revision is restored.
add_action( 'wbmw_revision_restored', function( $page_id, $revision_id, $user_id ) {
    // Example: Add a revision note about the restore
    update_post_meta( $page_id, '_wbmw_last_restore', array(
        'revision_id' => $revision_id,
        'user_id'     => $user_id,
        'time'        => current_time( 'mysql' ),
    ) );
}, 10, 3 );
| Parameter |
Type |
Description |
$page_id |
int |
Wiki page ID |
$revision_id |
int |
Revision ID that was restored |
$user_id |
int |
User who restored the revision |
Data Filters
These filters let you modify data before it's saved.
wbmw_page_data
Filter the post data array before wp_insert_post() or wp_update_post().
add_filter( 'wbmw_page_data', function( $post_data, $page_id, $user_id ) {
    // Example: Force all new pages to be drafts for review
    if ( 0 === $page_id ) {
        $post_data['post_status'] = 'draft';
    }
    return $post_data;
}, 10, 3 );
| Parameter |
Type |
Description |
$post_data |
array |
Post data for wp_insert_post/wp_update_post |
$page_id |
int |
Wiki page ID (0 for new pages) |
$user_id |
int |
Current user ID |
wbmw_page_categories
Filter category term IDs before they are assigned to a wiki page.
add_filter( 'wbmw_page_categories', function( $term_ids, $page_id ) {
    // Example: Always add a default category
    $default_cat = get_term_by( 'slug', 'general', 'wiki_category' );
    if ( $default_cat && empty( $term_ids ) ) {
        $term_ids[] = $default_cat->term_id;
    }
    return $term_ids;
}, 10, 2 );
| Parameter |
Type |
Description |
$term_ids |
int[] |
Array of category term IDs |
$page_id |
int |
Wiki page ID |
wbmw_page_tags
Filter tag names before they are assigned to a wiki page.
add_filter( 'wbmw_page_tags', function( $tags, $page_id ) {
    // Example: Normalize tag casing
    return array_map( 'strtolower', $tags );
}, 10, 2 );
| Parameter |
Type |
Description |
$tags |
string[] |
Array of tag names |
$page_id |
int |
Wiki page ID |
Display Filters
These filters modify data before it's rendered in templates.
wbmw_page_actions
Filter the action buttons shown on the single wiki page view.
add_filter( 'wbmw_page_actions', function( $actions, $page_id, $user_id ) {
    // Example: Add a "Print" button
    $actions['print'] = '<a href="#" class="wbmw-btn wbmw-btn-sm" onclick="window.print()">Print</a>';

    // Example: Remove the dashboard link
    unset( $actions['dashboard'] );

    return $actions;
}, 10, 3 );
| Parameter |
Type |
Description |
$actions |
array |
Keyed array of action HTML strings (edit, history, dashboard, protect/unprotect) |
$page_id |
int |
Wiki page ID |
$user_id |
int |
Current user ID |
wbmw_breadcrumbs
Filter breadcrumb items before display on the single wiki page.
add_filter( 'wbmw_breadcrumbs', function( $breadcrumbs, $page_id ) {
    // Example: Add a "Home" breadcrumb at the start
    return array( 0 => 'Home' ) + $breadcrumbs;
}, 10, 2 );
| Parameter |
Type |
Description |
$breadcrumbs |
array |
Associative array of page_id => title |
$page_id |
int |
Current wiki page ID |
wbmw_contributors_list
Filter contributor user IDs before display on the single wiki page.
add_filter( 'wbmw_contributors_list', function( $contributors, $page_id ) {
    // Example: Exclude a specific bot user
    return array_filter( $contributors, function( $uid ) {
        return $uid !== 99;
    } );
}, 10, 2 );
| Parameter |
Type |
Description |
$contributors |
int[] |
Array of user IDs |
$page_id |
int |
Wiki page ID |
wbmw_backlinks_list
Filter backlink post objects before display on the single wiki page.
add_filter( 'wbmw_backlinks_list', function( $backlinks, $page_id ) {
    // Example: Sort backlinks alphabetically
    usort( $backlinks, function( $a, $b ) {
        return strcmp( $a->post_title, $b->post_title );
    } );
    return $backlinks;
}, 10, 2 );
| Parameter |
Type |
Description |
$backlinks |
WP_Post[] |
Array of backlink post objects |
$page_id |
int |
Wiki page ID |
wbmw_template_path
Filter the resolved file path before a template is loaded. Use this to redirect specific templates to a custom location beyond the standard theme override directory.
add_filter( 'wbmw_template_path', function( $template_path, $template, $args ) {
    // Example: Use a different template for the print view
    if ( 'wiki-print' === $template ) {
        return get_stylesheet_directory() . '/my-wiki-print.php';
    }
    return $template_path;
}, 10, 3 );
| Parameter |
Type |
Description |
$template_path |
string |
Resolved absolute path to the template file |
$template |
string |
Template name without extension (e.g., wiki-page, wiki-edit) |
$args |
array |
Variables passed to the template |
wbmw_pagination_args
Filter the arguments passed to paginate_links() when building wiki pagination.
add_filter( 'wbmw_pagination_args', function( $args, $query ) {
    // Example: change the previous/next labels
    $args['prev_text'] = '« Previous';
    $args['next_text'] = 'Next »';
    return $args;
}, 10, 2 );
| Parameter |
Type |
Description |
$args |
array |
paginate_links() arguments |
$query |
WP_Query |
The query being paginated |
wbmw_list_query_args
Filter the WP_Query arguments for the wiki dashboard listing page.
add_filter( 'wbmw_list_query_args', function( $args ) {
    // Example: Change default sort order to title
    $args['orderby'] = 'title';
    $args['order']   = 'ASC';
    return $args;
} );
| Parameter |
Type |
Description |
$args |
array |
WP_Query arguments |
Template Hooks
Template hooks let you inject custom content at strategic points in wiki templates. All template hooks can be used in theme template overrides.
Editor Form Hooks
These hooks fire within the wiki editor form (templates/wiki-edit.php). All pass $page_id (int, 0 for new) and $is_edit (bool).
| Hook |
Location |
Purpose |
wbmw_before_editor_form |
Before <form> opens |
Add content above the editor form |
wbmw_editor_after_title |
After title input |
Add custom fields after the title |
wbmw_editor_after_content |
After wp_editor() |
Add fields after the content editor |
wbmw_editor_before_sidebar |
Before sidebar options |
Add options before parent/category/tag |
wbmw_editor_after_sidebar |
After sidebar options |
Add custom option sections |
wbmw_editor_before_submit |
Before submit buttons |
Add elements before Save/Publish |
wbmw_after_editor_form |
After </form> closes |
Add content below the editor form |
// Example: Add a custom meta field after the title
add_action( 'wbmw_editor_after_title', function( $page_id, $is_edit ) {
    $value = $is_edit ? get_post_meta( $page_id, '_wiki_subtitle', true ) : '';
    echo '<div class="wbmw-field">';
    echo '<label for="wiki-subtitle">Subtitle</label>';
    echo '<input type="text" id="wiki-subtitle" name="wiki_subtitle" value="' . esc_attr( $value ) . '">';
    echo '</div>';
}, 10, 2 );
Single Page Hooks
These hooks fire within the single wiki page view (templates/wiki-page.php). All pass $page_id (int) and $wiki_page (WP_Post).
| Hook |
Location |
Purpose |
wbmw_before_page_actions |
Before action buttons bar |
Add custom action buttons |
wbmw_after_page_actions |
After action buttons bar |
Add content after actions |
wbmw_before_page_sidebar |
Before metadata sidebar |
Add custom sidebar sections (top) |
wbmw_after_page_sidebar |
After sidebar sections |
Add custom sidebar sections (bottom) |
wbmw_before_page_content |
Before article content |
Add content before article body |
wbmw_after_page_content |
After article content |
Add content after article body |
wbmw_before_child_pages |
Before sub-pages listing |
Customize child pages intro |
wbmw_after_child_pages |
After sub-pages listing |
Add content after children |
wbmw_before_backlinks |
Before "What links here" |
Customize backlinks intro |
wbmw_after_backlinks |
After backlinks section |
Add content after backlinks |
// Example: Add a "Share" section after the page content
add_action( 'wbmw_after_page_content', function( $page_id, $wiki_page ) {
    $url = get_permalink( $page_id );
    echo '<div class="wiki-share">';
    echo '<strong>Share this page:</strong> ';
    echo '<a href="https://twitter.com/intent/tweet?url=' . urlencode( $url ) . '">Twitter</a>';
    echo '</div>';
}, 10, 2 );
Listing Hooks
These hooks fire within the wiki dashboard listing (templates/wiki-list.php).
| Hook |
Parameters |
Purpose |
wbmw_before_wiki_list |
$query (WP_Query) |
Add content/filters above the list |
wbmw_after_wiki_list |
$query (WP_Query) |
Add content below the list |
wbmw_wiki_list_item_actions |
$page_id (int) |
Add custom per-page action links |
// Example: Add a "Quick View" link to each list item
add_action( 'wbmw_wiki_list_item_actions', function( $page_id ) {
    echo '<a href="#" class="wbmw-btn wbmw-btn-sm quick-view" data-id="' . esc_attr( $page_id ) . '">Quick View</a>';
} );
Contributions Hooks
These hooks fire within the contributions template (templates/wiki-contributions.php).
| Hook |
Parameters |
Purpose |
wbmw_before_contributions |
$user_id, $query (WP_Query) |
Add content before contributions list |
wbmw_after_contributions |
$user_id, $query (WP_Query) |
Add content after contributions list |
History Hooks
These hooks fire within the revision history template (templates/wiki-history.php).
| Hook |
Parameters |
Purpose |
wbmw_before_revision_table |
$page_id, $revisions (array) |
Add content before revision table |
wbmw_after_revision_table |
$page_id, $revisions (array) |
Add content after revision table |
Diff Hooks
These hooks fire within the diff comparison template (templates/wiki-diff.php).
| Hook |
Parameters |
Purpose |
wbmw_before_diff_view |
$page_id (int) |
Add content before the diff comparison |
wbmw_after_diff_view |
$page_id (int) |
Add content after the diff comparison |
Notification Filters
wbmw_pending_notify_email
Override the recipient email for pending submission notifications. Fires when a moderated-role user creates a new wiki page that lands in pending status.
add_filter( 'wbmw_pending_notify_email', function( $email ) {
    // Example: Route to a dedicated moderation team inbox
    return 'wiki-mods@yoursite.com';
} );
| Parameter |
Type |
Description |
$email |
string |
Recipient email (from settings or admin_email fallback) |
wbmw_dashboard_url
Filter the wiki dashboard URL before it is used in navigation links, platform tabs, and email notifications.
add_filter( 'wbmw_dashboard_url', function( $url ) {
    // Example: Override for a custom multilingual setup
    $lang = apply_filters( 'wpml_current_language', null );
    if ( 'de' === $lang ) {
        return home_url( '/de/wiki/' );
    }
    return $url;
} );
| Parameter |
Type |
Description |
$url |
string |
Current dashboard page permalink |
Note: Polylang integration uses this filter automatically to switch the dashboard URL to the active language. WPML does not need it because WPML patches get_permalink() globally.
Admin Filters
wbmw_admin_setting_tabs
Modify the admin settings tabs.
add_filter( 'wbmw_admin_setting_tabs', function( $tabs ) {
    // Example: Add a custom tab
    $tabs['integrations'] = __( 'Integrations', 'my-plugin' );
    return $tabs;
} );
| Parameter |
Type |
Description |
$tabs |
array |
Associative array of tab_key => tab_label |
Content Processing Order
The plugin applies content filters in this order:
| Priority |
Filter |
Class |
| 5 |
the_content |
WBMW_Interlinking::parse_wiki_links() |
| 15 |
the_content |
WBMW_TOC::add_toc() |
Wiki links are processed first (priority 5) so the TOC generator (priority 15) doesn't interfere with link syntax. If you add custom content filters, choose your priority accordingly.
Constants
| Constant |
Value |
Description |
WBMW_VERSION |
1.0.0 |
Plugin version |
WBMW_PLUGIN_PATH |
/path/to/wb-member-wiki/ |
Plugin directory path |
WBMW_PLUGIN_URL |
URL to plugin directory |
Plugin URL |
WBMW_PLUGIN_BASENAME |
wb-member-wiki/wb-member-wiki.php |
Plugin basename |
Post Type and Taxonomy Constants
| Constant |
Value |
Description |
WBMW_CPT::POST_TYPE |
wiki_page |
Wiki page post type |
WBMW_CPT::TAXONOMY_CATEGORY |
wiki_category |
Category taxonomy |
WBMW_CPT::TAXONOMY_TAG |
wiki_tag |
Tag taxonomy |
Post Meta Keys
| Meta Key |
Type |
Description |
_wbmw_protected |
string |
Page protection flag (true when protected) |
_wbmw_contributors |
array |
User IDs of all page contributors |
_wbmw_links_to |
int |
Backlink index entry (one per outgoing link target) |
_wbmw_outgoing_links |
array |
Serialized array of outgoing link page IDs |
_wbmw_revision_note |
string |
Edit summary for a revision |
_wbmw_revision_author |
int |
User ID who created a revision |
_wbmw_demo_data |
int |
Demo data flag (1 for generated demo pages) |
Helper Functions
// Access control singleton
$access = wbmw_access();
$can_edit = $access->can_edit( $page_id );

// Platform detector singleton
$platform = wbmw_platform();
$is_bp = $platform->is_buddypress();
$name = $platform->get_platform_name();

// Settings helper
$settings = WBMW_Helpers::get_settings();
$slug = WBMW_Helpers::get_settings( 'wiki_slug', 'wiki' );

// Dashboard URL
$url = WBMW_Helpers::get_dashboard_url();