Jetonomy exposes 47 hooks in the free plugin and 8 additional hooks in Jetonomy Pro. Every hook follows the jetonomy_ prefix convention. Use them in your theme's functions.php, a site-specific mu-plugin, or a companion plugin.
Hook naming prefix: jetonomy_
Namespace: Jetonomy\
Content Hooks
These hooks fire around the full lifecycle of posts and replies.
jetonomy_after_create_post
Fires immediately after a new post is saved successfully.
Parameters
| Parameter |
Type |
Description |
$post_id |
int |
ID of the newly created post |
$space_id |
int |
ID of the space the post was created in |
Source: includes/api/class-posts-controller.php, includes/class-abilities.php
add_action( 'jetonomy_after_create_post', function( int $post_id, int $space_id ) {
    // Push an event to your analytics pipeline.
    my_analytics_track( 'forum_post_created', [
        'post_id'  => $post_id,
        'space_id' => $space_id,
        'user_id'  => get_current_user_id(),
    ] );
}, 10, 2 );
jetonomy_after_create_reply
Fires immediately after a new reply is saved successfully. The built-in Notifier also listens to this hook to dispatch reply notifications.
Parameters
| Parameter |
Type |
Description |
$reply_id |
int |
ID of the newly created reply |
$post_id |
int |
ID of the post being replied to |
Source: includes/api/class-replies-controller.php, includes/class-abilities.php
add_action( 'jetonomy_after_create_reply', function( int $reply_id, int $post_id ) {
    // Award XP in your gamification plugin.
    my_gamification_award_xp( get_current_user_id(), 5, 'reply_created' );
}, 10, 2 );
jetonomy_post_updated
Fires after a post is updated.
Parameters
| Parameter |
Type |
Description |
$post_id |
int |
ID of the updated post |
Source: includes/api/class-posts-controller.php
add_action( 'jetonomy_post_updated', function( int $post_id ) {
    // Bust an external cache when a post changes.
    my_cdn_purge( 'post', $post_id );
} );
jetonomy_post_deleted
Fires after a post is permanently deleted (not trashed).
Parameters
| Parameter |
Type |
Description |
$post_id |
int |
ID of the deleted post |
Source: includes/api/class-posts-controller.php
jetonomy_reply_updated
Fires after a reply is updated.
Parameters
| Parameter |
Type |
Description |
$reply_id |
int |
ID of the updated reply |
Source: includes/api/class-replies-controller.php
jetonomy_reply_deleted
Fires after a reply is permanently deleted.
Parameters
| Parameter |
Type |
Description |
$reply_id |
int |
ID of the deleted reply |
Source: includes/api/class-replies-controller.php
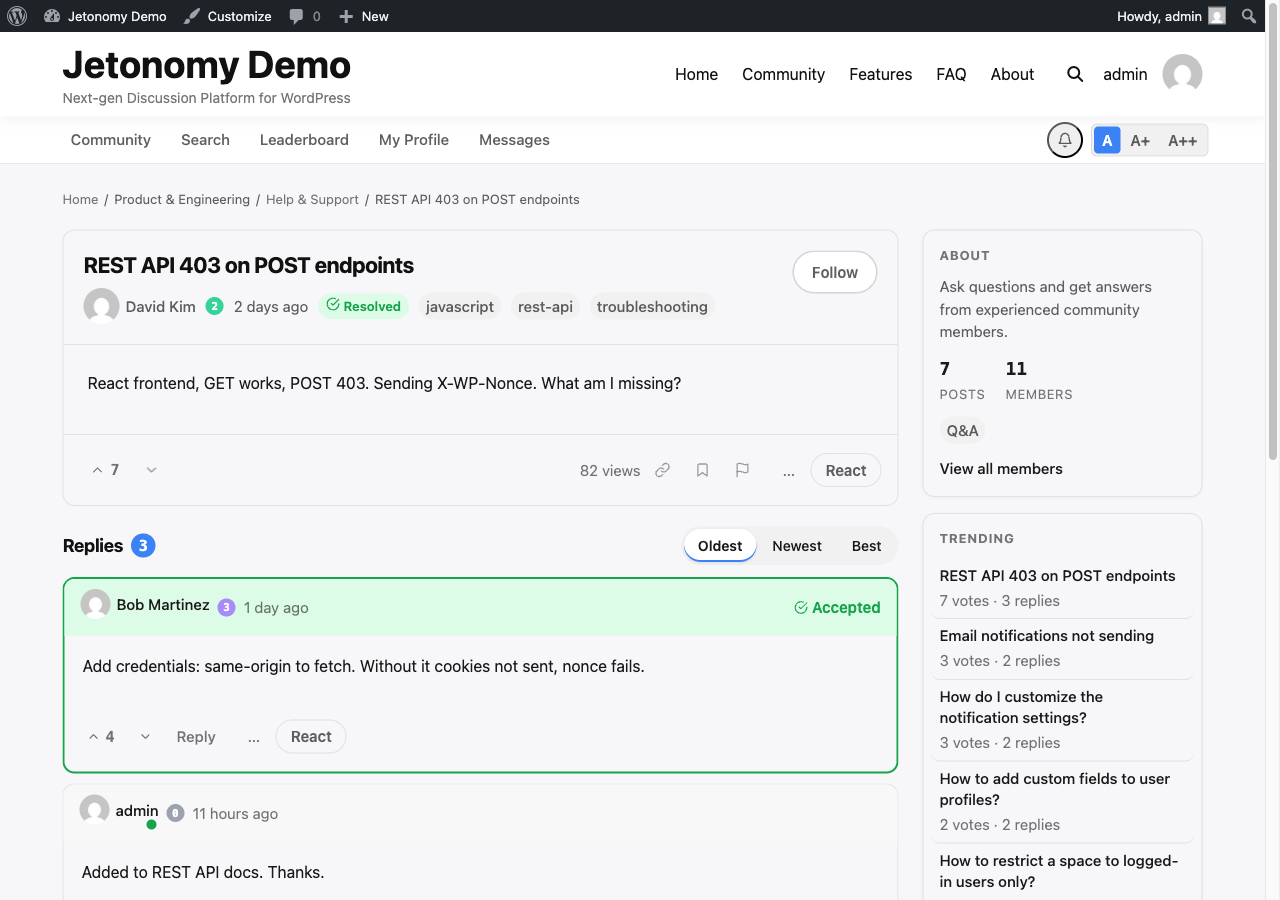
jetonomy_reply_accepted
Fires after a reply is marked as the accepted answer. The free plugin uses this to award +15 reputation to the reply author.
Parameters
| Parameter |
Type |
Description |
$reply_id |
int |
ID of the accepted reply |
$post_id |
int |
ID of the parent post |
Source: includes/api/class-replies-controller.php
add_action( 'jetonomy_reply_accepted', function( int $reply_id, int $post_id ) {
    // Grant a badge for having a reply accepted.
    my_badges_award( get_current_user_id(), 'answer-accepted' );
}, 10, 2 );
Voting
jetonomy_after_vote
Fires after a vote is cast or changed on a post or reply.
Parameters
| Parameter |
Type |
Description |
$object_type |
string |
'post' or 'reply' |
$object_id |
int |
ID of the voted-on item |
$direction |
string |
'up', 'down', or 'none' (vote removed) |
$user_id |
int |
The voting user's WP ID |
Source: includes/api/class-votes-controller.php, includes/class-abilities.php
add_action( 'jetonomy_after_vote', function( string $type, int $id, string $direction, int $user_id ) {
    if ( 'up' === $direction && 'post' === $type ) {
        // Award XP to the post author for receiving an upvote.
        $post = \Jetonomy\Models\Post::find( $id );
        if ( $post ) {
            my_xp_award( (int) $post->author_id, 2, 'post_upvoted' );
        }
    }
}, 10, 4 );
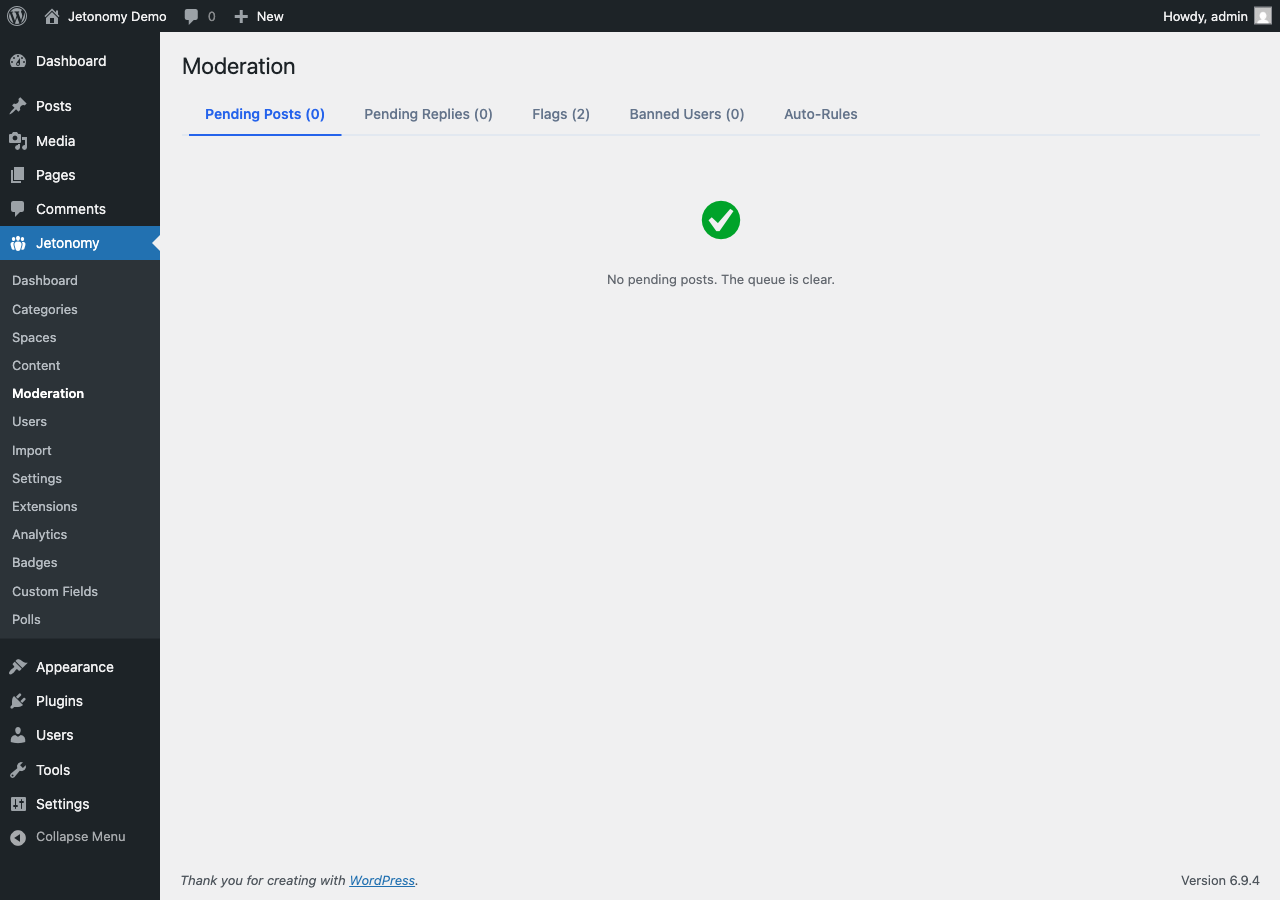
Moderation
jetonomy_content_moderated
Fires when a moderator takes an action on a post or reply — approve, spam, or trash.
Parameters
| Parameter |
Type |
Description |
$action |
string |
'approve', 'spam', or 'trash' |
$object_type |
string |
'post' or 'reply' |
$object_id |
int |
ID of the moderated item |
$moderator_id |
int |
WP user ID of the moderator |
Source: includes/api/class-moderation-controller.php, includes/admin/class-admin.php
add_action( 'jetonomy_content_moderated', function( string $action, string $type, int $id, int $mod_id ) {
    if ( 'spam' === $action ) {
        my_spam_log( $type, $id, $mod_id );
    }
}, 10, 4 );
Trust & Reputation
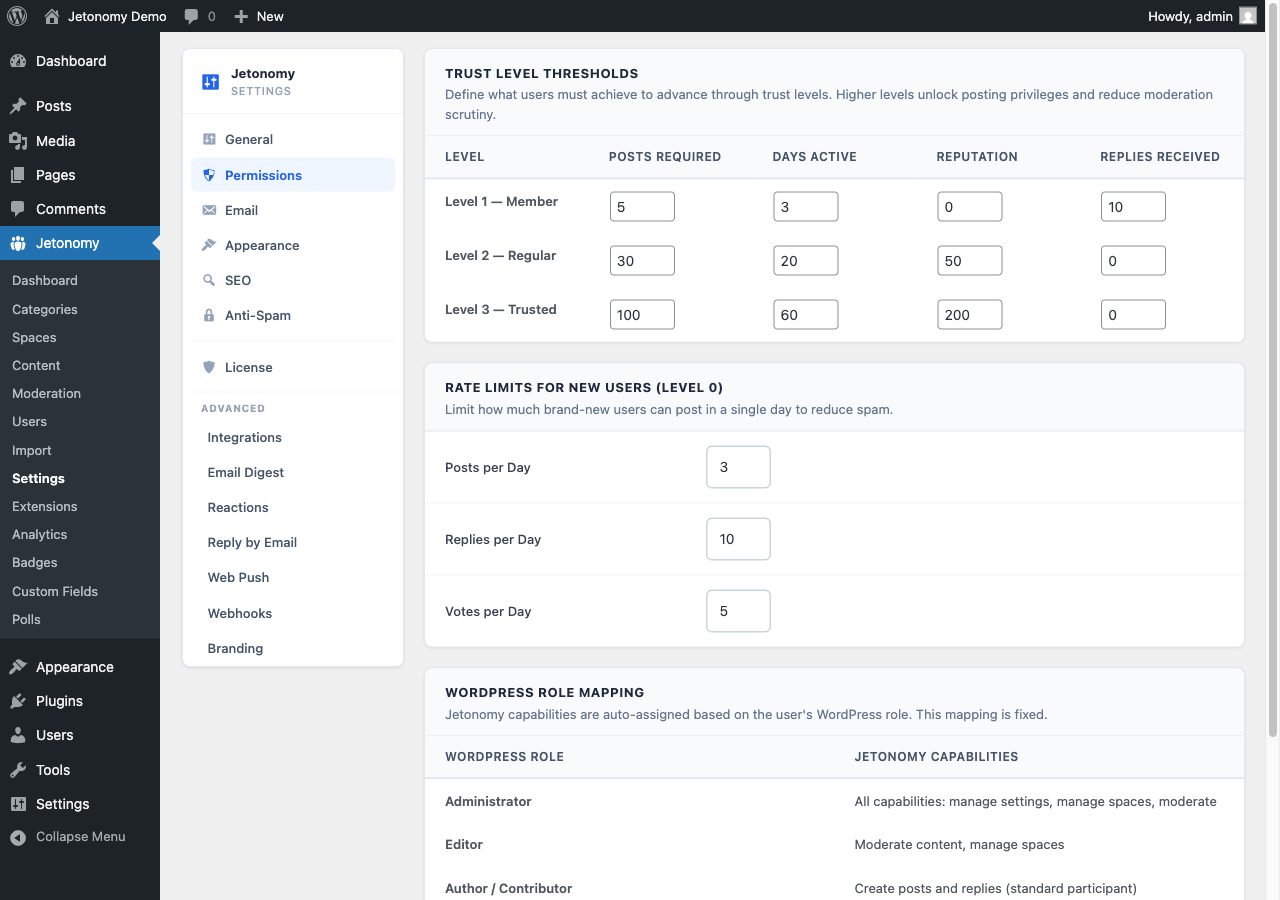
jetonomy_trust_level_changed
Fires when a user's trust level is recalculated and changes. Runs from the daily cron job and the wp jetonomy recalculate-trust WP-CLI command.
Parameters
| Parameter |
Type |
Description |
$user_id |
int |
WP user ID |
$old_level |
int |
Previous trust level (0–5) |
$new_level |
int |
New trust level (0–5) |
Source: includes/class-cron.php, includes/class-cli.php
add_action( 'jetonomy_trust_level_changed', function( int $user_id, int $old, int $new ) {
    if ( $new > $old ) {
        // Grant a WP capability when a user reaches Trust Level 3.
        if ( 3 === $new ) {
            $user = get_user_by( 'ID', $user_id );
            $user->add_cap( 'my_plugin_advanced_features' );
        }
    }
}, 10, 3 );
jetonomy_reputation_changed
Fires whenever a user's reputation score changes.
Parameters
| Parameter |
Type |
Description |
$user_id |
int |
WP user ID |
$delta |
int |
Points added (positive) or removed (negative) |
$reason |
string |
Machine-readable reason slug (e.g. 'post_upvoted', 'reply_accepted') |
Source: includes/trust/class-reputation.php
add_action( 'jetonomy_reputation_changed', function( int $user_id, int $delta, string $reason ) {
    // Sync reputation to BuddyPress profile.
    bp_update_user_meta( $user_id, 'jetonomy_rep', \Jetonomy\Models\UserProfile::get_reputation( $user_id ) );
}, 10, 3 );
Notifications
jetonomy_notification_created
Fires after a notification is created and stored.
Parameters
| Parameter |
Type |
Description |
$notification_id |
int |
ID of the new notification record |
$user_id |
int |
Recipient WP user ID |
$type |
string |
Notification type slug (e.g. 'reply', 'mention', 'accepted') |
Source: includes/notifications/class-notifier.php
add_action( 'jetonomy_notification_created', function( int $notif_id, int $user_id, string $type ) {
    // Forward notifications to a mobile push service.
    if ( 'mention' === $type ) {
        my_push_service_notify( $user_id, 'You were mentioned in a discussion.' );
    }
}, 10, 3 );
Spaces
jetonomy_user_joined_space
Fires after a user successfully joins a space.
Parameters
| Parameter |
Type |
Description |
$user_id |
int |
WP user ID of the new member |
$space_id |
int |
ID of the space joined |
Source: includes/models/class-space-member.php
add_action( 'jetonomy_user_joined_space', function( int $user_id, int $space_id ) {
    // Auto-subscribe the user to a MailChimp list tied to this space.
    my_mailchimp_subscribe( $user_id, "space_{$space_id}" );
}, 10, 2 );
Membership
These hooks fire from both the MemberPress and PMPro adapters.
jetonomy_membership_activated
Fires when a user's membership subscription becomes active.
Parameters
| Parameter |
Type |
Description |
$user_id |
int |
WP user ID |
$level_id |
string |
Membership level identifier |
$adapter |
string |
Adapter identifier (e.g. 'memberpress', 'pmpro', 'woocommerce') |
Source: includes/adapters/class-member-press-adapter.php, class-pmpro-adapter.php
jetonomy_membership_deactivated
Fires when a user's membership expires or is cancelled.
Parameters
| Parameter |
Type |
Description |
$user_id |
int |
WP user ID |
$level_id |
string |
Membership level identifier |
$adapter |
string |
Adapter identifier (e.g. 'memberpress', 'pmpro', 'woocommerce') |
Source: includes/adapters/class-member-press-adapter.php, class-pmpro-adapter.php
add_action( 'jetonomy_membership_deactivated', function( int $user_id, string $level_id, string $adapter ) {
    // Revoke access to private spaces when membership lapses.
    $private_spaces = \Jetonomy\Models\Space::get_by_membership_level( $level_id );
    foreach ( $private_spaces as $space ) {
        \Jetonomy\Models\SpaceMember::remove( $user_id, $space->id );
    }
}, 10, 3 );
Topic Management
jetonomy_post_merged
Fires after two posts are merged (all replies moved to the target, source deleted).
Parameters
| Parameter |
Type |
Description |
$source_post_id |
int |
The post that was merged and deleted |
$target_post_id |
int |
The post that received the replies |
jetonomy_reply_split
Fires after a reply is split into a new standalone post.
Parameters
| Parameter |
Type |
Description |
$new_post_id |
int |
ID of the newly created post |
$original_reply_id |
int |
ID of the reply that was split out |
Template Hooks
These hooks fire inside the PHP templates and let you inject content without overriding template files.
jetonomy_before_content
Fires inside the .jt-app wrapper, before the header partial and content container. Bridge plugins (such as BuddyNext) use this to inject a community subnav in place of the default Jetonomy community nav.
Parameters
| Parameter |
Type |
Description |
$data |
array |
Route data: ['route' => string, 'slug' => string] |
Source: includes/class-template-loader.php
add_action( 'jetonomy_before_content', function( array $data ) {
    echo '<div class="my-subnav">Custom nav here</div>';
} );
jetonomy_after_content
Fires after the main .container closes, before the .jt-app wrapper closes.
Parameters
| Parameter |
Type |
Description |
$data |
array |
Route data |
jetonomy_new_post_fields
Fires inside the new-post form, after the built-in fields. Use this to inject custom form fields (e.g. for Pro custom fields extension).
Source: templates/views/new-post.php
add_action( 'jetonomy_new_post_fields', function() {
    // Render an additional "Estimated time" field.
    echo '<label for="jt-estimated-time">' . esc_html__( 'Estimated time (hours)', 'my-plugin' ) . '</label>';
    echo '<input type="number" id="jt-estimated-time" name="estimated_time" min="0" />';
} );
jetonomy_post_meta_fields
Fires inside the single-post view, after the post meta line.
Source: templates/views/single-post.php
jetonomy_post_actions
Fires inside the single-post view, inside the post action toolbar.
Source: templates/views/single-post.php
jetonomy_reply_actions
Fires inside the reply card, inside the reply action row.
Source: templates/partials/reply-card.php
jetonomy_profile_after_stats
Fires on user profile pages, after the reputation/trust stats block.
Source: templates/views/user-profile.php
jetonomy_profile_display_fields
Fires on user profile pages in the display (read-only) section. Use this to render extra profile fields.
Source: templates/views/user-profile.php
add_action( 'jetonomy_profile_display_fields', function() {
    $user_id = get_queried_object_id(); // or extract from the URL
    $company = get_user_meta( $user_id, 'company', true );
    if ( $company ) {
        printf( '<p class="jt-profile-field"><strong>%s</strong> %s</p>',
            esc_html__( 'Company:', 'my-plugin' ),
            esc_html( $company )
        );
    }
} );
jetonomy_profile_edit_fields
Fires inside the edit-profile form. Pair with jetonomy_profile_display_fields and a custom save_post / REST action to persist data.
Source: templates/views/edit-profile.php
jetonomy_header_nav_items
Fires inside the community header, after the built-in nav items. Add extra navigation links here.
Source: templates/partials/header.php
add_action( 'jetonomy_header_nav_items', function() {
    echo '<a href="/community/events/" class="jt-nav-link">Events</a>';
} );
Admin Extension Hooks
Use these to add content to the Jetonomy admin pages without overriding core admin files.
| Hook |
Parameters |
Where it fires |
jetonomy_admin_dashboard_widgets |
none |
Dashboard page — add custom stat cards |
jetonomy_admin_dashboard_after_stats |
none |
Dashboard — below the stats row |
jetonomy_admin_settings_tabs |
none |
Settings page — register new tab nav items |
jetonomy_admin_settings_tab_content |
$active_tab (string) |
Settings page — render tab content |
jetonomy_admin_moderation_tabs |
none |
Moderation page — extra tab nav items |
jetonomy_admin_moderation_tab_content |
$active_tab (string) |
Moderation page — render tab content |
jetonomy_admin_space_edit_tabs |
$space_id (int) |
Space edit page — extra tab nav items |
jetonomy_admin_space_edit_tab_content |
$active_tab (string), $space_id (int) |
Space edit page — render tab content |
jetonomy_admin_render_extensions |
none |
Admin — Extensions tab placeholder |
jetonomy_admin_render_license |
none |
Admin — License tab placeholder |
Example: adding a Settings tab
// Register the tab nav item.
add_action( 'jetonomy_admin_settings_tabs', function() {
    $active = $_GET['tab'] ?? 'general';
    $class  = 'my-custom' === $active ? 'nav-tab-active' : '';
    printf(
        '<a href="?page=jetonomy-settings&tab=my-custom" class="nav-tab %s">%s</a>',
        esc_attr( $class ),
        esc_html__( 'My Settings', 'my-plugin' )
    );
} );

// Render the tab content.
add_action( 'jetonomy_admin_settings_tab_content', function( string $active_tab ) {
    if ( 'my-custom' !== $active_tab ) {
        return;
    }
    echo '<div class="jt-settings-card">';
    echo '<div class="jt-settings-card__head">';
    echo '<p class="jt-settings-card__title">My Settings</p>';
    echo '</div>';
    // Your settings form here.
    echo '</div>';
} );
Filter Hooks
jetonomy_template_map
Filters the route-to-template map used by Template_Loader. Pass an absolute path to override an existing template or add a completely new route. See Template Overrides for the complete guide.
Parameters
| Parameter |
Type |
Description |
$map |
array |
['route' => 'relative/path.php'] |
Return: array Modified map
add_filter( 'jetonomy_template_map', function( array $map ): array {
    // Register a new 'events' route resolved against the Pro plugin directory.
    $map['events'] = MYPLUGIN_DIR . 'templates/events.php';
    return $map;
} );
jetonomy_check_content
Filters content before it is saved as a post or reply. Return a WP_Error to reject the content with a message shown to the user.
Parameters
| Parameter |
Type |
Description |
$result |
true|WP_Error |
Pass through or return a WP_Error to block |
$content |
string |
The sanitized HTML content string |
$user_id |
int |
Author's WP user ID |
Return: true|WP_Error
Source: includes/api/class-posts-controller.php, class-replies-controller.php
add_filter( 'jetonomy_check_content', function( $result, string $content, int $user_id ) {
    // Block posts containing a forbidden phrase.
    if ( str_contains( strtolower( $content ), 'buy cheap followers' ) ) {
        return new WP_Error( 'spam_blocked', __( 'This content was flagged as spam.', 'my-plugin' ) );
    }
    return $result;
}, 10, 3 );
jetonomy_after_post_content
Filters output rendered after the main post content area in single-post view. Return an HTML string.
Parameters
| Parameter |
Type |
Description |
$html |
string |
HTML to render after post content (empty by default) |
$post |
\Jetonomy\Models\Post |
The current post object |
Return: string
Source: templates/views/single-post.php
add_filter( 'jetonomy_after_post_content', function( string $html, $post ): string {
    $html .= '<div class="my-related-posts">' . my_get_related_posts( $post->id ) . '</div>';
    return $html;
}, 10, 2 );
jetonomy_notification_email_headers
Filters the email headers array passed to wp_mail() for all Jetonomy notifications.
Parameters
| Parameter |
Type |
Description |
$headers |
array |
Array of mail headers |
Return: array
Source: includes/adapters/class-wp-mail-adapter.php
add_filter( 'jetonomy_notification_email_headers', function( array $headers ): array {
    $headers[] = 'Reply-To: noreply@example.com';
    return $headers;
} );
jetonomy_profile_url
Filters the public URL for a user's community profile.
Parameters
| Parameter |
Type |
Description |
$url |
string |
Default profile URL (e.g. /community/u/janedoe/) |
$user_id |
int |
WP user ID |
Return: string
Source: includes/functions.php
add_filter( 'jetonomy_profile_url', function( string $url, int $user_id ): string {
    // Point profile links to a BuddyPress profile instead.
    $bp_url = bp_core_get_user_domain( $user_id );
    return $bp_url ?: $url;
}, 10, 2 );
jetonomy_admin_menu_label
Filters the top-level admin menu label.
Return: string
add_filter( 'jetonomy_admin_menu_label', fn() => 'Forum' );
jetonomy_admin_menu_icon
Filters the Dashicons icon for the admin menu item.
Return: string (Dashicons class, e.g. 'dashicons-format-chat')
jetonomy_show_community_nav
Filters whether the built-in community nav bar is displayed. Return false to hide it (useful when a bridge plugin provides its own nav).
Parameters
| Parameter |
Type |
Description |
$show |
bool |
true by default |
Return: bool
jetonomy_importers
Filters the list of registered importers shown in the Import tool.
Parameters
| Parameter |
Type |
Description |
$importers |
array |
['id' => Importer_Instance] |
Return: array
Source: includes/import/class-import-manager.php
add_filter( 'jetonomy_importers', function( array $importers ): array {
    $importers['my-forum'] = new My_Forum_Importer();
    return $importers;
} );
jetonomy_search_query_args
Fires inside the Search controller before the SQL is built. Use this to modify search parameters.
Parameters
| Parameter |
Type |
Description |
$args |
array |
Keys: q, space_id, date_from, date_to, author_id, tag_slug, sort |
Return: array
Source: includes/api/class-search-controller.php
Pro Hooks
These hooks are available only when Jetonomy Pro is active. Pro injects into core admin via the standard admin hooks (jetonomy_admin_dashboard_widgets, jetonomy_admin_settings_tabs) and registers its own extension lifecycle events.
| Hook |
Type |
Description |
jetonomy_pro_extension_booted |
action |
Fires after a Pro extension's boot() runs. Params: $extension_id (string) |
jetonomy_pro_extension_enabled |
action |
Fires when an extension is toggled on in admin. Params: $extension_id (string) |
jetonomy_pro_extension_disabled |
action |
Fires when an extension is toggled off. Params: $extension_id (string) |
jetonomy_pro_message_sent |
action |
Fires after a private message is sent. Params: $message_id (int), $conversation_id (int), $sender_id (int) |
jetonomy_pro_reaction_added |
action |
Fires when a reaction is added. Params: $object_type (string), $object_id (int), $emoji (string), $user_id (int) |
jetonomy_pro_poll_vote_cast |
action |
Fires when a poll vote is cast. Params: $poll_id (int), $option_id (int), $user_id (int) |
jetonomy_pro_webhook_sent |
action |
Fires after a webhook is dispatched. Params: $webhook_id (int), $event (string), $response_code (int) |
jetonomy_pro_digest_sent |
action |
Fires after an email digest is sent. Params: $user_id (int), $frequency (string) |
What's Next?