Wbcom Designs Product Roadmap Docs
Back to product Buy Now

Getting Started

Install Product Roadmap, add a board to a page, and configure the basics

Installation

This guide walks you through installing and activating Product Roadmap on your WordPress site.


Requirements

Before installing, confirm your server meets these minimums:

  • WordPress 6.0 or higher
  • PHP 7.4 or higher
  • MySQL 5.6 / MariaDB 10.1 or higher

Product Roadmap Pro requires the free Product Roadmap plugin to be installed and active. Install the free plugin first, then add Pro on top.


Install the Free Plugin

Option 1: Install from WordPress.org

  1. In your WordPress admin, go to Plugins → Add New.
  2. Search for Product Roadmap.
  3. Click Install Now, then Activate.

Option 2: Upload the ZIP

  1. Download the plugin ZIP from WordPress.org or from your account page.
  2. Go to Plugins → Add New → Upload Plugin.
  3. Click Choose File, select the ZIP, and click Install Now.
  4. Click Activate Plugin.

Install Product Roadmap Pro

Pro is a separate ZIP that you download from your wbcomdesigns.com account.

  1. Keep the free plugin active.
  2. Go to Plugins → Add New → Upload Plugin.
  3. Upload the Pro ZIP and click Install Now, then Activate Plugin.
  4. Enter your license key when prompted to enable automatic updates.

What Happens on Activation

When Product Roadmap activates for the first time, it:

  1. Registers the roadmap item content type and its statuses and categories.
  2. Registers the [roadmap] and [roadmap_changelog] shortcodes.
  3. Registers the roadmap/v1 REST API namespace.
  4. Sets default labels, statuses, and notification options.

No page is created automatically. You add the board to a page yourself with a shortcode. See Add a Roadmap to a Page.


Next Steps

Add a Roadmap to a Page

The roadmap board is embedded on the front end with a shortcode. This guide shows you how to create a page and display your board on it.

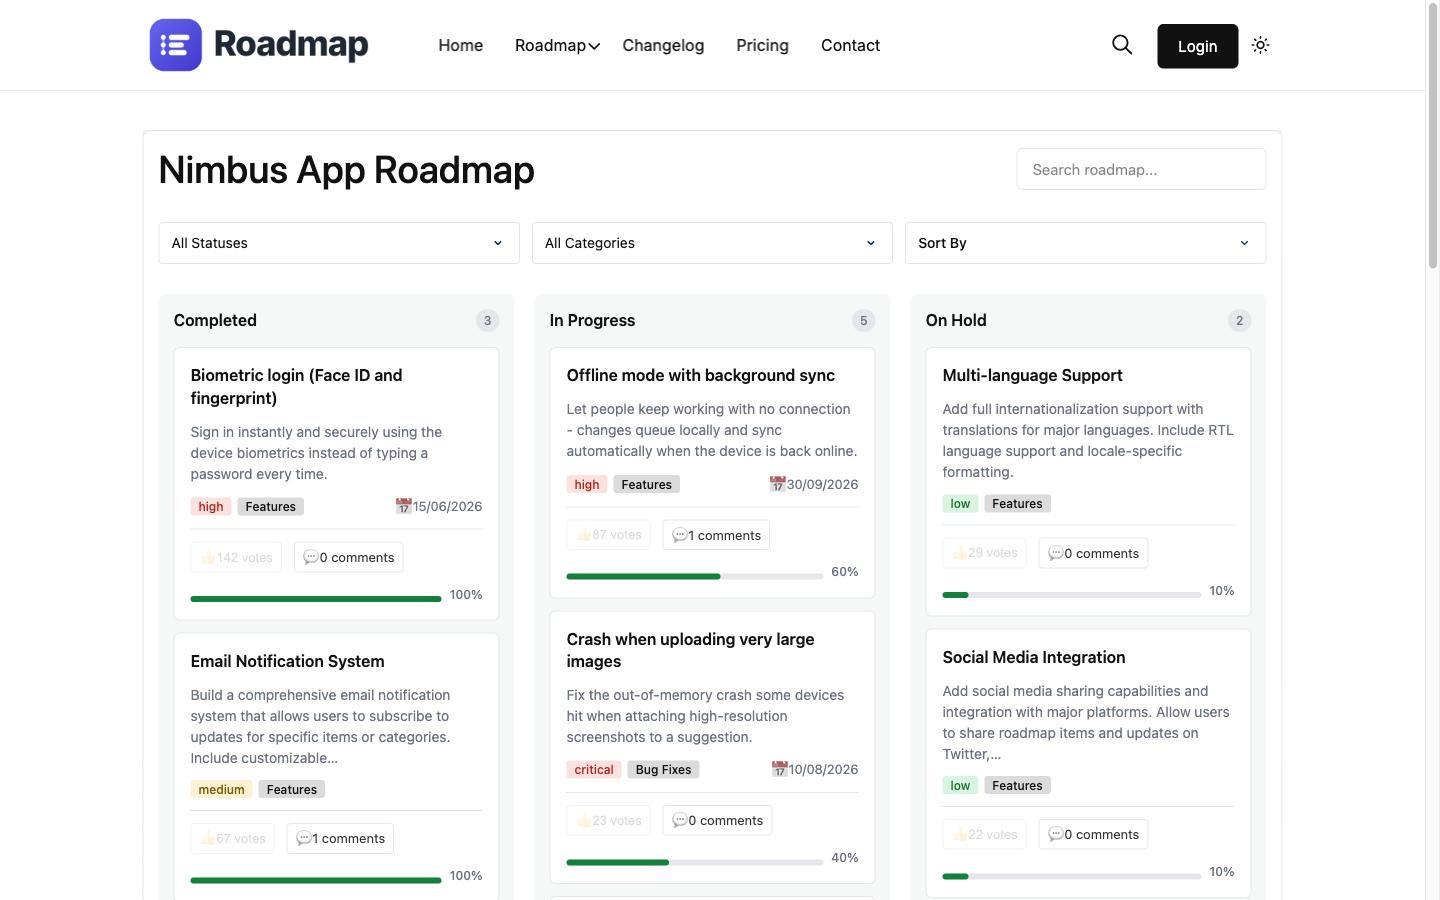
Roadmap board view


Create a Page

  1. In your WordPress admin, go to Pages → Add New.
  2. Give the page a title, for example "Roadmap".
  3. Add a shortcode block (or paste directly into a paragraph in the Classic editor).
  4. Enter the roadmap shortcode:
[roadmap product="main"]
  1. Click Publish, then View Page to see the board.

The product Attribute Is Required

The product attribute is not optional. It tells the shortcode which board to render. If you leave it out, the board has no product context and will not display items correctly.

[roadmap product="main"]

In the free plugin, use product="main" for your single board. In Pro, each product you create has its own slug, so you can render several boards on different pages:

[roadmap product="mobile-app"]
[roadmap product="web-dashboard"]

See Multiple Products for how product slugs are created in Pro.


Choose a View (Pro)

The free plugin renders the Board (Kanban) view. Pro adds a template attribute so you can pick a different layout on any page:

[roadmap template="timeline" product="main"]

The available templates are board, timeline, cards, list, minimal, and ideabox. See Views and Templates for what each one looks like.


Verify the Board

After publishing, open the page as a logged-out visitor to confirm:

  • Items appear under their status columns.
  • The upvote button is visible on each item.
  • The suggestion form appears if you have suggestions enabled in Settings.

Next Steps

  • Settings rename statuses, set categories, and configure moderation.
  • Voting understand how upvotes work for guests and members.

Settings

Product Roadmap settings live under Roadmap → Settings in the WordPress admin. This guide covers the options that shape how your board looks and behaves.


Labels

Rename the words your visitors see so the board matches your product's voice.

  • Board title the heading shown above the board.
  • Suggestion button label the text on the "submit an idea" button, for example "Suggest a feature".
  • Upvote label the word next to the vote count, for example "Votes" or "Upvotes".
  • Empty state text the message shown when a status column has no items.

Statuses

Statuses are the columns on the board and the stages an item moves through. The default pipeline is:

  1. Planned
  2. In Progress
  3. Under Review
  4. On Hold
  5. Completed

You can rename any status, change its color, hide a status from the public board, and reorder the columns. See Statuses and Categories for how the pipeline works day to day.


Categories

Categories group items by area, for example "Mobile", "Billing", or "API". Add, rename, and delete categories under Roadmap → Categories. Visitors can filter the board by category.


Notifications

Control the emails the plugin sends:

  • Notify admins on new suggestion email the site admin when a visitor submits an idea so you can moderate it.
  • Notify submitter on status change email the person who suggested an item when its status changes, for example from Planned to In Progress.
  • From name and address the sender details used on these emails.

Spam and Rate Limiting

Because the suggestion form is public, protect it from abuse:

  • Require approval hold every new suggestion in a pending queue until an admin approves it. See Customer Suggestions.
  • Rate limit cap how many suggestions one person (by user account or IP address) can submit per hour.
  • Honeypot field a hidden field that blocks basic bots without a visible captcha.
  • Minimum submission gap a short delay between submissions from the same visitor.

Voting Options

  • Allow guest voting let logged-out visitors upvote. When on, votes are tracked by IP address. When off, only logged-in members can vote.
  • One vote per item enforce a single upvote per person per item.

See Voting for the full behavior.


Next Steps

Using the Roadmap

Views, voting, customer suggestions, statuses, and categories

Views and Templates

Product Roadmap can render your items in several layouts. The free plugin ships the Board (Kanban) view. Pro adds five more templates that you select with the template attribute on the shortcode.


Board (Free)

The Board view is a Kanban layout with one column per status. Items sit under the status they are currently in, showing the title, category, vote count, and target date.

[roadmap product="main"]

The Board is the default, so you do not need a template attribute to use it. It is included in both the free plugin and Pro.


Pro Templates

Pro unlocks five extra templates. Switch between them by adding template to the shortcode:

[roadmap template="timeline" product="main"]
Template Best for
board Kanban columns by status (the default).
timeline A time-ordered view built around target dates.
cards A responsive grid of item cards with vote counts.
list A compact, scannable single-column list.
minimal A stripped-back layout for embedding in tight spaces.
ideabox A voting-first layout that puts suggestions and upvotes front and center.

Timeline

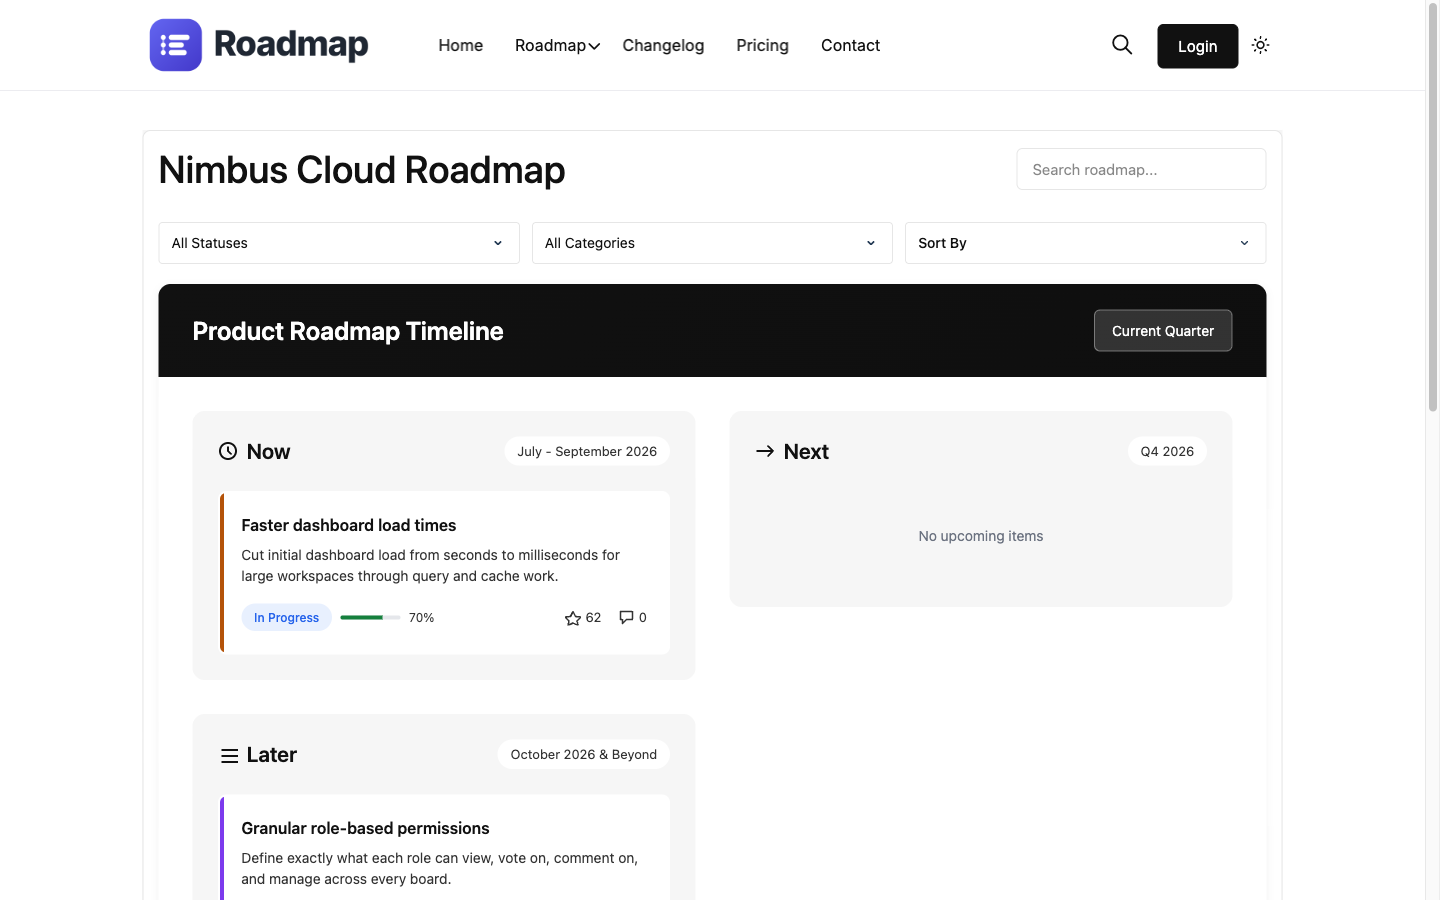
The Timeline view arranges items by target date so visitors can see what is coming and when.

Roadmap timeline view

[roadmap template="timeline" product="main"]

Cards

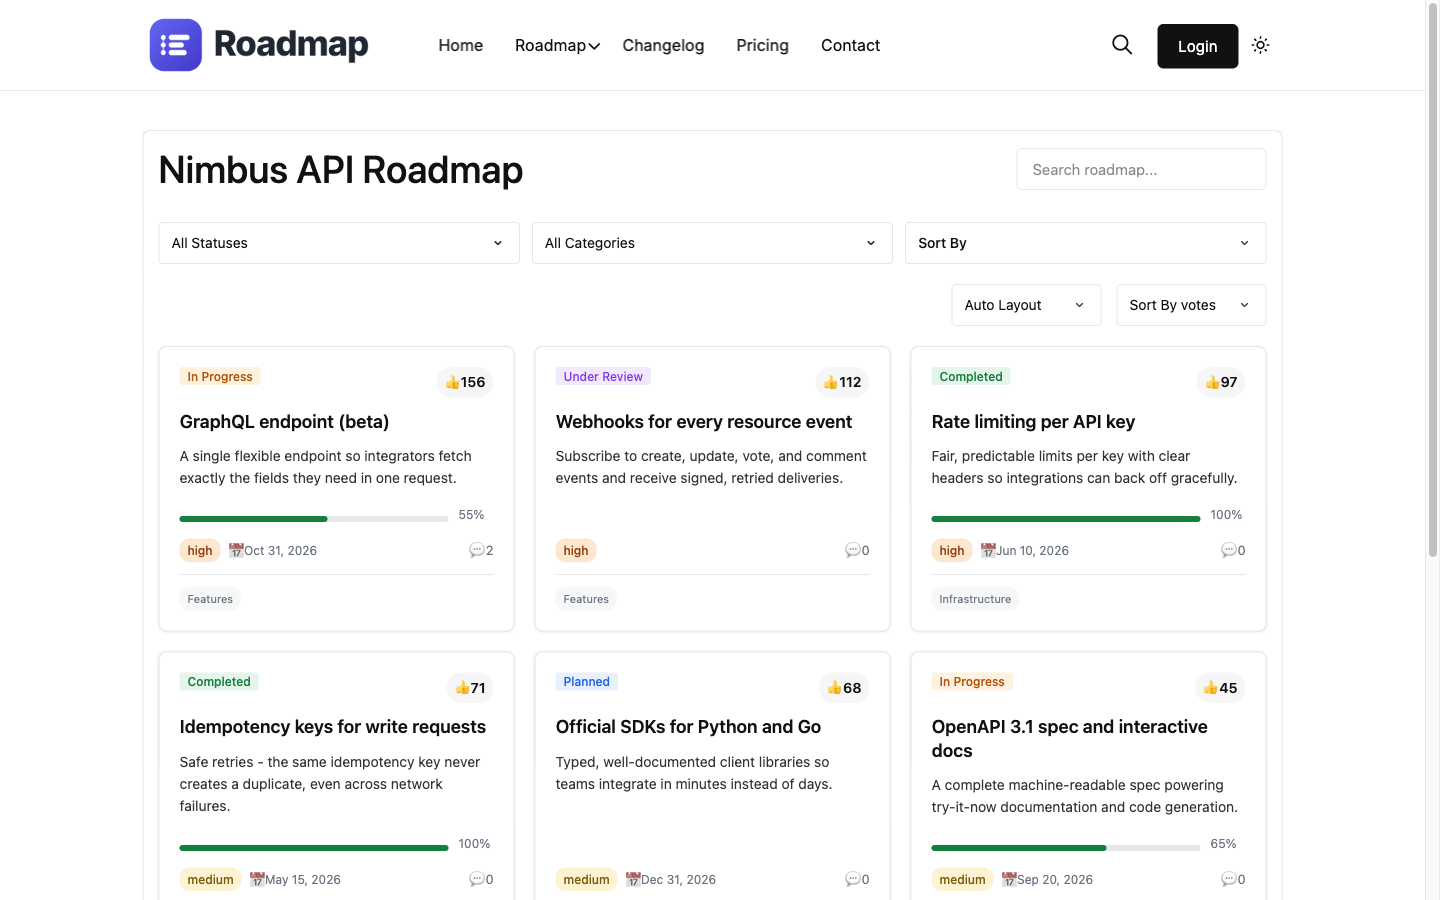
The Cards view is a responsive grid. Each card shows the item title, category, status badge, progress, and vote button. It works well on marketing and landing pages.

Roadmap cards view

[roadmap template="cards" product="main"]

List, Minimal, and Idea Box

  • List a single-column, high-density layout for long roadmaps.
  • Minimal a compact layout with less chrome, for sidebars or narrow columns.
  • Idea Box a voting-first layout that highlights the suggestion form and vote counts to gather feedback.
[roadmap template="list" product="main"]
[roadmap template="minimal" product="main"]
[roadmap template="ideabox" product="main"]

Notes

  • The product attribute is required on every template. See Add a Roadmap to a Page.
  • All templates are theme-adaptive and follow your site's light or dark mode.
  • If you use an invalid template value, the shortcode falls back to the Board view.

Next Steps

Voting

Voting lets your visitors show which roadmap items matter most to them. Every item has an upvote button, and the vote count helps you prioritize what to build next.


How Upvotes Work

Each item on the board shows a vote button and a running total. Clicking the button adds one vote. Clicking again removes it, so a visitor can change their mind.

Votes are counted per item. A visitor can vote for as many different items as they like, but only once per item.


Guests vs Logged-In Members

How votes are tracked depends on whether the visitor is logged in and whether you allow guest voting.

Visitor Tracking method Requires
Logged-in member By user account Nothing extra.
Logged-out visitor By IP address Guest voting enabled in Settings.

When guest voting is off, the vote button prompts logged-out visitors to sign in first. Turn guest voting on or off under Roadmap → Settings. See Settings.


One Vote per Person per Item

The plugin enforces a single vote per person per item:

  • Logged-in members are limited by their user ID.
  • Guests are limited by IP address.

This keeps counts honest without forcing everyone to create an account. Because guest limiting uses IP address, visitors sharing one network (an office or campus) may share a vote slot for a given item.


Vote Counts and Sorting

Vote totals are visible on every view. In Pro, you can sort any board by vote count so the most-wanted items rise to the top. See Filters and Presets.


Next Steps

Customer Suggestions

Suggestions let your visitors propose new roadmap items directly from the board. You review each one and decide whether it appears publicly. This turns your roadmap into a two-way feedback channel.


How Visitors Submit an Idea

When suggestions are enabled, the board shows a submit button (labeled "Suggest a feature" by default). Clicking it opens a short form where the visitor enters:

  • A title for the idea.
  • A description with more detail.
  • A category (optional), if you have categories set up.

After submitting, the visitor sees a confirmation message. Whether the idea appears right away depends on your moderation setting.

You control who can submit and whether guests are allowed under Roadmap → Settings. See Settings.


Moderation and Approval Flow

Every suggestion lands in a queue under Roadmap → Suggestions in the admin. From there you can:

  • Approve publish the suggestion as a roadmap item so it appears on the board and can collect votes.
  • Reject dismiss the suggestion without publishing it.
  • Edit before approving clean up the title, description, or category first.
  • Assign a status and category slot the approved item into your pipeline.

Require Approval

When Require approval is on (recommended), new suggestions stay in the pending queue and are hidden from the public board until you approve them. When off, approved-by-default suggestions appear immediately, which is faster but exposes you to spam.


Spam Protection

Because the form is public, protect it under Roadmap → Settings:

  • Rate limit cap submissions per person per hour.
  • Honeypot field blocks basic bots.
  • Minimum submission gap enforces a delay between submissions.

See Settings for the full list.


Notifications

  • Admins can be emailed when a new suggestion arrives, so the queue never goes unwatched.
  • Submitters can be emailed when their item changes status, for example when it moves from Planned to In Progress.

Next Steps

Statuses and Categories

Statuses, categories, priorities, and target dates are how you organize a roadmap item and communicate its progress to visitors.


The Status Pipeline

Statuses are the stages an item moves through, shown as columns on the Board view. The default pipeline is:

  1. Planned accepted and queued, not started yet.
  2. In Progress actively being worked on.
  3. Under Review built and being tested or reviewed.
  4. On Hold paused for now.
  5. Completed shipped and done.

Move an item between statuses by editing it in the admin, or by drag-and-drop in Pro. See Filters and Presets for drag-and-drop reorder.

You can rename any status, change its color, reorder the stages, or hide a status from the public board under Roadmap → Settings. See Settings.


Categories

Categories group items by area of the product, for example "Mobile", "Billing", "API", or "Performance". They help visitors filter a long roadmap down to the part they care about.

  • Add and rename categories under Roadmap → Categories.
  • Assign a category when you create or edit an item.
  • Visitors filter the board by category on the front end.

Priorities

Each item can carry a priority (for example Low, Medium, High) so your team knows what to tackle first. Priority is an internal signal that helps you order work and, in Pro, sort and filter the board. See Filters and Presets.


Target Dates and Progress

  • Target date the date you expect an item to ship. Target dates power the Timeline view and give visitors a sense of when to expect work. See Views and Templates.
  • Progress a percentage that shows how far along an item is. Progress bars appear on the item so visitors can see momentum without you changing its status.

A Typical Flow

  1. A suggestion is approved and lands in Planned with a category assigned. See Customer Suggestions.
  2. Votes accumulate. See Voting.
  3. You set a priority and a target date, then move it to In Progress and update progress as you go.
  4. It moves to Under Review, then Completed when it ships.
  5. You publish a changelog entry to announce it. See Public Changelog.

Next Steps

Changelog

Publish a public changelog of shipped work

Public Changelog

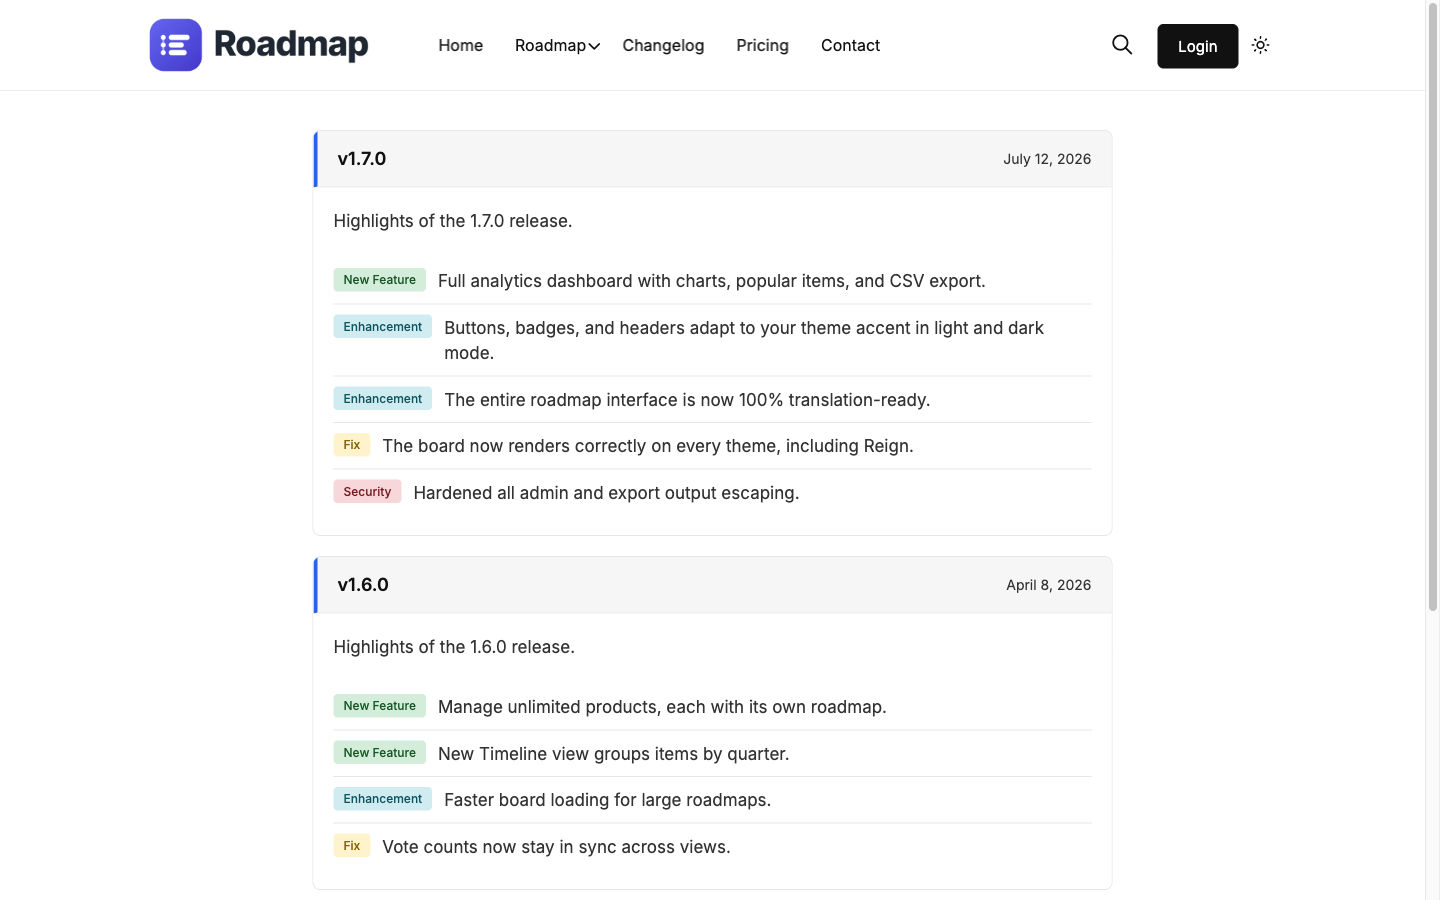
The changelog is a public, dated list of what you have shipped. It pairs with your roadmap: the roadmap shows what is coming, and the changelog shows what is done. Product Roadmap includes a [roadmap_changelog] shortcode to display it.

Public changelog view


Create a Changelog Entry

  1. In your WordPress admin, go to Roadmap → Changelog → Add New.
  2. Fill in the entry fields:
    • Version the release number, for example 1.7.0.
    • Date the release date.
    • Type the kind of change (for example New, Improve, Fix), used to label and color each item.
    • Items the individual changes in this release, one line per change.
  3. Click Publish to make the entry live.

Each entry can list several items, and each item carries its own type so visitors can scan New features separately from Fixes.


Display the Changelog

Add the changelog shortcode to any page or post:

[roadmap_changelog]

Create a page (for example "Changelog"), add the shortcode, and publish. The entries appear newest first, grouped by version and date.

See Shortcodes for the full attribute reference.


Entry Types

Types label each line so the changelog is easy to skim:

Type Use for
New A feature or capability that did not exist before.
Improve An enhancement to something that already worked.
Fix A bug fix.
Security A security-related change.

Types are shown as colored badges next to each item.


Linking to the Roadmap

A common flow is to move an item to Completed on the roadmap, then publish a changelog entry announcing it. This closes the loop for visitors who voted for or suggested the item. See Statuses and Categories.


Next Steps

Pro Features

Multiple products, the Gutenberg block, analytics, and advanced filters

Multiple Products

The free plugin runs a single roadmap board. Product Roadmap Pro lets you run separate boards for separate products, each with its own items, statuses, and page. This is useful when you maintain more than one app, plan, or platform.


How Products Work

A product is a taxonomy term that scopes a set of roadmap items. Each item belongs to one product, and each board renders only the items for the product you name in the shortcode.

The free plugin uses a single implicit product referenced as product="main". Pro lets you create as many products as you need, each with its own slug.


Create a Product

  1. In your WordPress admin, go to Roadmap → Products → Add New.
  2. Enter a name, for example "Mobile App".
  3. WordPress generates a slug, for example mobile-app. You can edit the slug.
  4. Save the product.

Repeat for each product you want a separate board for.


Render Per-Product Boards

Use the product slug in the shortcode to render that product's board. Put each on its own page:

[roadmap product="mobile-app"]
[roadmap product="web-dashboard"]

You can combine a product with a template so different products use different layouts:

[roadmap template="timeline" product="mobile-app"]
[roadmap template="cards" product="web-dashboard"]

See Views and Templates for the template options.


Assigning Items to a Product

When you create or edit a roadmap item, choose its product from the Product box. Approved suggestions can also be assigned to a product before they go live. See Customer Suggestions.


Notes

  • The product attribute is always required, in both free and Pro. See Add a Roadmap to a Page.
  • Categories and statuses are shared across products, so your pipeline stays consistent. Filter each board by category as needed.
  • Analytics can be viewed per product. See Analytics Dashboard.

Next Steps

Gutenberg Block

Product Roadmap Pro adds a native block for the WordPress block editor. It does everything the shortcode does, but with a visual interface and a live preview inside the editor, so you do not have to remember attribute names.


Add the Block

  1. Edit a page or post with the block editor.
  2. Click the + (add block) button.
  3. Search for Roadmap and select the Roadmap block.
  4. The block inserts and shows its settings in the sidebar.

Block Settings

Configure the block from the sidebar panel on the right. The settings map directly to the shortcode attributes:

Setting What it does
Product Choose which product board to show. Required.
View / Template Pick Board, Timeline, Cards, List, Minimal, or Idea Box.
Category filter Limit the board to one category.
Status filter Show only selected statuses.
Sort Order by votes, recency, or target date.
Items per page Control how many items load at once.

As you change settings, the block preview updates so you can confirm the layout before publishing.


Why Use the Block

  • No shortcode syntax pick options from menus instead of typing attributes.
  • Live preview see the board while you edit, not just after publishing.
  • Selectable products and templates dropdowns list your actual products and views, so there is nothing to mistype.

The block and the shortcode produce the same front-end output. Use whichever fits your workflow. See Shortcodes for the shortcode equivalent.


Next Steps

Analytics Dashboard

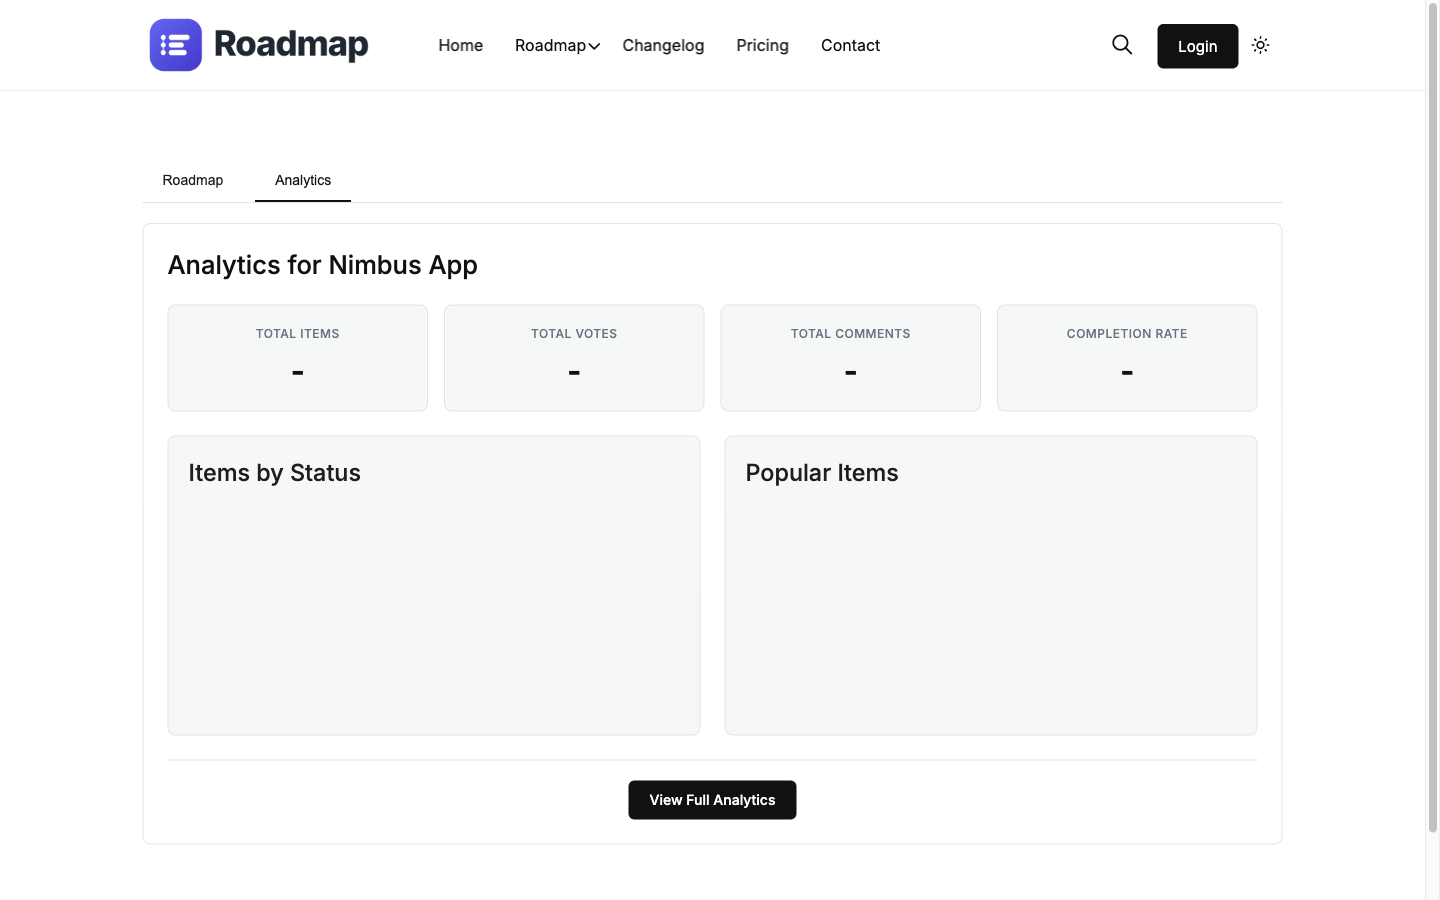
Product Roadmap Pro includes an analytics dashboard that turns votes and suggestions into numbers you can act on. Find it under Roadmap → Analytics in the WordPress admin.

Analytics dashboard


What It Shows

The dashboard summarizes engagement across your roadmap:

  • Total votes how many upvotes items have received overall.
  • Popular items a ranked list of the most-voted items, so you can see demand at a glance.
  • Status distribution how your items are spread across Planned, In Progress, Under Review, On Hold, and Completed.
  • Suggestions activity how many ideas visitors have submitted and how many you have approved.

Time Windows

Filter the dashboard to a period so you can compare recent activity to the past:

  • Last 7 days
  • Last 30 days
  • Last 90 days
  • All time

Narrowing the window shows whether interest in an item is fresh or has cooled off, which helps you prioritize what to build now.


Per-Product Analytics

If you run multiple products, you can scope the dashboard to one product to see its engagement in isolation. See Multiple Products.


CSV Export

Export the current view to a CSV file for spreadsheets or reports:

  1. Set the time window and product filter you want.
  2. Click Export CSV.
  3. Open the file in your spreadsheet tool to sort, chart, or share it.

The export includes item titles, statuses, categories, and vote totals for the selected period.


Next Steps

Filters and Presets

Product Roadmap Pro adds advanced filtering, saved presets, sorting, drag-and-drop reordering, and bulk actions. Together they make a large roadmap manageable for both visitors and admins.


Advanced Filters

On the front end, visitors can narrow the board with several filters at once:

  • Status show only certain stages, for example just Planned and In Progress.
  • Category limit to one area of the product. See Statuses and Categories.
  • Priority focus on high-priority items.
  • Search match items by keyword in the title or description.

Filters combine, so a visitor can view "High priority Mobile items that are In Progress" in one step.


Saved Presets

A preset is a saved combination of filters and sort order. Instead of re-applying the same filters each visit, save them once and reload with a click.

  1. Set the filters and sort you want.
  2. Click Save preset and give it a name, for example "Most wanted".
  3. Select the preset later to restore that exact view.

Presets are useful for internal triage views ("Needs a decision") and for public views you want to feature ("Top voted").


Sorting

Order any board by:

  • Votes most-upvoted first. See Voting.
  • Recency newest items first.
  • Target date soonest ship date first.
  • Priority highest priority first.

Drag-and-Drop Reorder

In the admin, reorder items and move them between statuses by dragging. Drop an item into a different status column to change its stage without opening the editor. The new order and status save automatically.


Bulk Actions

Select multiple items in the admin and act on them at once:

  • Change status for many items together.
  • Assign or change category in bulk.
  • Set priority across a selection.
  • Delete several items at once.

Bulk actions save time when you groom the roadmap after a planning session or clear out a batch of approved suggestions. See Customer Suggestions.


Next Steps

Developer

Shortcode attributes, REST API, and hooks for extending the roadmap

Shortcodes

Product Roadmap registers three shortcodes: [roadmap] for the board, [roadmap_changelog] for the public changelog, and [roadmap_user_profile] (Pro) for a member's roadmap activity. This is the full attribute reference.


[roadmap]

Renders a roadmap board. The product attribute is required.

[roadmap product="main"]

Attributes

Attribute Type Default Description
product string (required) Product slug to render. Use main for the free single board. Required in both free and Pro.
template string board View template: board, timeline, cards, list, minimal, or ideabox. Pro only, except board.
category string '' Limit the board to one category slug.
status string '' Comma-separated status slugs to show. If omitted, all public statuses show.
orderby string votes Sort key: votes, date, target_date, or priority.
order string desc Sort direction: asc or desc.
per_page integer 20 Items to load per page.

Examples

[roadmap product="mobile-app" template="timeline"]
[roadmap product="main" category="billing" orderby="votes"]
[roadmap product="main" status="planned,in-progress" per_page="10"]

The template values beyond board require Product Roadmap Pro. See Views and Templates.


[roadmap_changelog]

Renders the public changelog, newest first.

[roadmap_changelog]

Attributes

Attribute Type Default Description
product string '' Limit entries to one product. If omitted, shows all entries.
limit integer 10 Number of entries to display.
type string '' Filter items by type, for example new, improve, fix, security.

Example

[roadmap_changelog product="mobile-app" limit="5"]

See Public Changelog for how entries are created.


[roadmap_user_profile] (Pro)

Renders the current member's roadmap activity: the items they suggested, the items they voted for, and the status of each. Useful on account or profile pages.

[roadmap_user_profile]

Attributes

Attribute Type Default Description
product string '' Limit activity to one product. If omitted, shows activity across all products.
show string all Which activity to show: all, suggestions, or votes.

Example

[roadmap_user_profile show="votes"]

This shortcode requires Product Roadmap Pro and a logged-in user. For logged-out visitors it prompts them to sign in.


Next Steps

  • REST API read and write roadmap data programmatically.
  • Hooks extend the shortcodes with actions and filters.

REST API

Product Roadmap exposes a REST API under the roadmap/v1 namespace. Use it to read items, cast votes, and submit suggestions from your own front-end code, a mobile app, or an integration.


Base URL

All endpoints live under:

/wp-json/roadmap/v1/

For example, on a site at https://example.com the items endpoint is https://example.com/wp-json/roadmap/v1/items.


Authentication

  • Read endpoints (listing items, reading the changelog) are public for items that are public.
  • Write endpoints (voting, suggesting) follow your Settings. Guest voting and guest suggestions work when enabled; otherwise the request must be authenticated with a logged-in cookie plus a valid REST nonce, or with Application Passwords for external clients.

Send the nonce in the X-WP-Nonce header for cookie-authenticated requests.


Items

List items

GET /wp-json/roadmap/v1/items?product=main

The product parameter is required. Requesting items without a product returns an error, mirroring the shortcode rule that every board is scoped to a product.

Common query parameters:

Parameter Description
product Product slug. Required.
status Filter by status slug.
category Filter by category slug.
orderby votes, date, target_date, or priority.
per_page Items per page.
page Page number for pagination.

Get a single item

GET /wp-json/roadmap/v1/items/{id}

Votes

Cast or remove a vote for an item.

POST /wp-json/roadmap/v1/votes

Body parameters:

Parameter Description
item_id The roadmap item to vote on. Required.

Voting is limited to one vote per person per item. Logged-in users are tracked by user ID and guests by IP address, matching the front-end behavior. See Voting. Posting again to the same item toggles the vote off.


Suggestions

Submit a new suggestion.

POST /wp-json/roadmap/v1/suggestions

Body parameters:

Parameter Description
product Product slug the suggestion belongs to. Required.
title Suggestion title. Required.
description Suggestion detail.
category Category slug (optional).

Submitted suggestions enter the moderation queue and respect your rate-limit and approval settings. See Customer Suggestions.


Responses and Errors

  • Successful reads return JSON with the requested resources plus pagination headers (X-WP-Total, X-WP-TotalPages).
  • Errors return a standard WordPress REST error object with a code, message, and HTTP status, for example a 400 when product is missing or a 429 when a rate limit is hit.

Next Steps

  • Hooks filter the query and react to API events.
  • Shortcodes the front-end equivalents of these endpoints.

Hooks

Product Roadmap provides action and filter hooks so developers can extend the board, adjust queries, and react to events. Product Roadmap Pro consumes several of these same hooks, so they are a stable extension surface.


Actions

Actions let you run code when something happens on the roadmap.

roadmap_item_viewed

Fires when a roadmap item is viewed. Pro uses this to record analytics. Use it to log views or trigger your own tracking.

add_action( 'roadmap_item_viewed', function ( $item_id ) {
    // Record that $item_id was viewed.
}, 10, 1 );

roadmap_item_status_changed

Fires when an item moves between statuses. Use it to notify an external system.

add_action( 'roadmap_item_status_changed', function ( $item_id, $old_status, $new_status ) {
    // React to the status change.
}, 10, 3 );

roadmap_suggestion_submitted

Fires when a visitor submits a suggestion, after it enters the queue.

add_action( 'roadmap_suggestion_submitted', function ( $suggestion_id ) {
    // Post to Slack, add to a CRM, etc.
}, 10, 1 );

roadmap_vote_recorded

Fires when a vote is cast or removed.

add_action( 'roadmap_vote_recorded', function ( $item_id, $user_key, $is_added ) {
    // $is_added is true for a new vote, false when toggled off.
}, 10, 3 );

Filters

Filters let you change data before the plugin uses it.

roadmap_api_query_args

Adjusts the query arguments used to fetch items, both on the front end and through the REST API. Pro uses this to apply advanced filters and presets. Use it to change ordering or add a meta query.

add_filter( 'roadmap_api_query_args', function ( $args, $request ) {
    // Force a default sort by target date.
    $args['orderby'] = 'target_date';
    return $args;
}, 10, 2 );

roadmap_item_data

Filters the data array for a single item before it is rendered or returned by the API. Use it to add or reshape fields.

add_filter( 'roadmap_item_data', function ( $data, $item_id ) {
    $data['custom_flag'] = get_post_meta( $item_id, 'custom_flag', true );
    return $data;
}, 10, 2 );

roadmap_statuses

Filters the list of statuses. Use it to add, rename, or reorder statuses programmatically instead of in Settings.

add_filter( 'roadmap_statuses', function ( $statuses ) {
    $statuses['shipped'] = __( 'Shipped', 'your-textdomain' );
    return $statuses;
}, 10, 1 );

roadmap_templates

Filters the registered view templates. Use it to register a custom template alongside the built-in ones. See Views and Templates.

add_filter( 'roadmap_templates', function ( $templates ) {
    $templates['compact'] = 'My Compact View';
    return $templates;
}, 10, 1 );

Notes

  • Hook names and signatures shown here are the extension points the Pro addon relies on, so they are safe to build against.
  • Always namespace and text-domain your own additions to avoid collisions.

Next Steps

  • REST API the endpoints these hooks influence.
  • Shortcodes the front-end output you are extending.

Something unclear? Open a support ticket →

Buy Product Roadmap